Self-Service Payment Collection & Fund Automation Guide for Non-API Merchants

Step-by-step guide covering wallet registration, sub-contract creation, auto-sweep, and auto-withdrawal configuration
This document is designed for non-API merchants. It walks you through generating recharge addresses, setting up prepaid deposits, enabling KYT detection, configuring auto-sweep and auto-withdrawal strategies, and handling blacklisted fund sweeps — all from the admin console without any code integration.
Tutorial Objectives
This tutorial guides you through the complete workflow: wallet preparation, admin console login, batch sub-contract creation, prepaid account setup, pollution blocking (KYT) activation, auto-sweep and auto-withdrawal strategy configuration, blacklisted fund sweep setup and withdrawal, a live payment test, and verifying the automated execution results.
Prerequisites
- A Web3 decentralized wallet, such as TronLink
- 3 merchant admin wallet addresses
- 1 merchant finance wallet address
- Corresponding chain assets, e.g. TRC20 USDT
- Platform invitation code
- Admin approval required before logging in to the admin console
Admin wallets must NOT be exchange (centralized) wallets. They must be Web3 decentralized wallets that can connect and sign transactions.
Overall Workflow
- Register or prepare wallets
- Log in to the admin console
- Batch-create sub-contract addresses
- Enable the prepaid account and deposit funds
- Enable pollution blocking / KYT detection
- Configure auto-sweep and auto-withdrawal strategies
- Configure blacklisted fund sweep settings
- Sweep and withdraw blacklisted funds
- Complete a test payment using a sub-contract address
- Verify auto-sweep and auto-withdrawal results
Part 1: Basic Configuration
1. Register or Prepare Wallets
Before using the system, you need a Web3 decentralized wallet and must submit your organization information via the registration page. This tutorial uses a TRC20 standard merchant as an example.
You can use an existing Web3 wallet or create a new one by following the official guide: Create a Web3 Wallet
Instructions
On the registration page, select the organization type and blockchain network. Fill in the organization name, email, admin wallet address, finance wallet address, and invitation code. Check the agreement box and click Sign Up to submit.
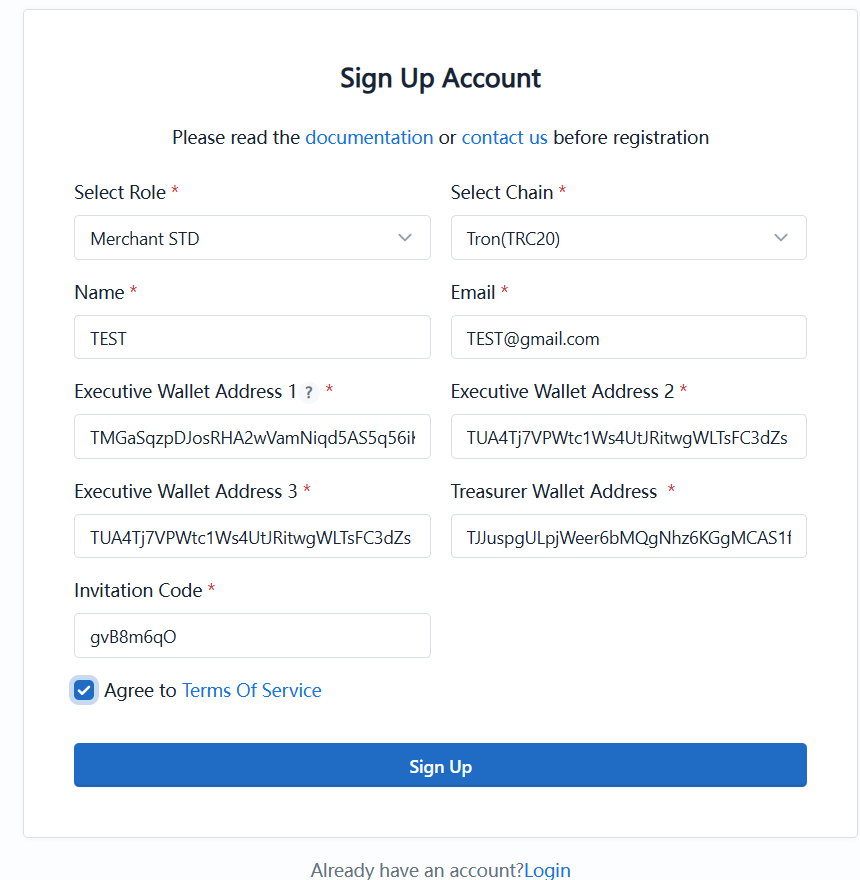
Both the admin wallet and finance wallet must be Web3 decentralized wallets. Exchange wallet addresses are not accepted.
2. Log In to the Admin Console
Once approved, you can log in to the admin console using an admin wallet.
Instructions
Open the login page, select the blockchain network used during registration (e.g. Tron(TRC20)), click Connect TronLink Wallet, and once connected, click Login to enter the admin console.
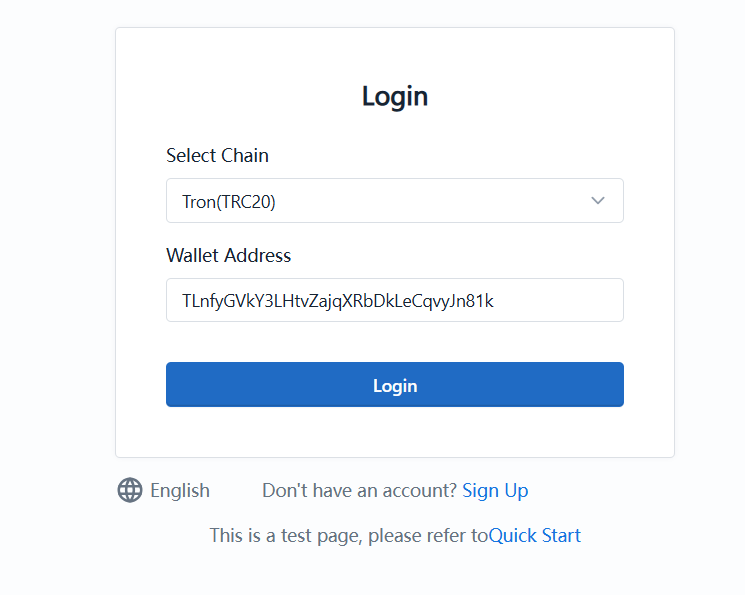
The chain network selected during login must match the one used during registration, and the admin wallet must be the one that was approved.
3. Batch-Create Sub-Contract Addresses
No code integration is required. You can batch-generate recharge sub-contract addresses directly from the admin console for user deposits and fund collection.
Instructions
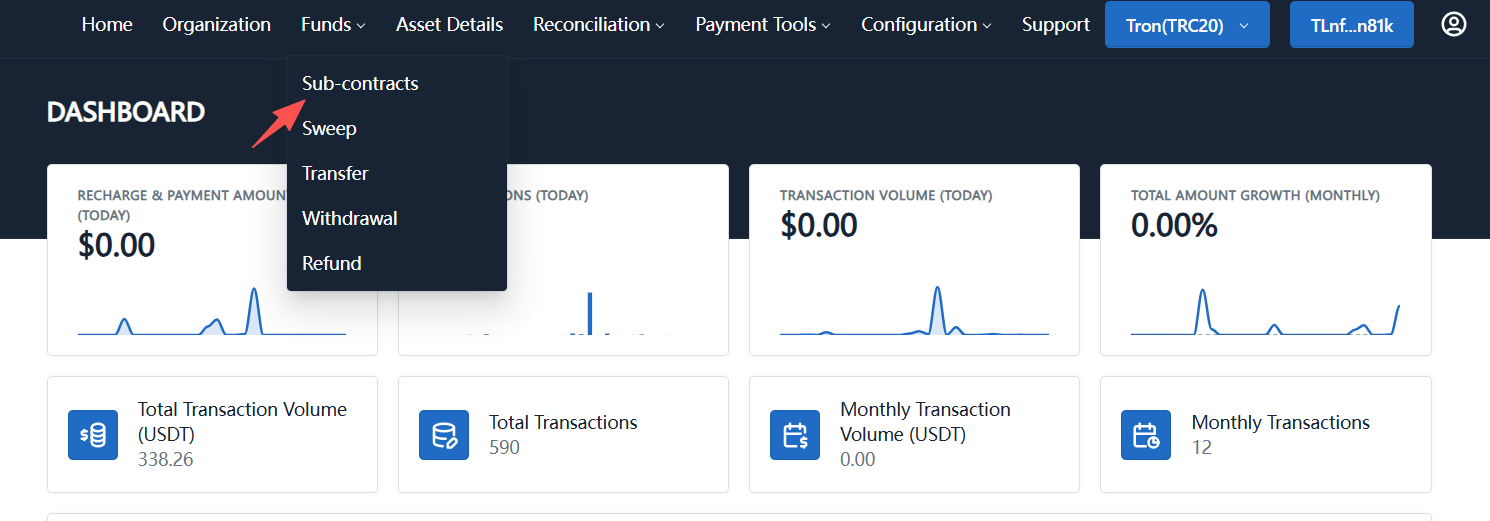
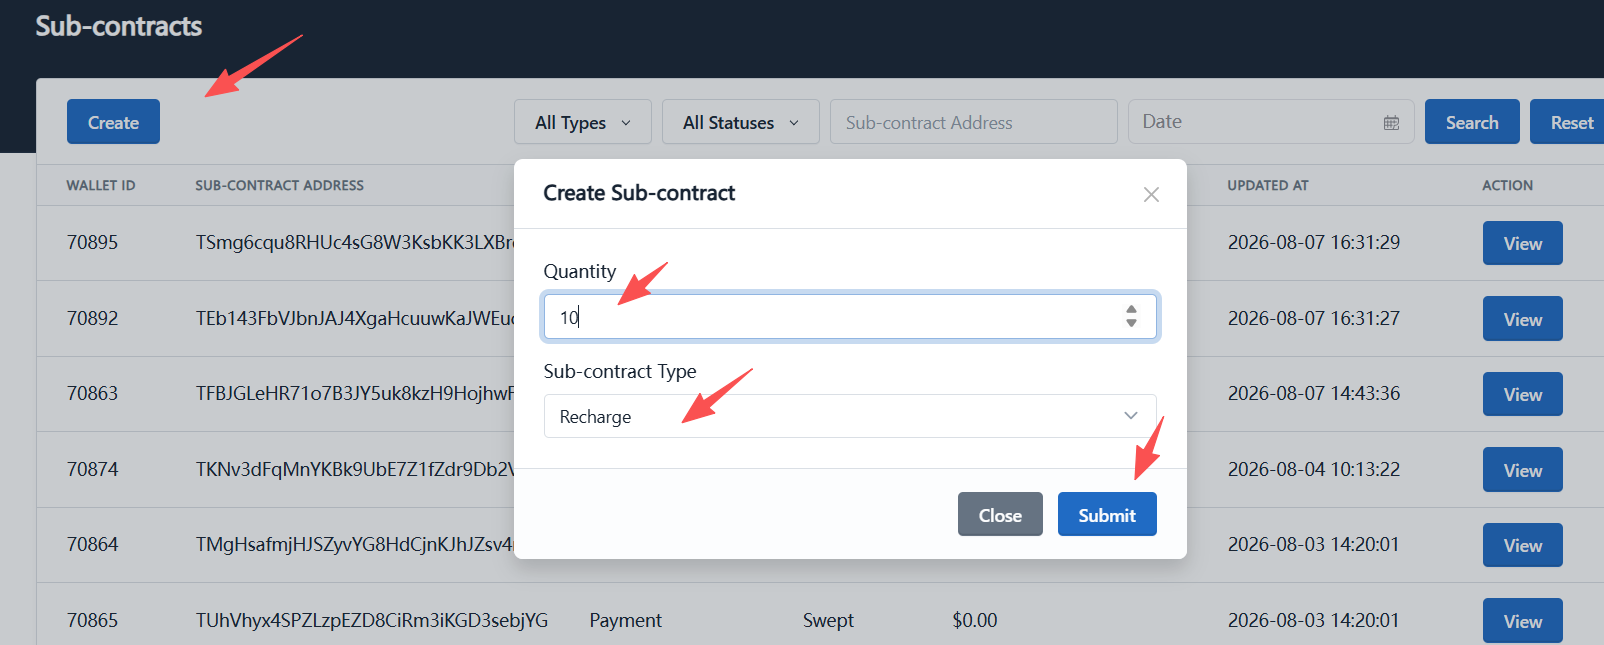
Navigate to Funds → Sub-Contracts, click Create, enter the number of sub-contracts to create (e.g. 10), select Recharge as the sub-contract type, and click Submit.
Sweep Methods
After a sub-contract address receives user deposits, merchants can handle fund sweeping in two ways:
- Auto-sweep: Configure auto-sweep rules on the strategy settings page. The system automatically sweeps funds when thresholds are met.
- Manual sweep: Merchants can also manually initiate sweeping from the admin console based on actual fund processing needs.
After sweeping, funds move into the cold vault. Merchants can later use auto-withdrawal strategies or manually withdraw to transfer cold vault funds to the finance wallet.
Manual Sweep
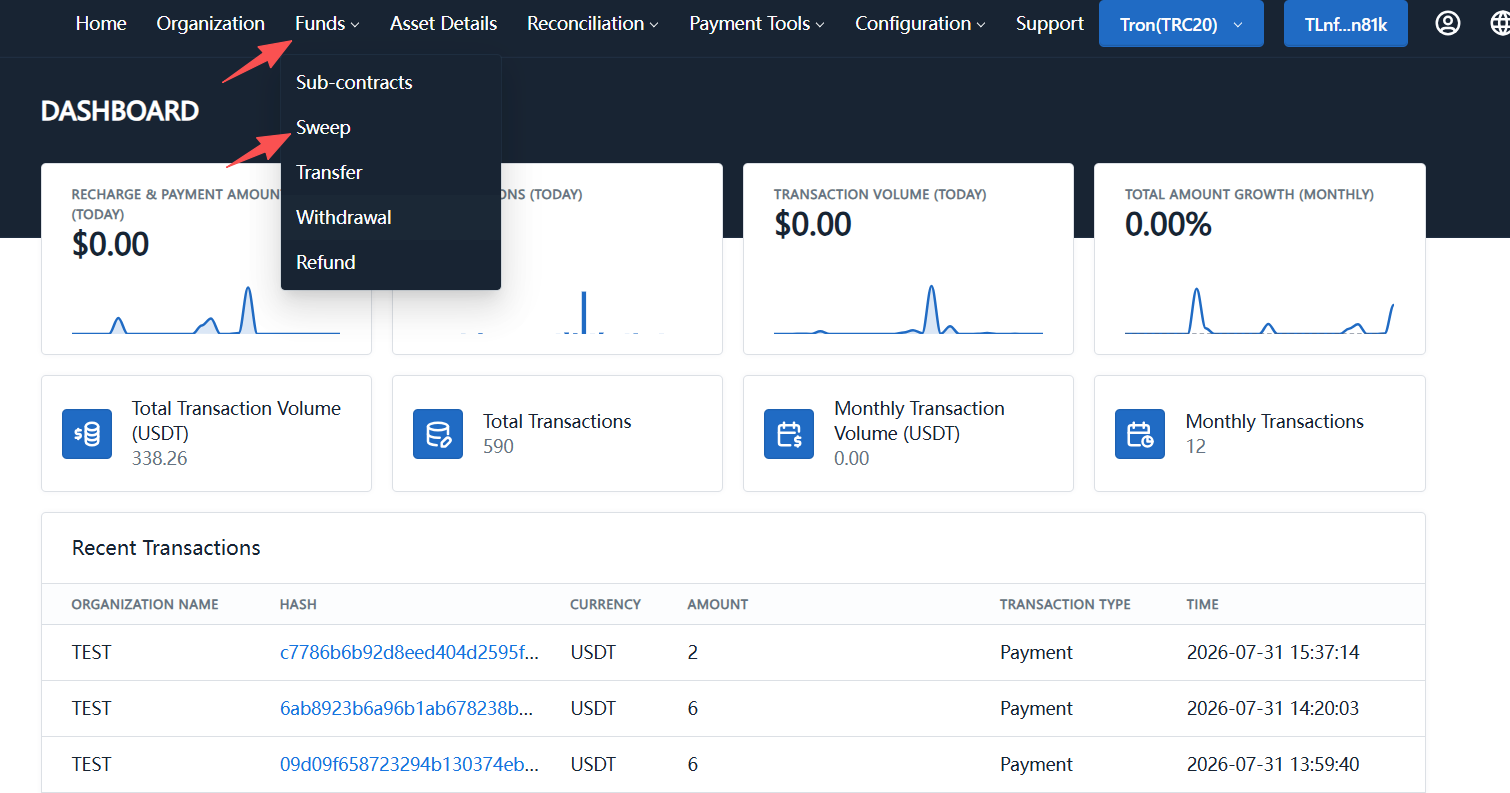
Navigate to Funds → Sweep and view the list of sub-contracts with pending sweep balances under the Pending Sweep tab.
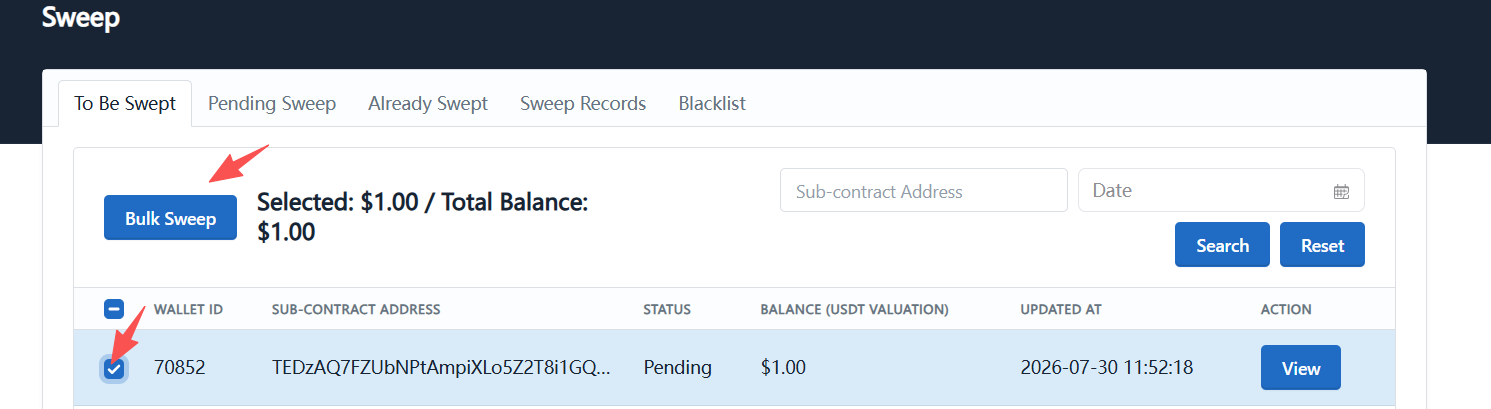
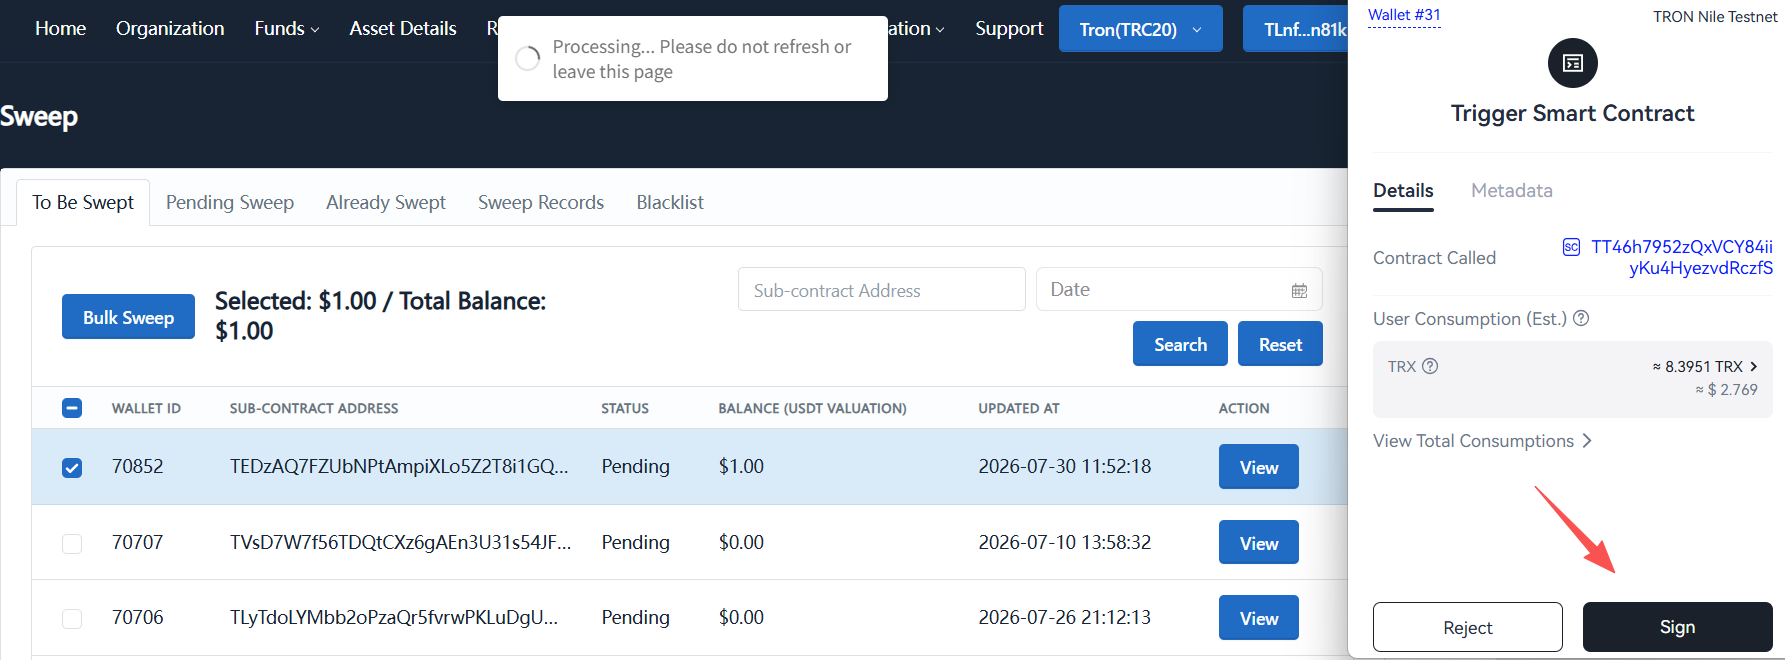
Select the sub-contracts you want to sweep and click Bulk Sweep. The system will prompt a wallet signature request. Once you click Sign in your wallet, the sweep transaction is submitted on-chain. Successful sweep records can be found under the Sweep Records tab.
Manual Withdrawal
After a successful sweep, funds enter the cold vault. To withdraw cold vault funds to the finance wallet, navigate to Asset Details and click One-Click Fund Withdrawal, or check the result under Fund Withdrawal Records.
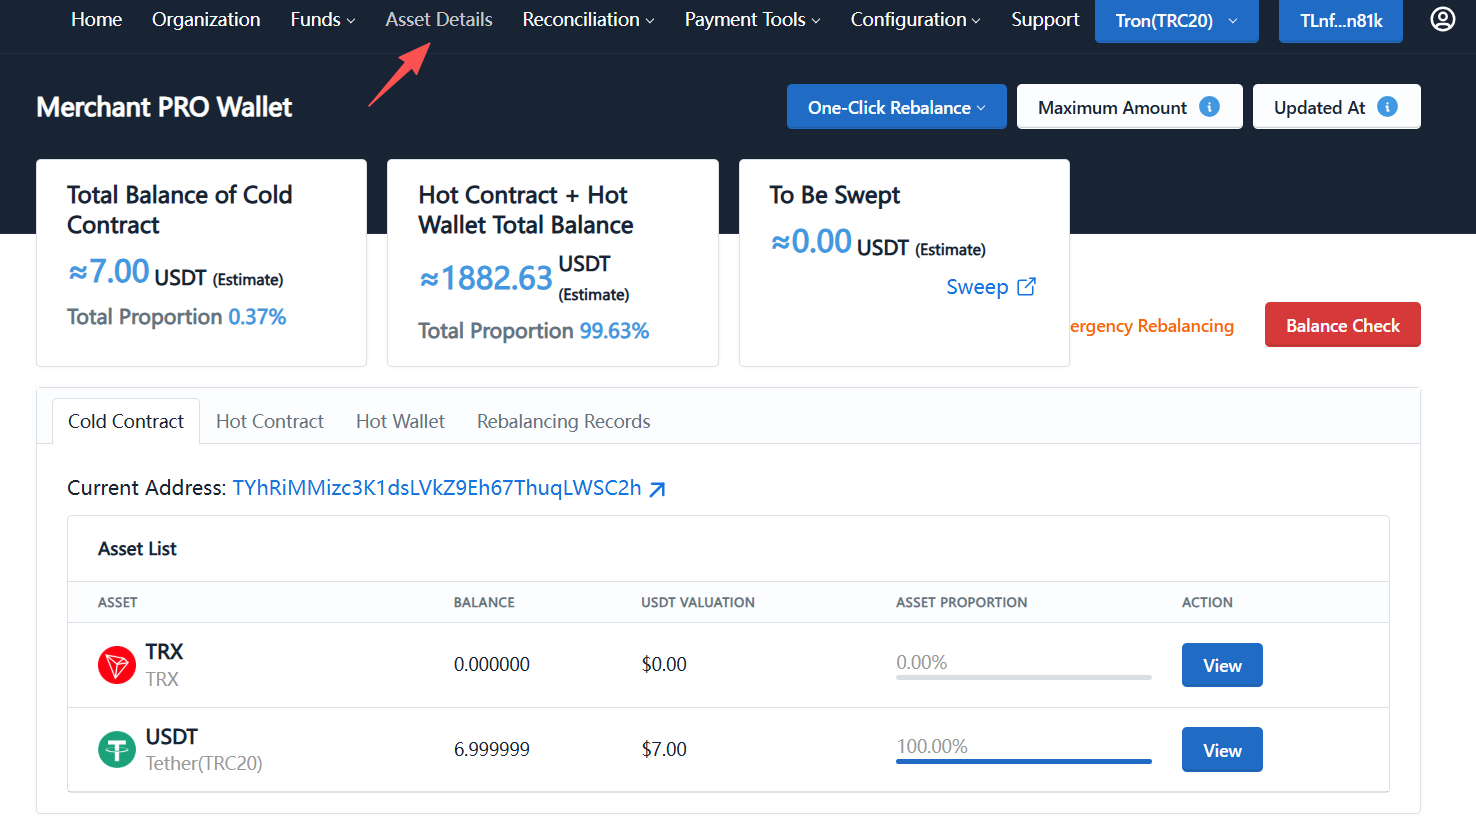
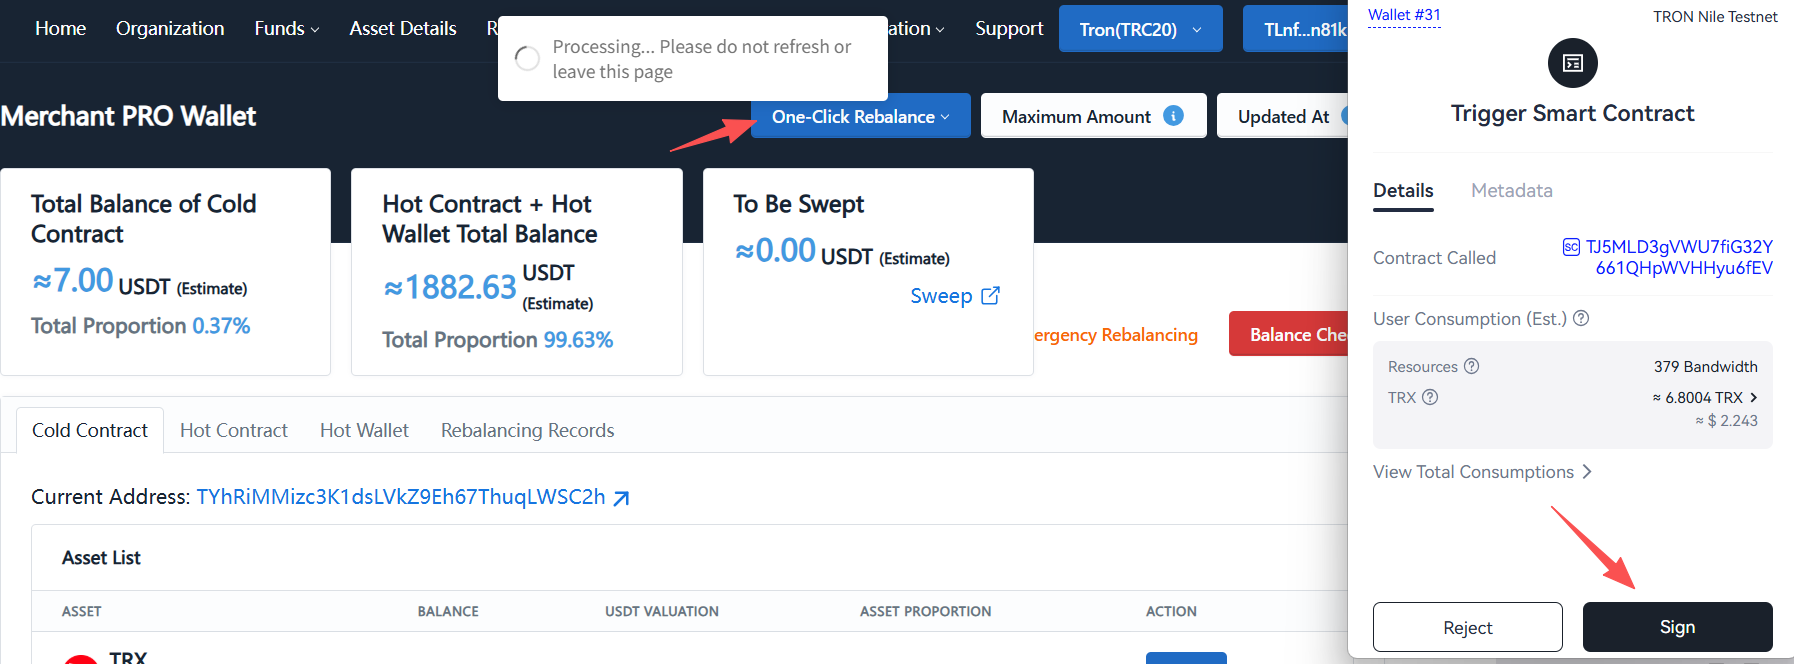
This action transfers cold vault funds to the merchant's finance wallet, which is useful when you need to move swept funds for subsequent operations.
- Recharge sub-contract addresses can be provided directly to users for deposits. Collection addresses are mainly for address pool expansion and should not be given to users for deposits.
- Manual sweeping requires the logged-in admin or finance wallet to have TRX for gas fees.
- After sweeping, funds enter the cold vault. After withdrawal, funds enter the merchant's finance wallet.
4. Enable the Prepaid Account and Deposit Funds
The prepaid account must be enabled before you can use auto-sweep, auto-withdrawal, and KYT detection features.
Instructions
Navigate to System Configuration → Strategy Settings → Prepaid Account. Toggle the prepaid switch on, click Deposit, select the deposit network (e.g. Tron(TRC20)), and copy the deposit address or scan the QR code to send USDT. After the deposit is confirmed, refresh the prepaid balance.
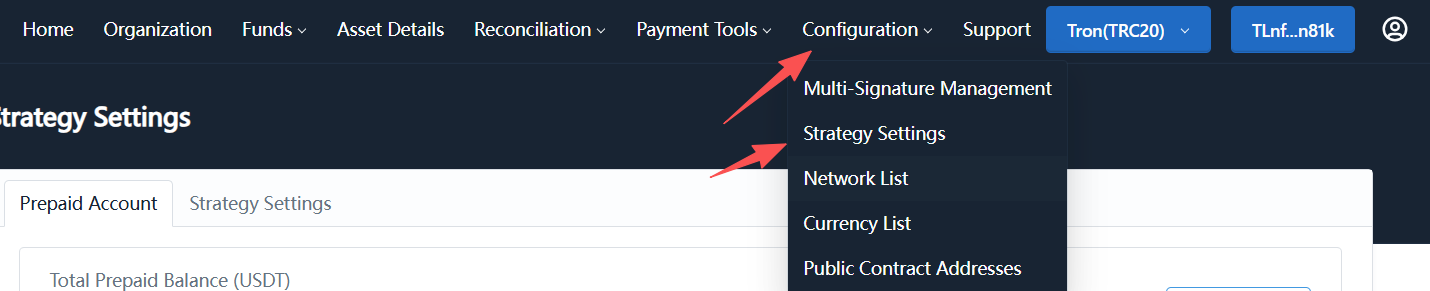
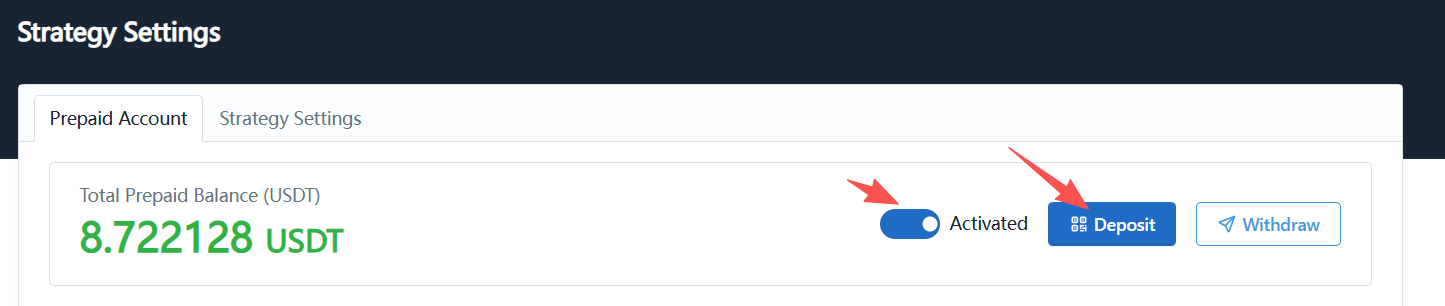
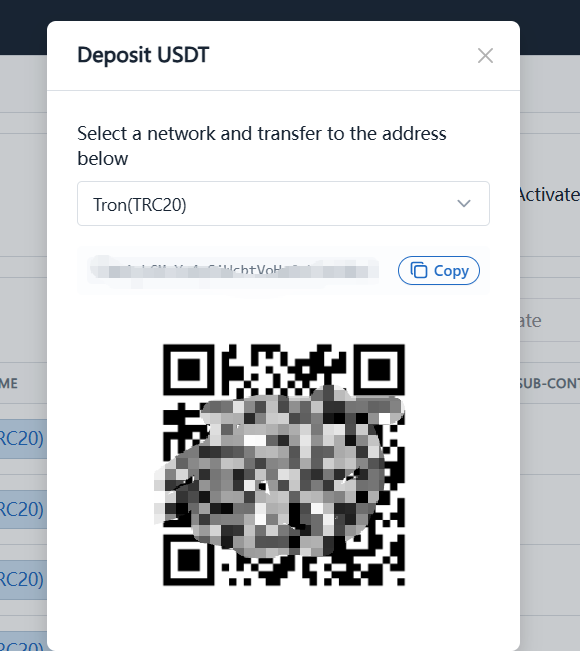
You must enable the prepaid account and complete a deposit before using any auto-strategy. Auto-distribution and auto-refund are extended features — contact the technical team for configuration.
5. Enable Pollution Blocking / KYT Detection
Pollution blocking detects whether deposited funds carry risk. When enabled, the KYT detection service is activated. If risky funds are detected, the corresponding recharge sub-contract will be blacklisted for separate handling.
Instructions
Navigate to System Configuration → Strategy Settings → Sweep Strategy, set the Pollution Blocking switch to Enabled, and click Save Sweeping Strategy.
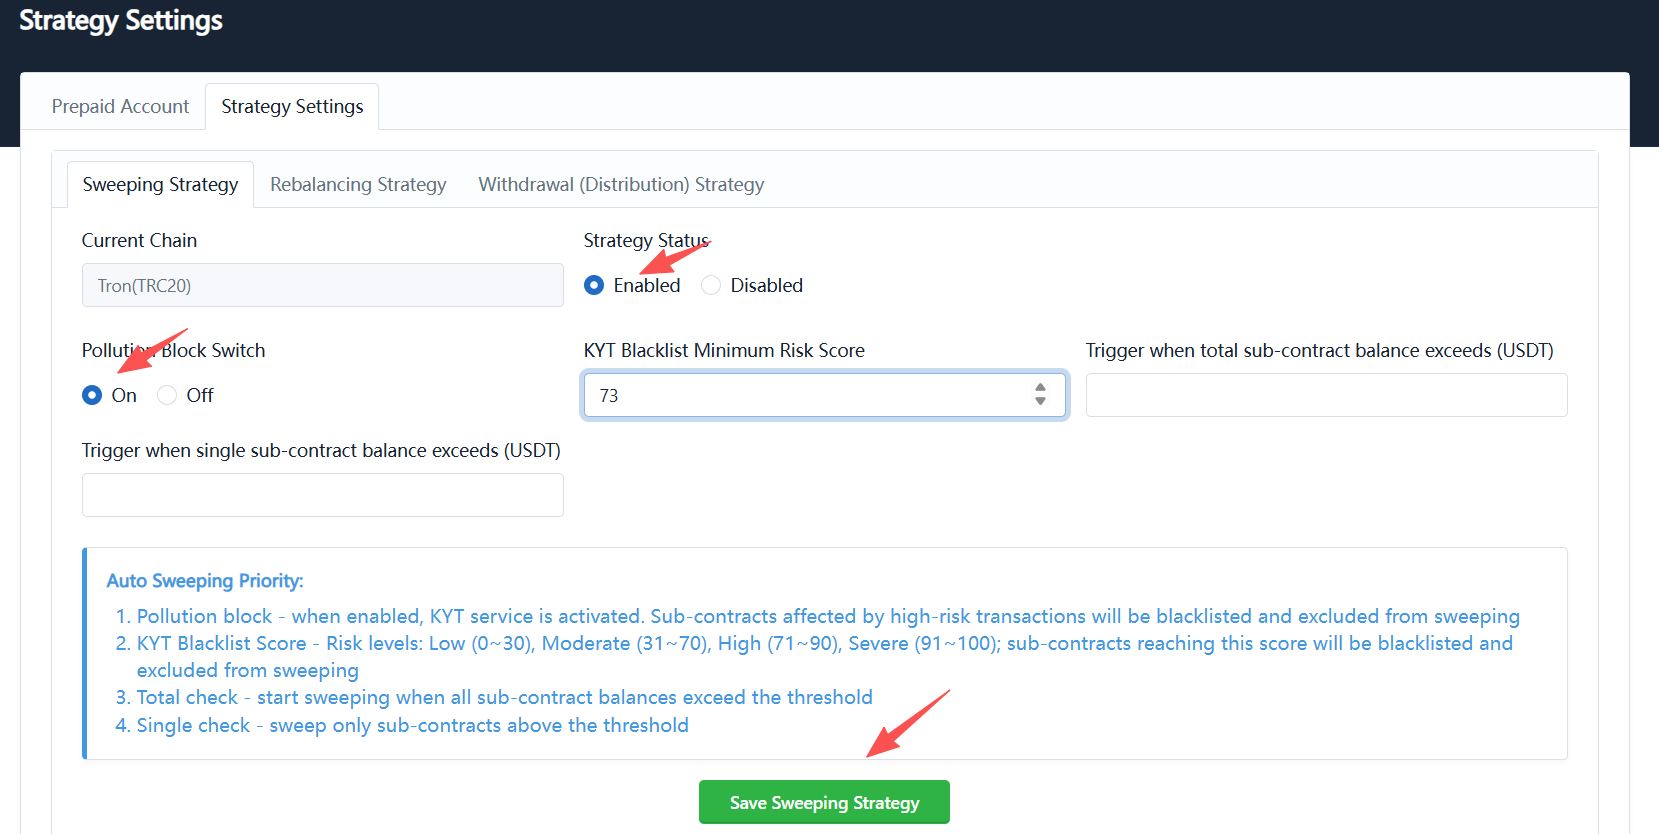
You must enable the prepaid account and complete a deposit before enabling pollution blocking. Blacklisted sub-contracts will be excluded from the normal sweep process.
6. Configure Auto-Sweep and Auto-Withdrawal Strategies
Auto-sweep collects funds from sub-contracts into the cold vault. Auto-withdrawal transfers funds from the cold vault to the merchant's finance wallet.
Instructions
Navigate to System Configuration → Strategy Settings. On the Sweeping Strategy tab, set the sweep trigger conditions — for example, sweep when the cumulative balance of all sub-contracts reaches 1,000 USDT, or when a single sub-contract balance exceeds 100 USDT. Switch to the Fund Withdrawal Strategy tab and set the cold vault balance trigger — for example, auto-withdraw when the cold vault balance reaches 100 USDT. Save each strategy after configuration.
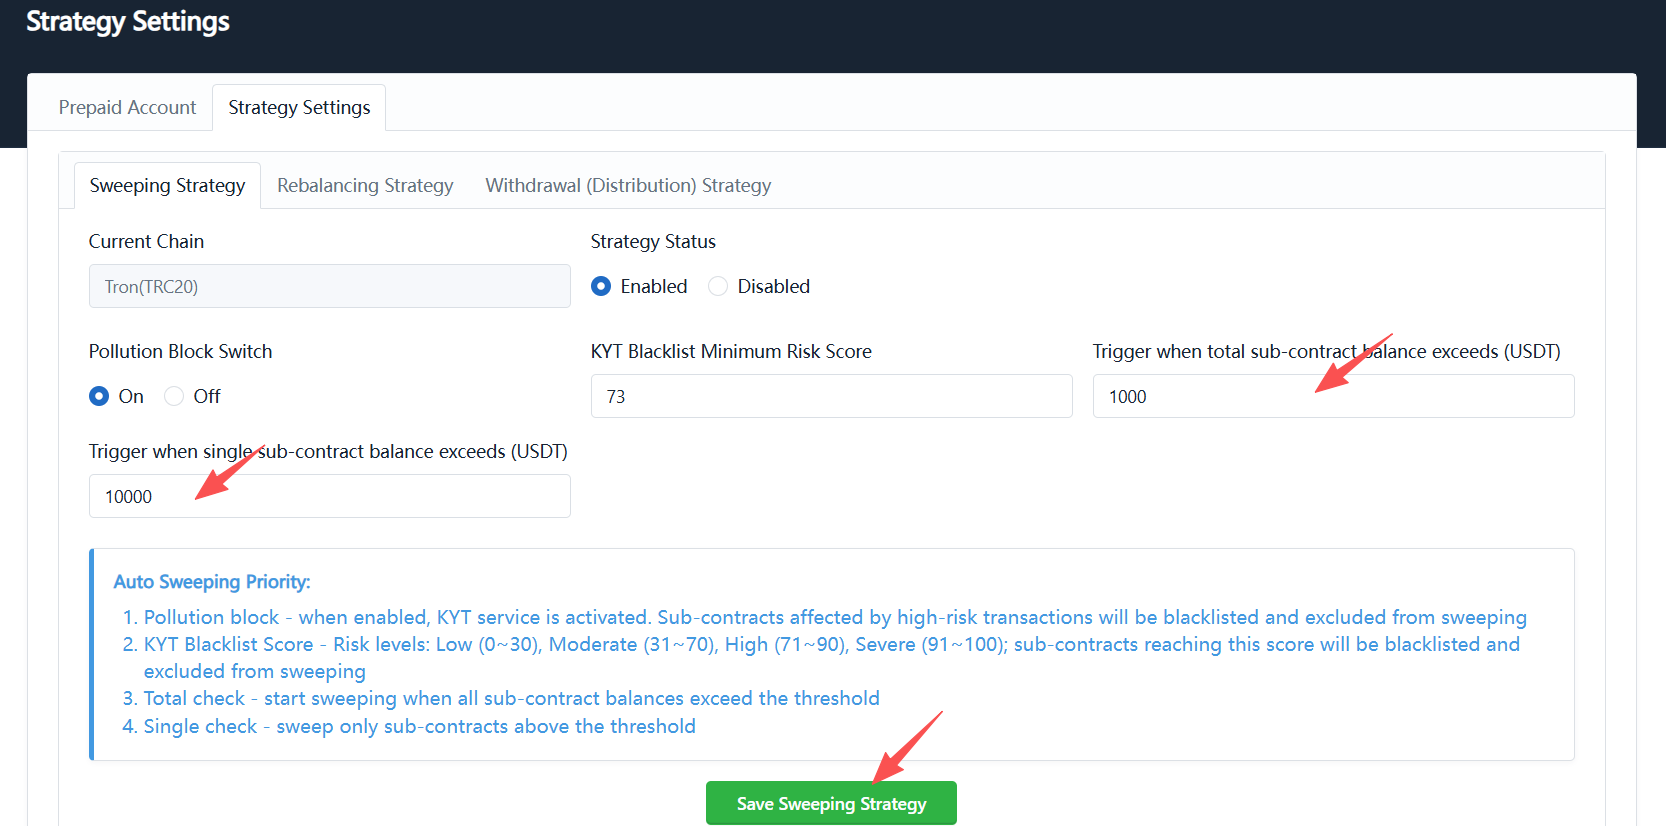
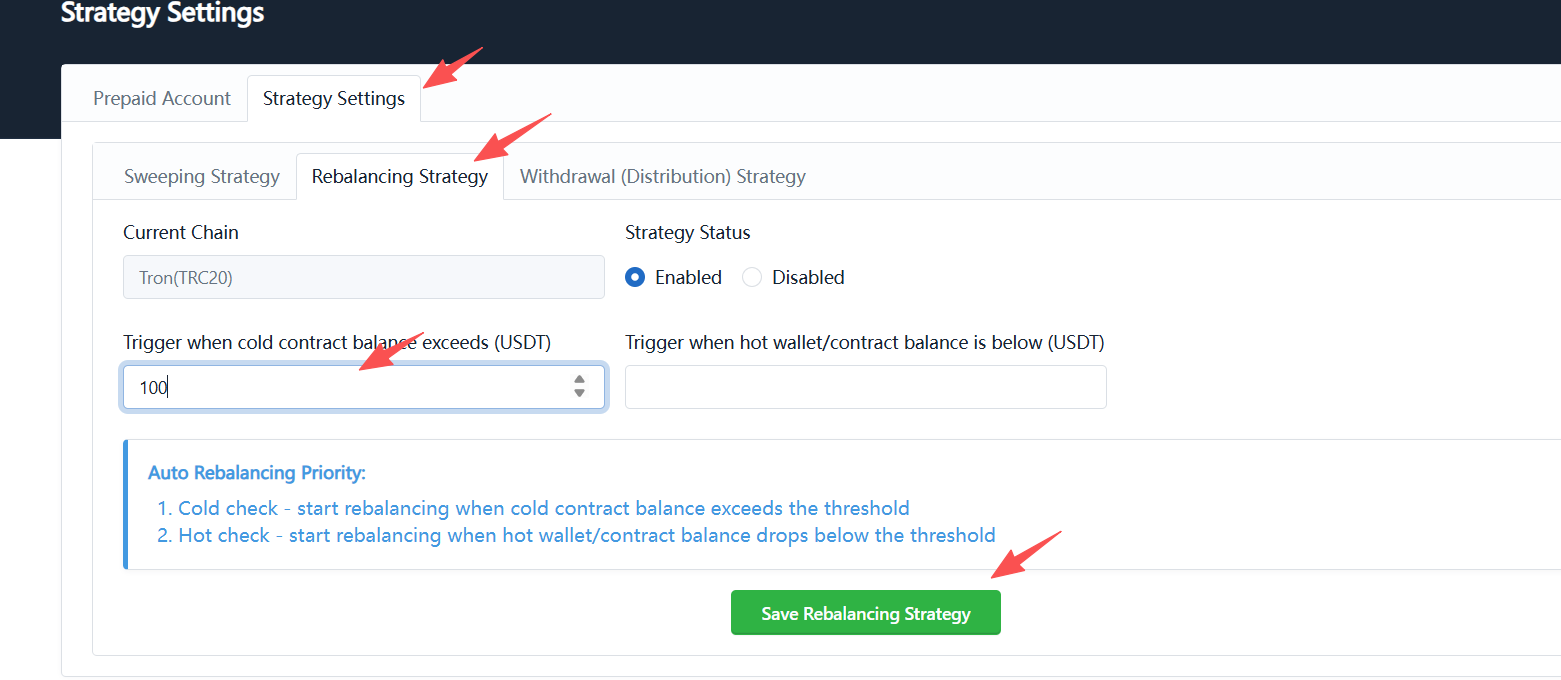
Auto-sweep scans every 5 minutes by default; auto-withdrawal scans every 30 minutes. Execution only occurs when balances meet the configured thresholds.
7. Configure Blacklisted Fund Sweep Settings
When the system detects risky funds via KYT, a sub-contract may be blacklisted. Blacklisted sub-contracts are excluded from the normal sweep process. Merchants must configure emergency sweep and emergency fund withdrawal addresses via multisig to handle these funds separately.
Blacklisted fund sweep moves funds from blacklisted sub-contracts to a designated emergency sweep address. Merchants can later withdraw from the emergency sweep address to an emergency fund withdrawal address for freezing, auditing, or refund processing.
Instructions
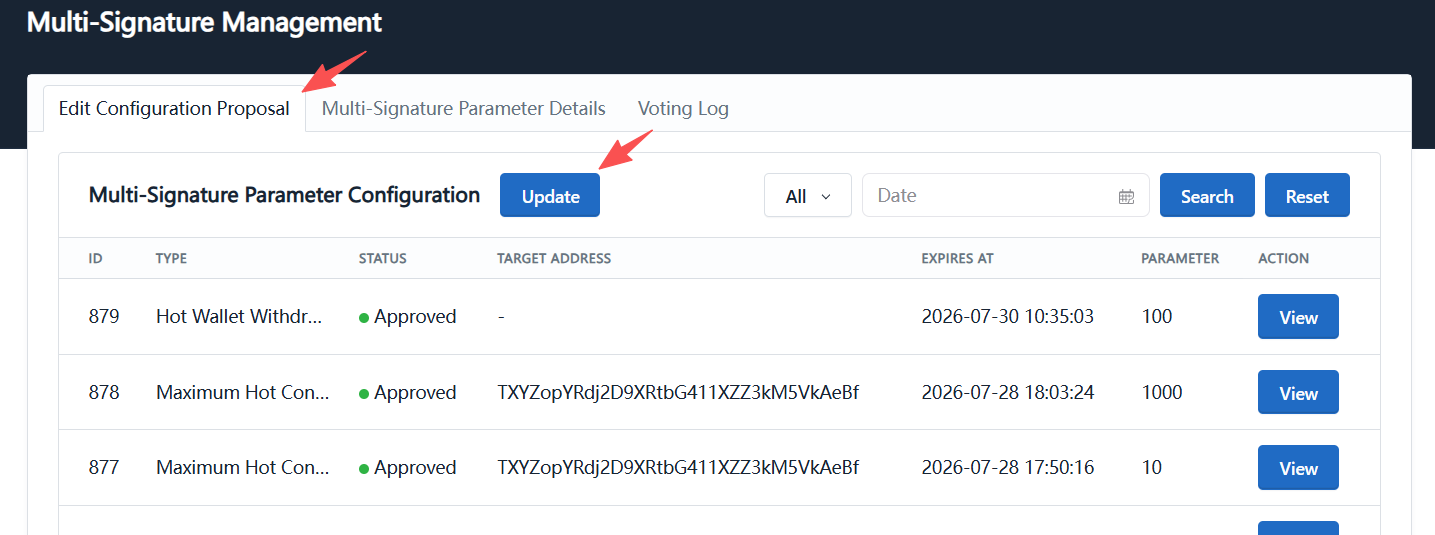
On the Edit Configuration Proposal page, click Update to create a multisig parameter change proposal.
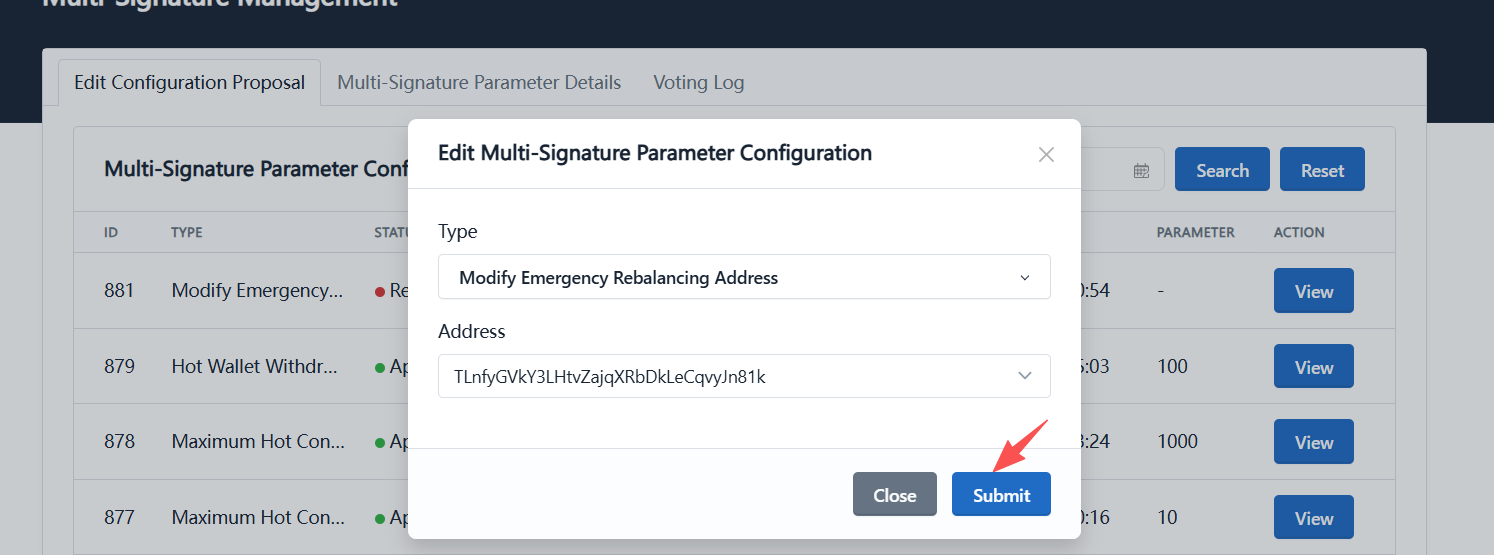
Select Modify Emergency Fund Withdrawal Address as the multisig type, choose New for the address, and click Submit. The system will prompt a wallet signature. After the admin completes the signature, the proposal enters a pending approval state.
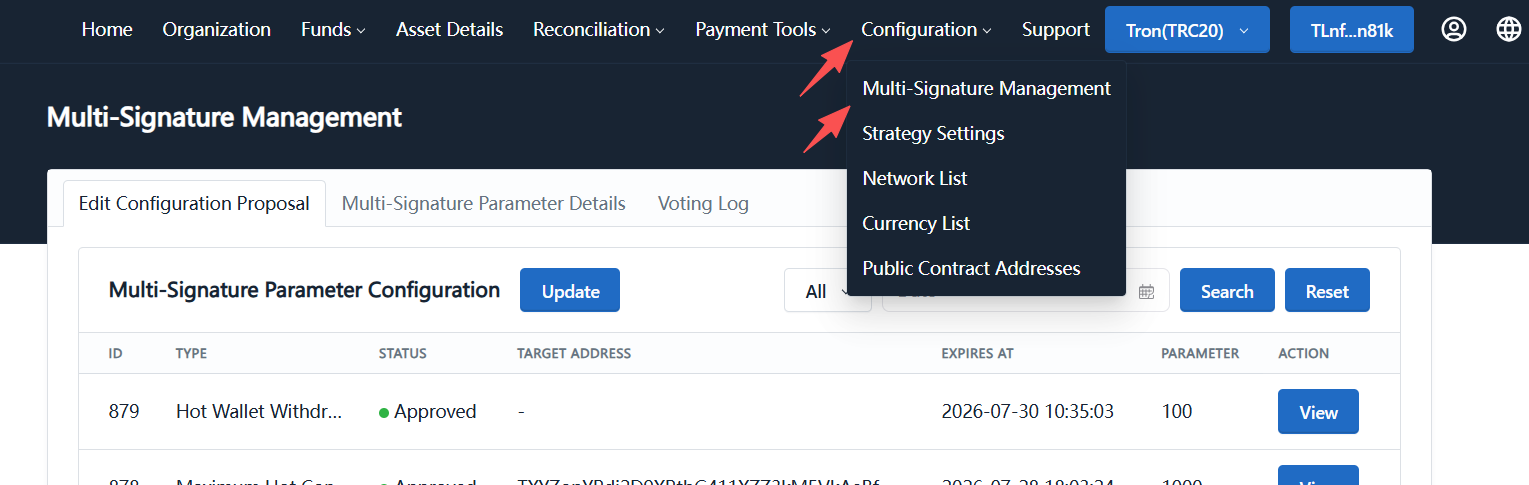
Multisig Approval
After the proposal is submitted, you need to switch to another admin wallet for approval.
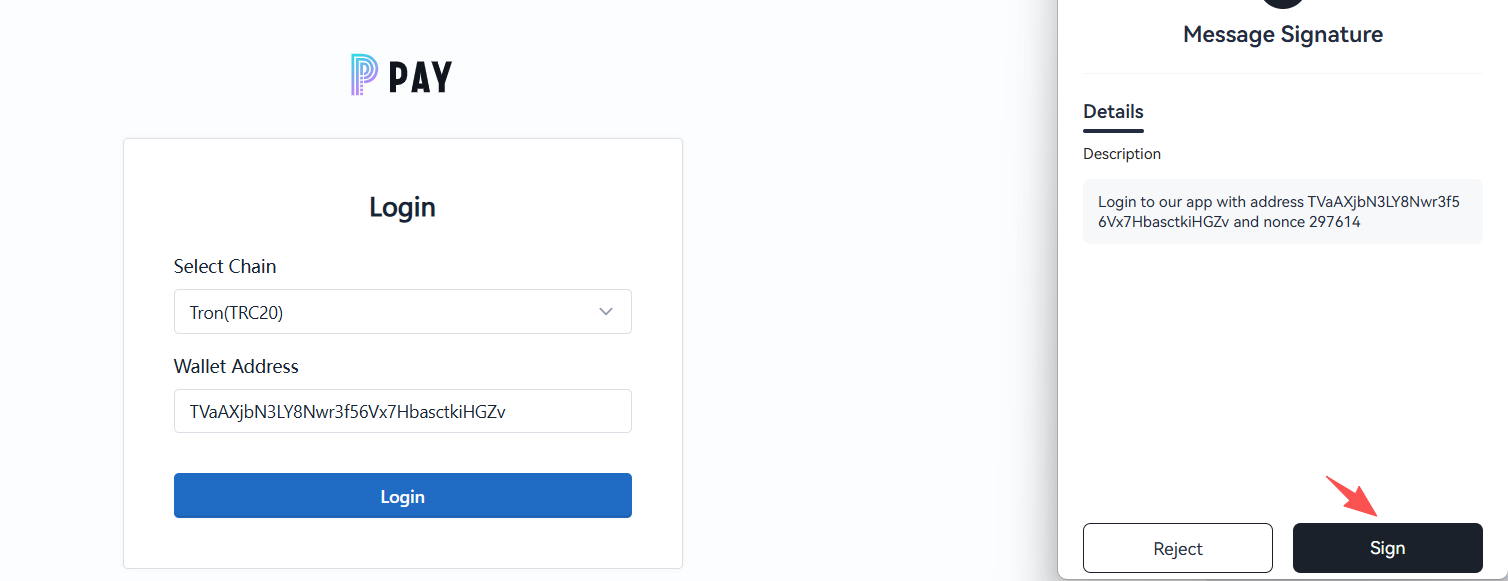
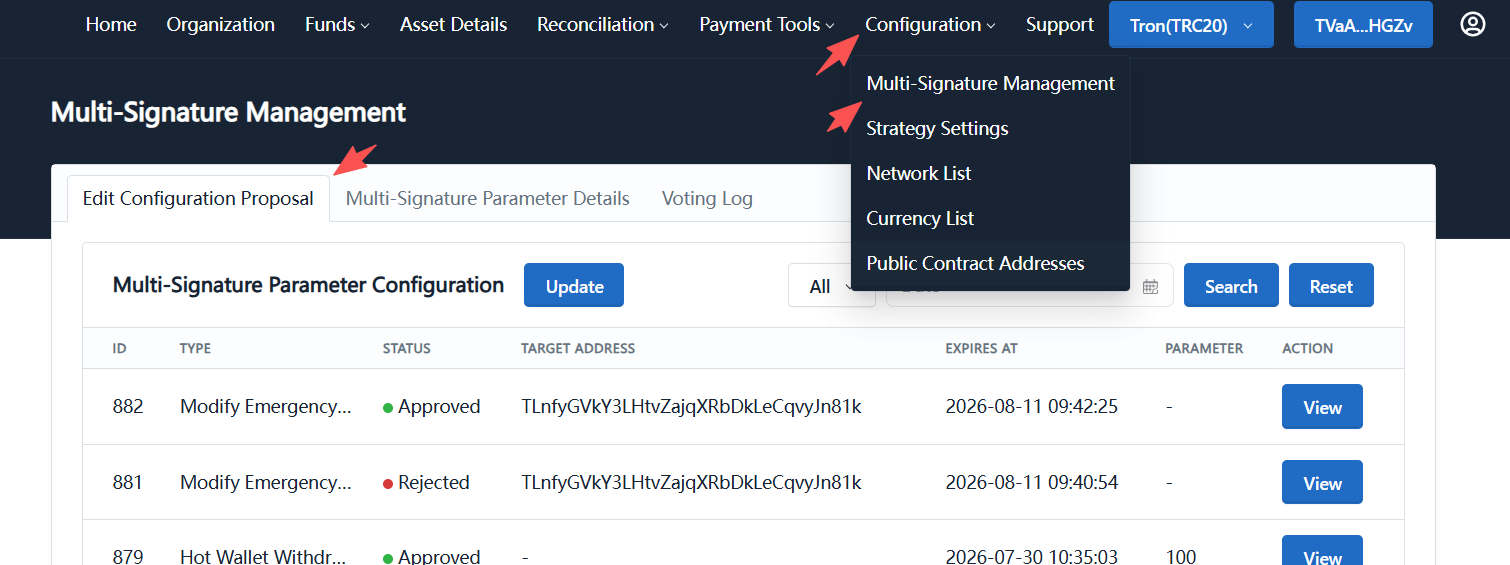
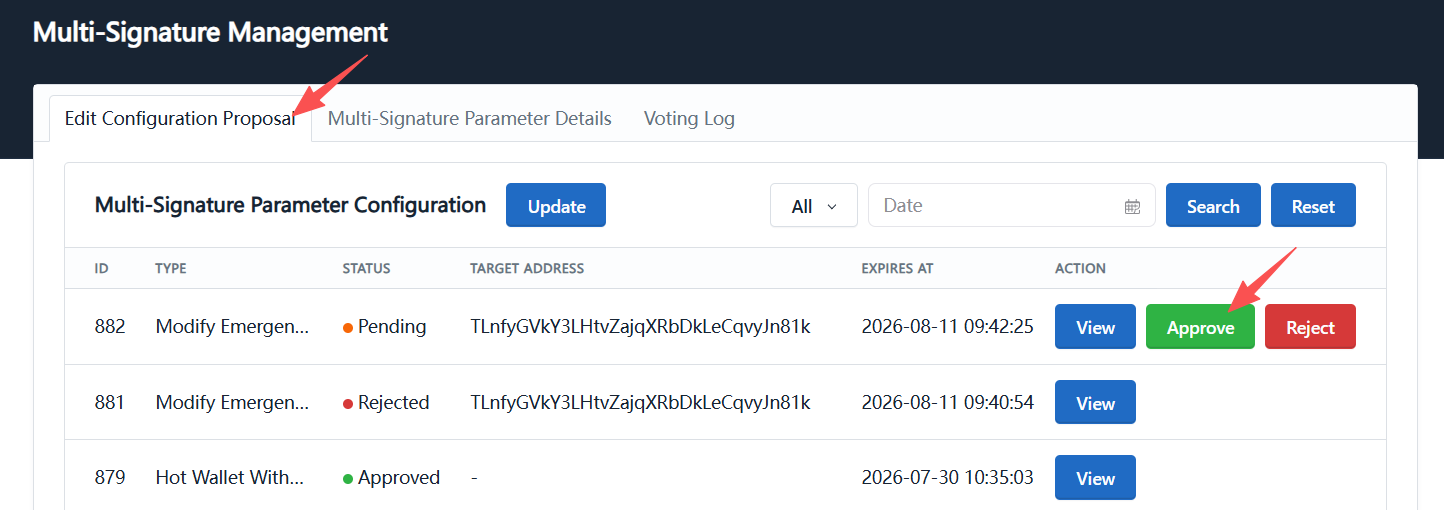
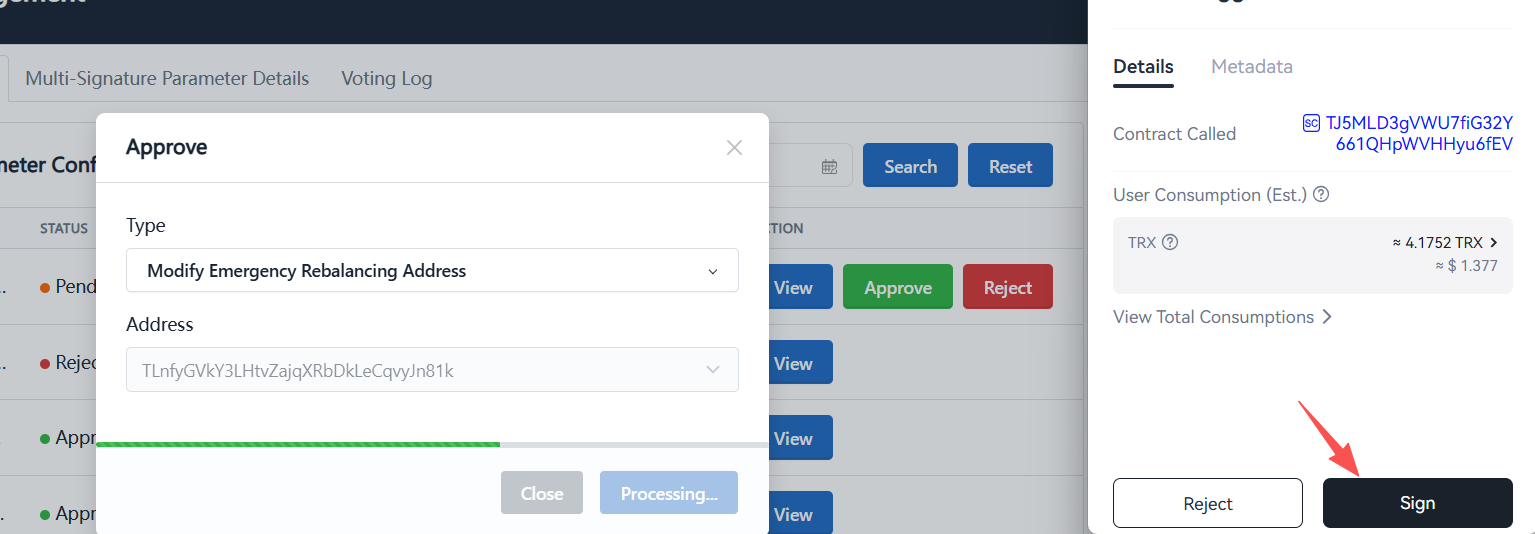
Log in with another admin wallet and navigate to: System Configuration → Multi-Signature Management → Edit Configuration Proposal. Find the pending proposal, click Approve, and complete the signature in your wallet. Once signed, the system continues the on-chain submission and waits for blockchain confirmation.
8. Sweep and Withdraw Blacklisted Funds
When a sub-contract is blacklisted due to KYT detection, its funds are excluded from the normal sweep process. Merchants can manually sweep these funds to the emergency sweep address for separate handling.
Instructions
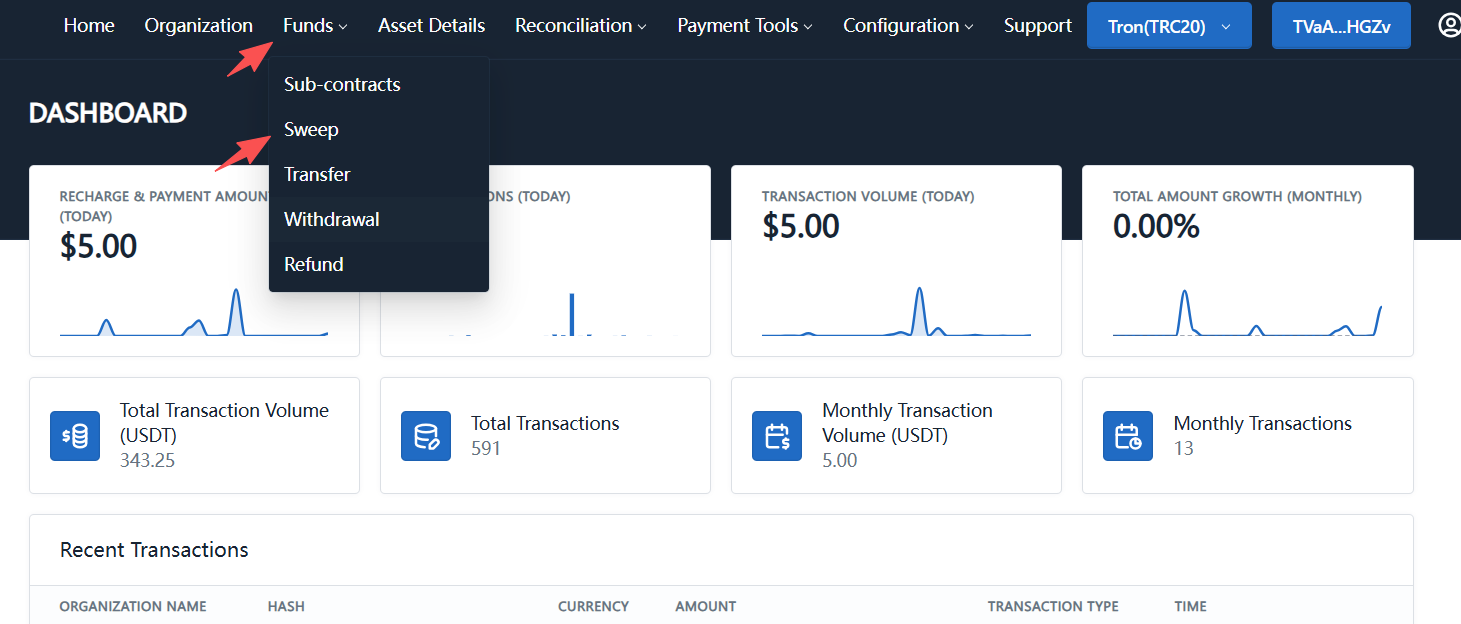
Navigate to: Funds → Sweep → Blacklist
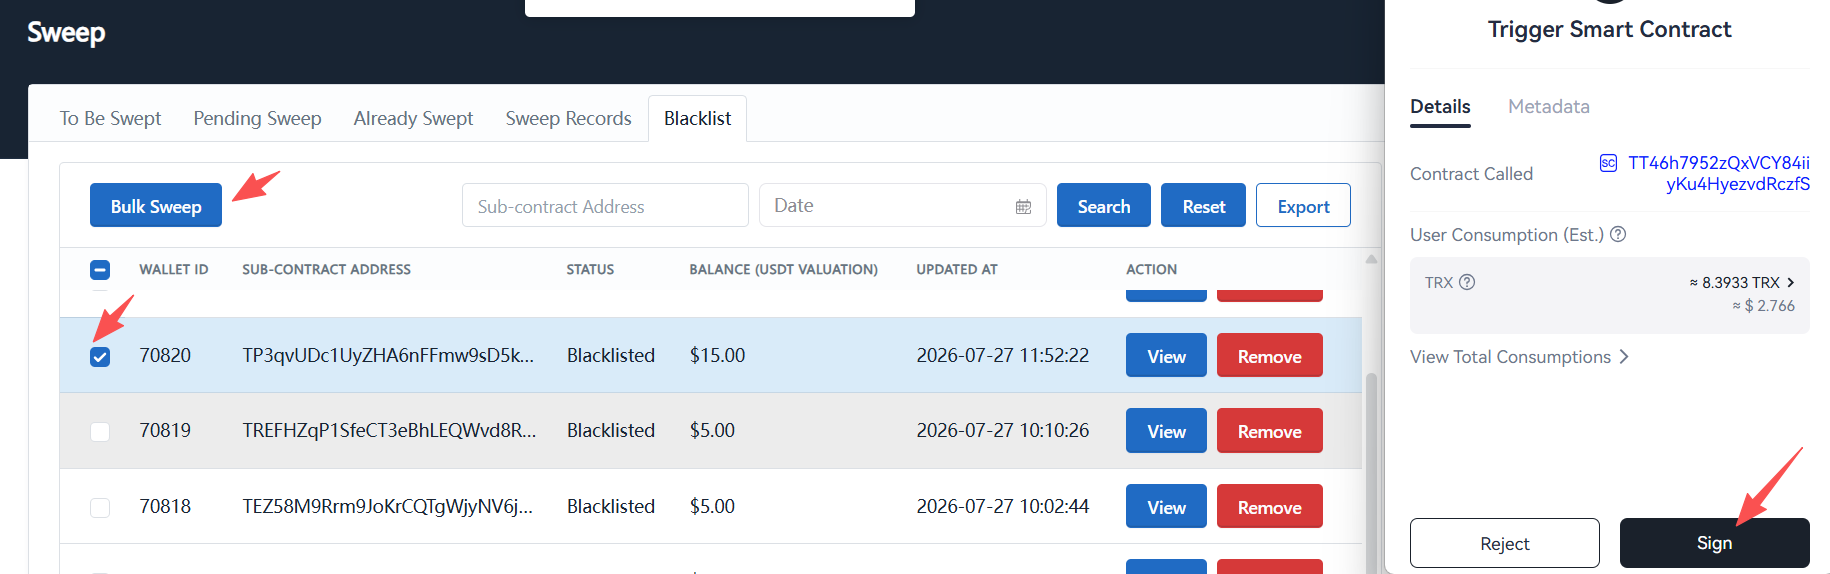
Select the sub-contracts you want to process in the blacklist and click Bulk Sweep. The system will prompt a wallet signature. After the admin completes the signature, the sweep transaction is submitted on-chain.
Withdraw Blacklisted Funds
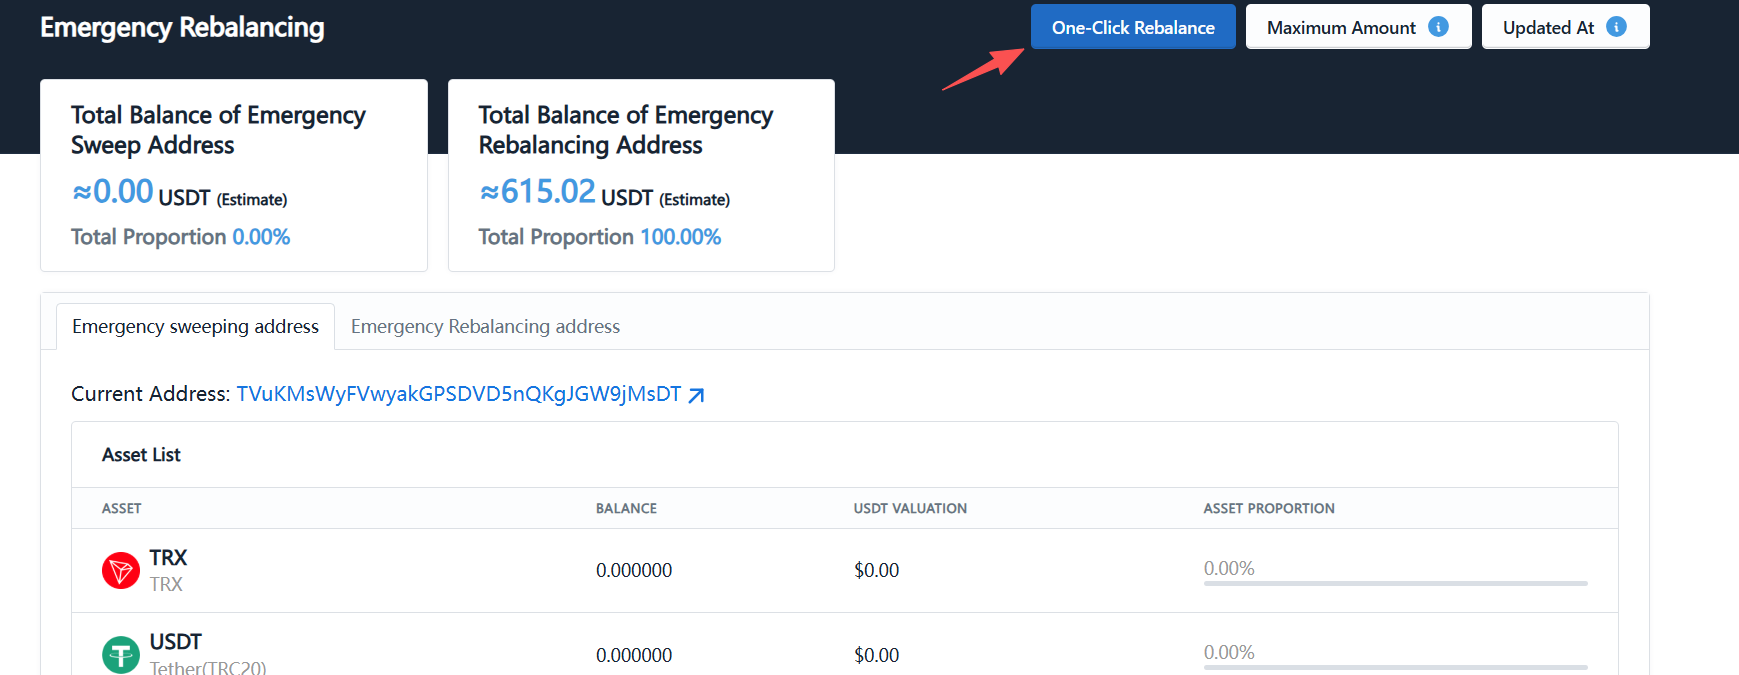
After blacklisted sub-contract funds have been swept to the emergency sweep address, merchants can withdraw them to the emergency fund withdrawal address for further freezing, auditing, or refund processing.
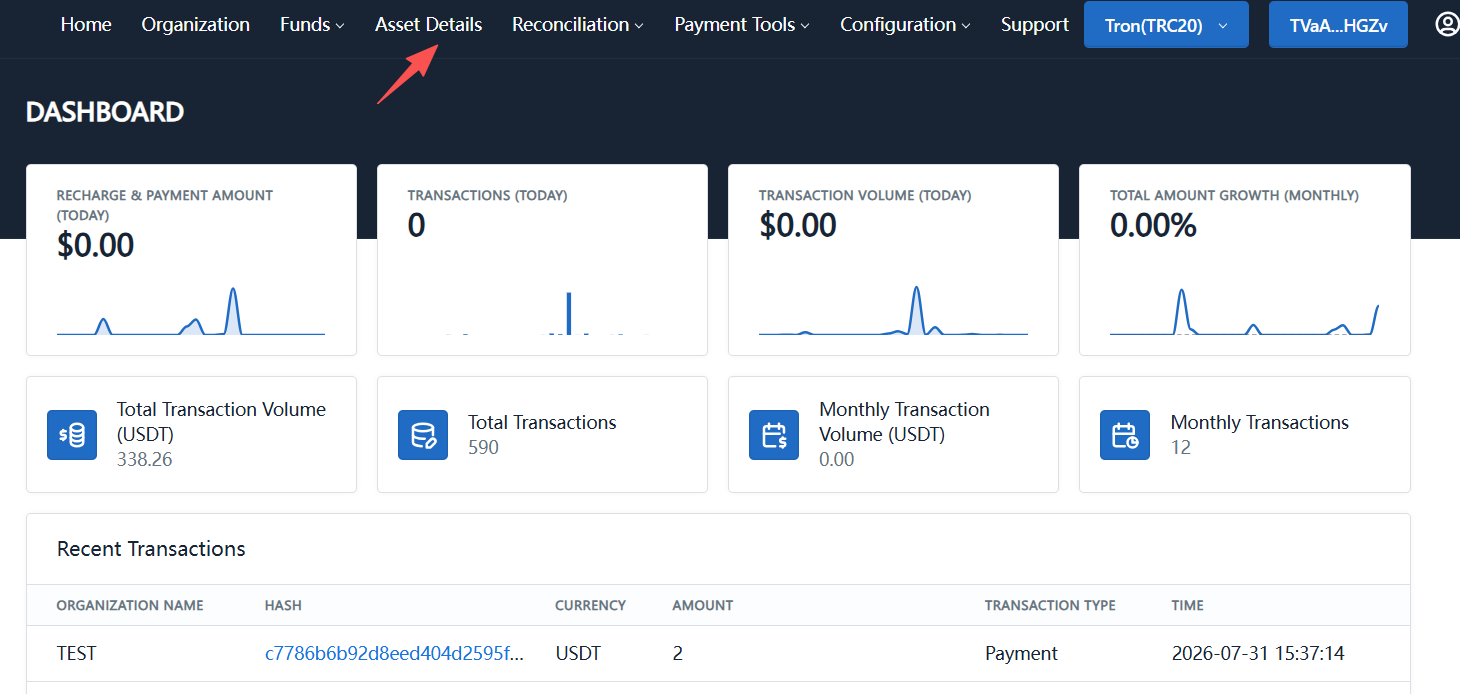
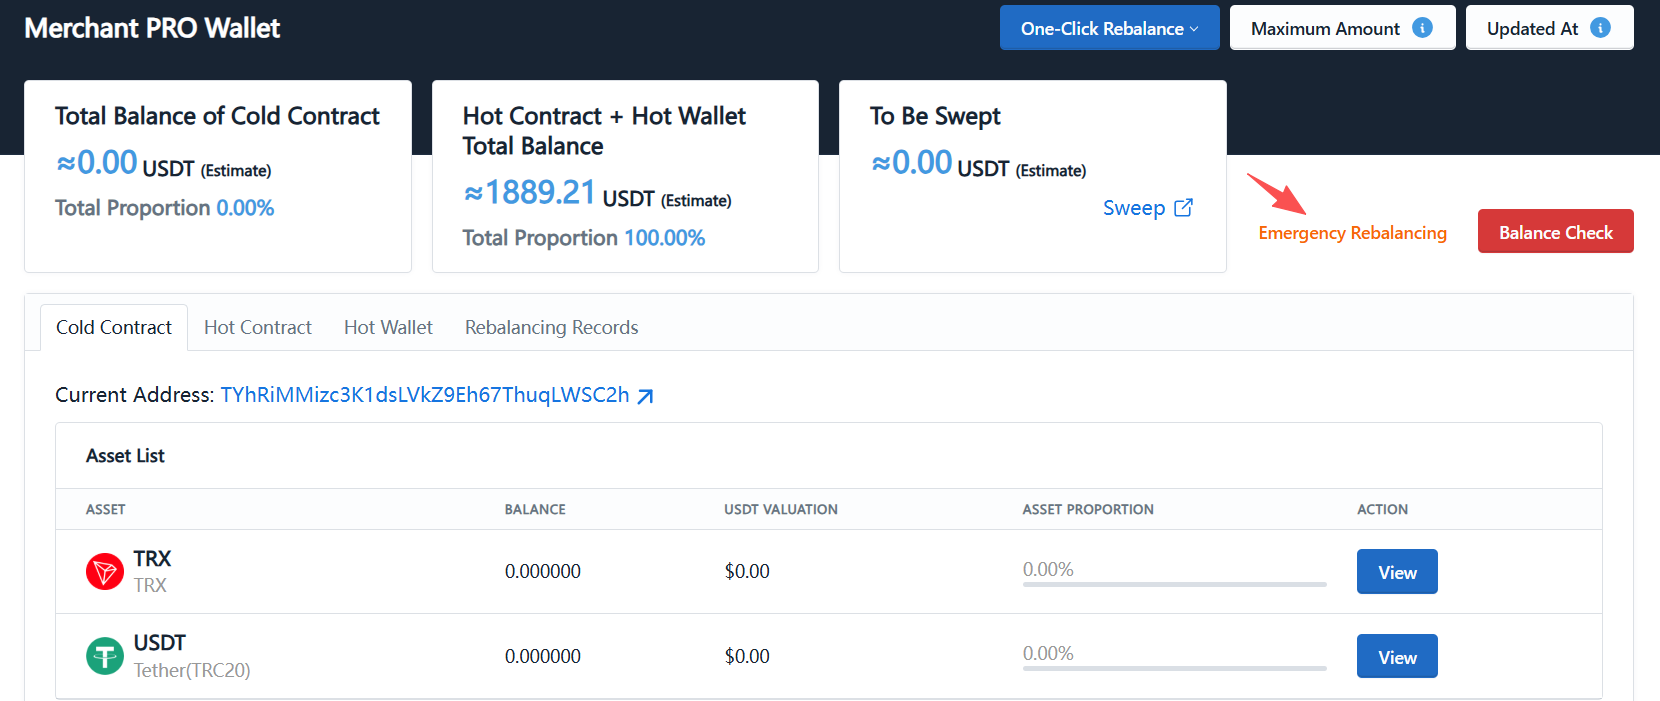
Navigate to: Asset Details → Emergency Fund Withdrawal
View the emergency sweep address balance and click One-Click Fund Withdrawal. The system will prompt a wallet signature. After the admin completes the signature, the fund withdrawal transaction is submitted on-chain.
- Blacklisted sub-contract funds are considered high-risk and will not follow the normal sweep process.
- Before sweeping blacklisted funds, you must configure the emergency sweep address via multisig. Before emergency fund withdrawal, you must configure the emergency fund withdrawal address via multisig.
- Both blacklisted fund sweep and emergency withdrawal require admin wallet signatures and on-chain submission. Verify the source, handling method, and target address before proceeding to avoid errors.
Part 2: Live Demo
After completing the configuration above, you can run a live payment test to verify that auto-sweep and auto-withdrawal execute correctly.
9. Complete a Test Payment Using a Sub-Contract Address
Select a created recharge sub-contract address and provide it to a user for payment.
Instructions
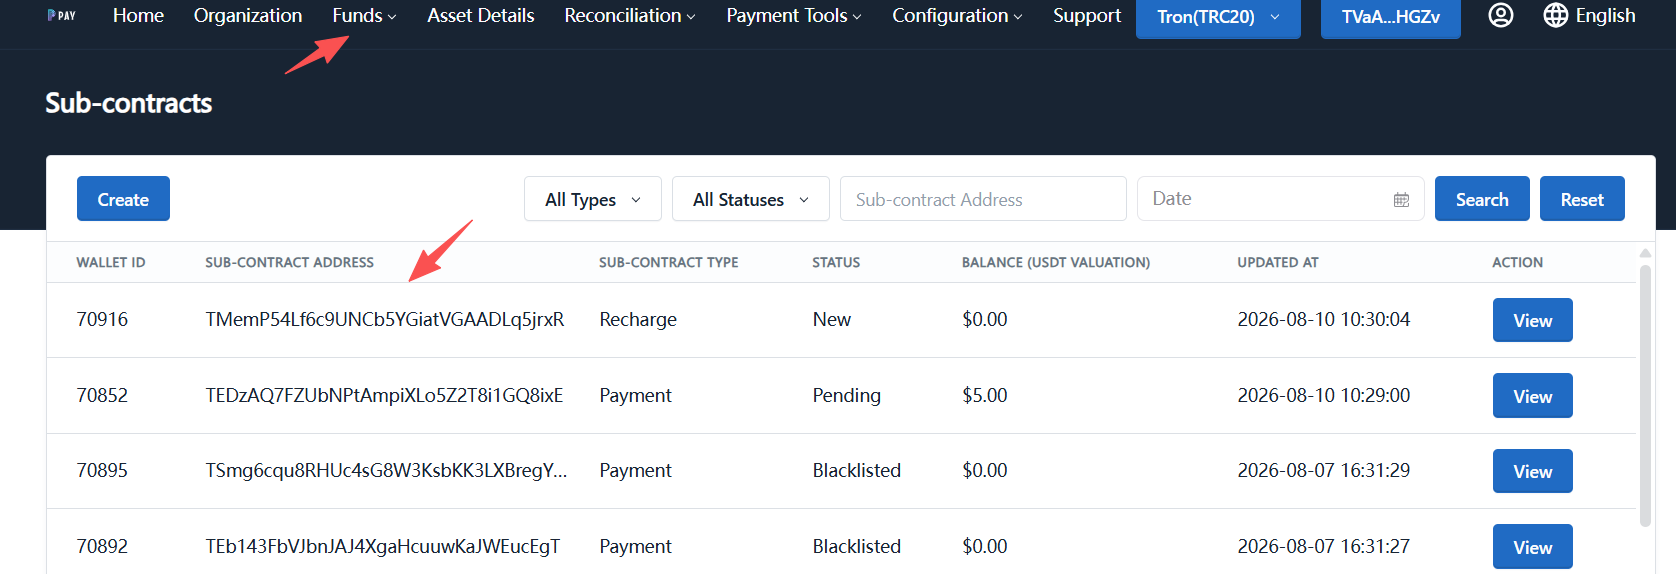
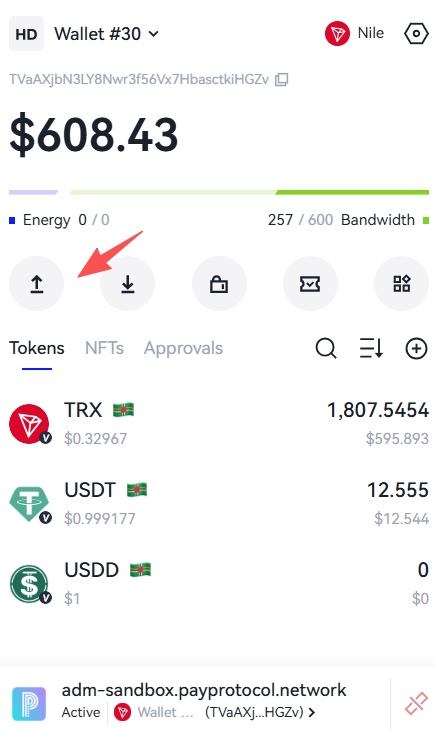
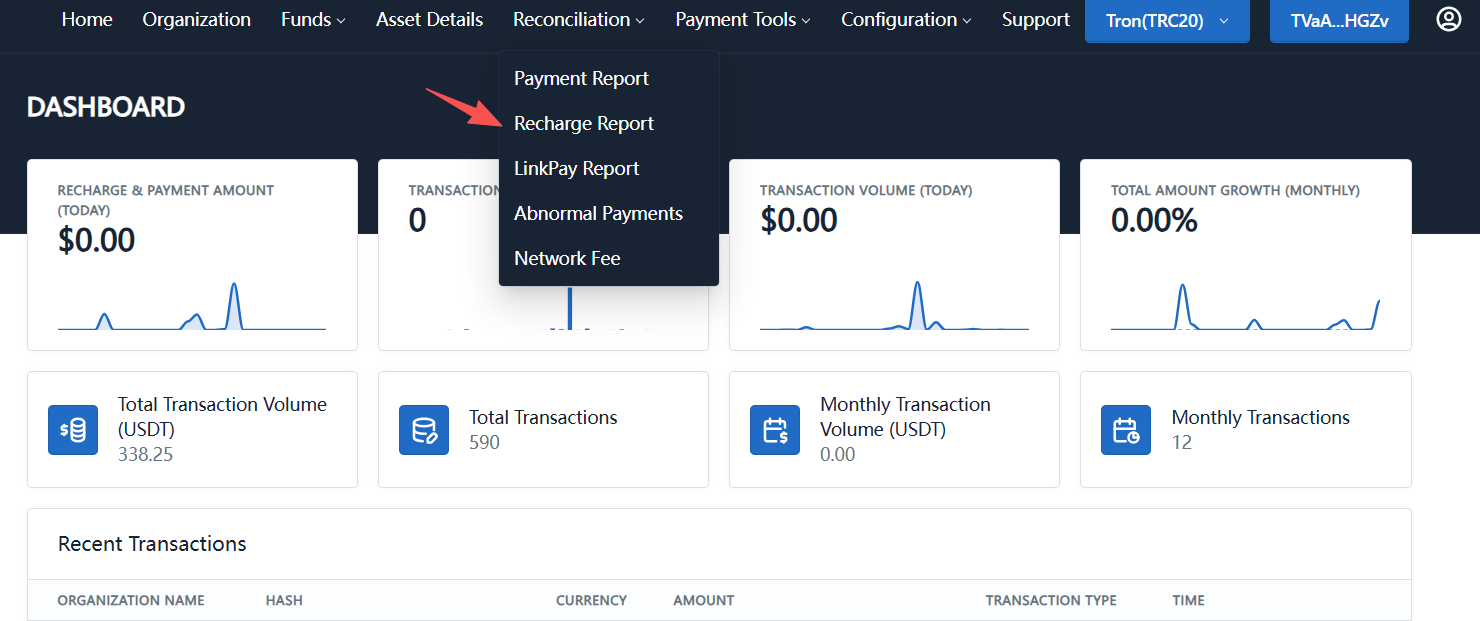
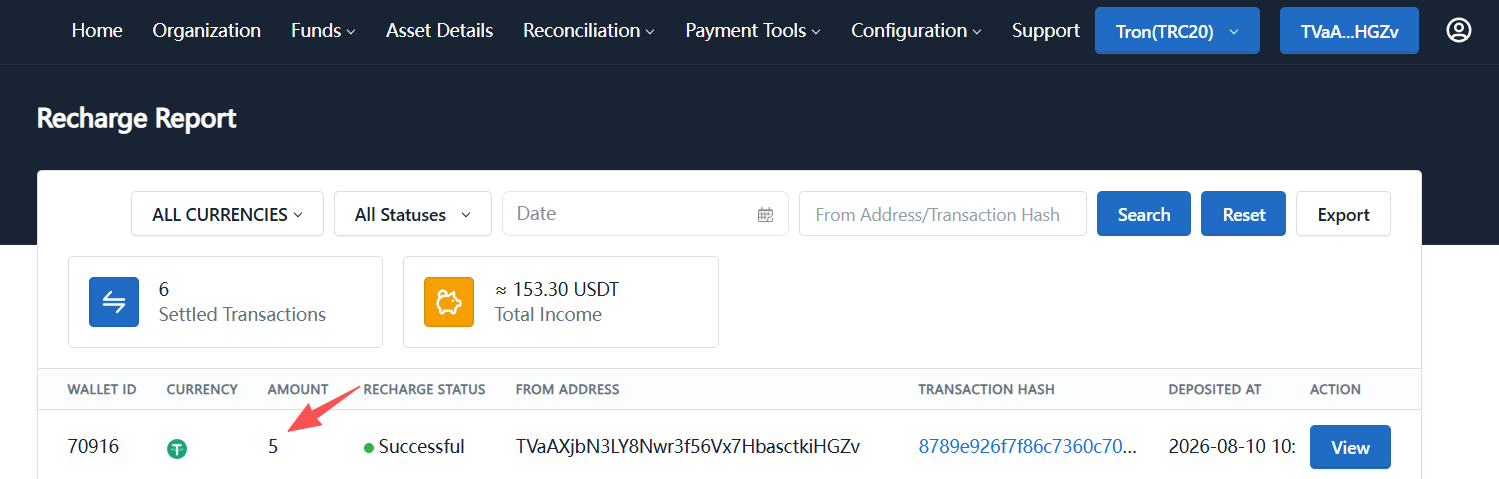
Navigate to Funds → Sub-Contracts and copy a recharge sub-contract address. The user can send USDT to this address from a Web3 wallet or exchange. After the transfer, navigate to Reconciliation → Recharge Report to view the corresponding deposit order.
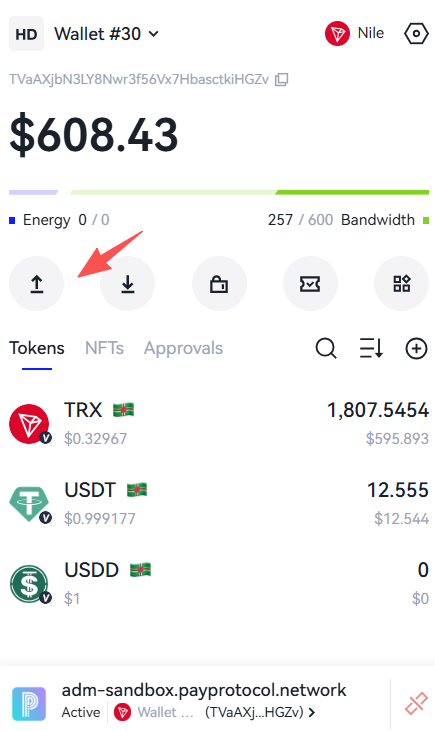
- The test amount must meet the sweep trigger threshold configured earlier; otherwise, auto-sweep will not be triggered.
- When transferring from an exchange, make sure to select the correct chain network.
10. Verify Auto-Sweep and Auto-Withdrawal Results
After a successful user payment, if the strategy conditions are met, the system will automatically execute sweep and fund withdrawal.
Instructions
To check sweep results: navigate to Funds → Sweep → Sweep Records. To check fund withdrawal results: navigate to Asset Details → Fund Withdrawal Records.
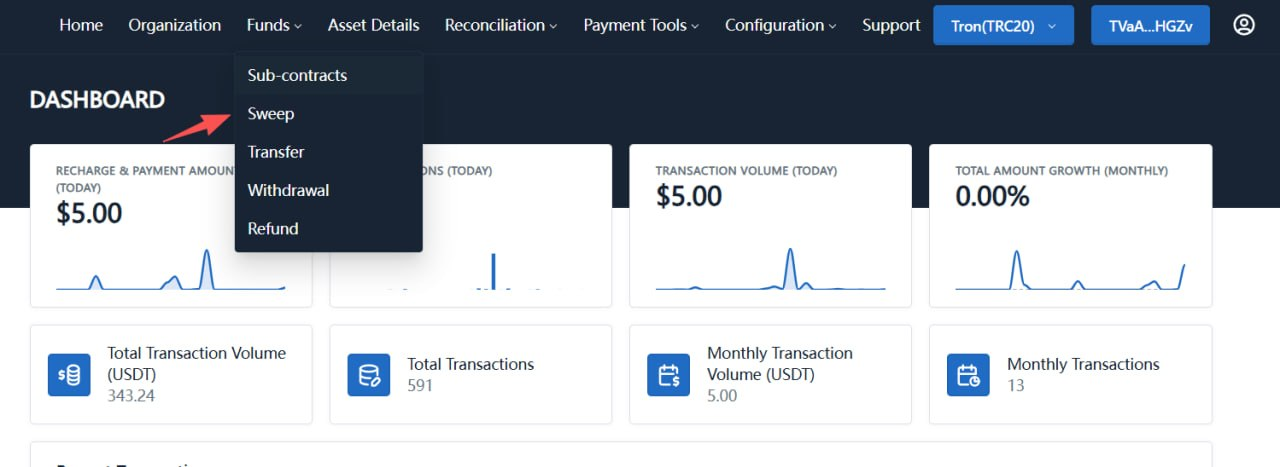
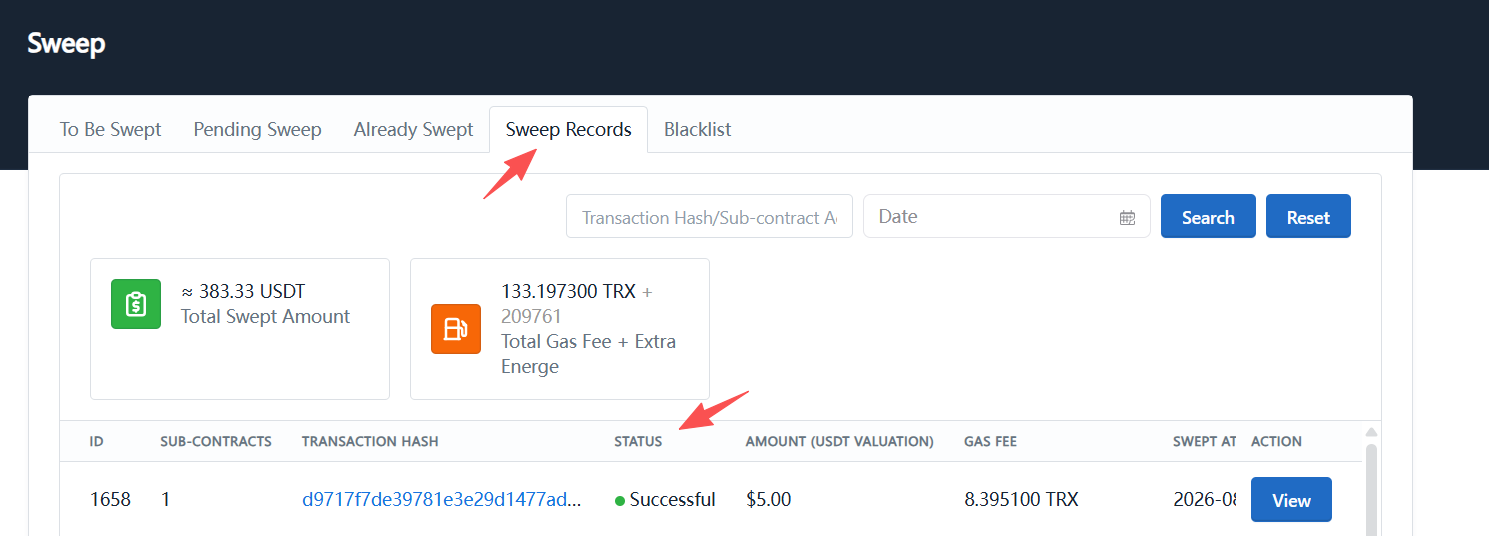
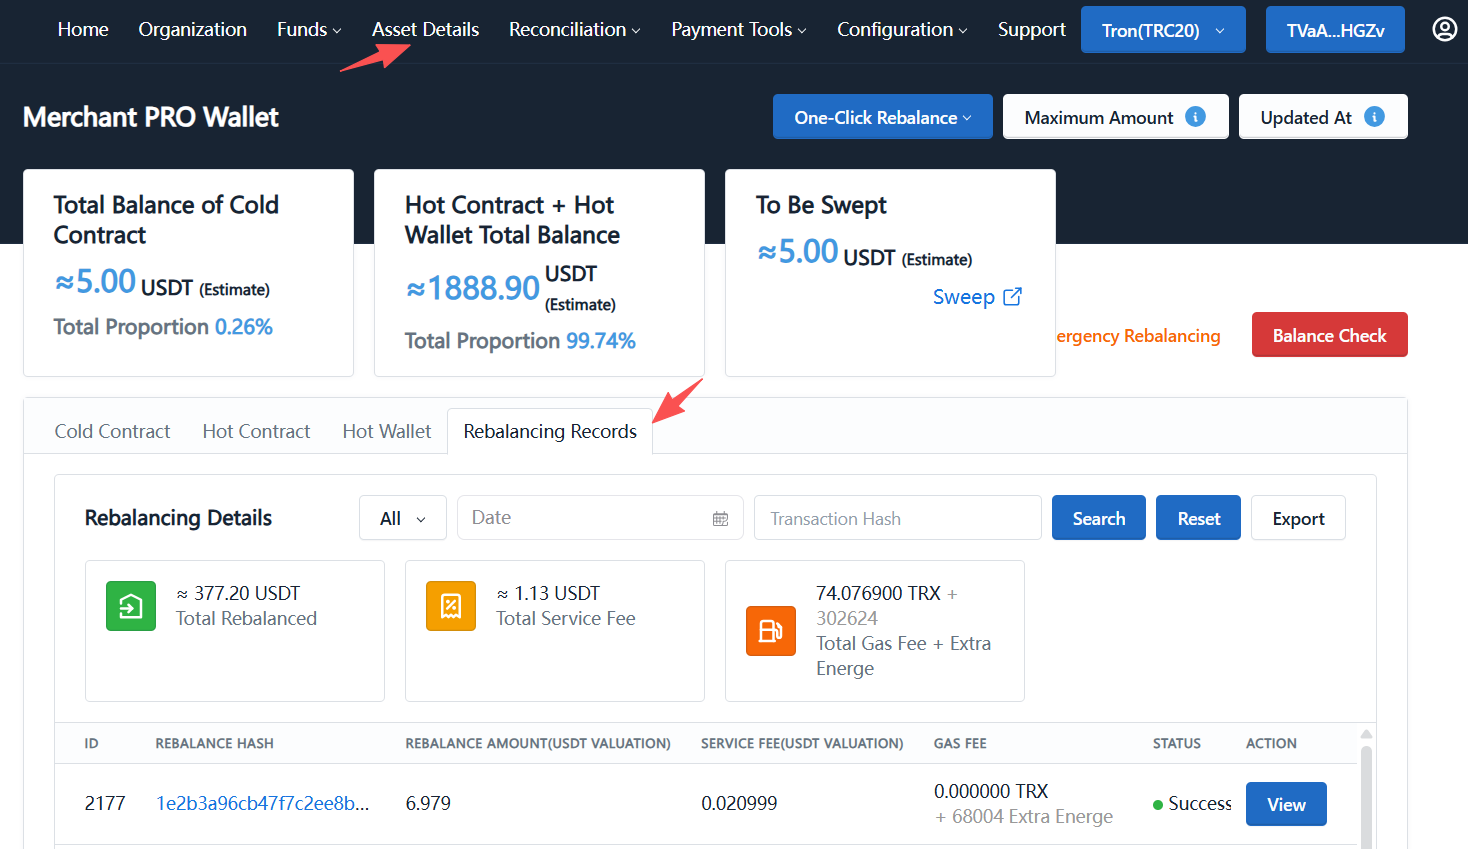
Automated tasks do not execute in real time. Sweep tasks scan every 5 minutes by default; fund withdrawal tasks scan every 30 minutes. Merchants can also sweep or initiate fund withdrawal manually — see: How to withdraw funds from Pay Protocol?
Part 3: Key Reminders
- The prepaid account must be enabled and funded before using any auto-strategy.
- Admin wallets must be Web3 decentralized wallets.
- Recharge sub-contract addresses can be provided directly to users for deposits.
- Collection addresses are mainly for address pool expansion and should not be given to users for deposits.
- When pollution blocking is enabled, risky sub-contracts are blacklisted and excluded from the normal sweep process.
- Auto-sweep and auto-withdrawal only execute when trigger thresholds are met.
- Always click Save after configuring strategies.
- On-chain transactions require block confirmation; the admin console may not update immediately.
- Test payment amounts must meet the configured trigger thresholds.
- Auto-distribution and auto-refund require contact with the technical team for setup.
Part 4: Completion Checklist
- Merchant registered and approved
- Admin wallet can successfully log in to the admin console
- Recharge sub-contract addresses batch-created
- Prepaid account enabled and funded
- Pollution blocking / KYT detection enabled
- Auto-sweep strategy saved
- Auto-withdrawal strategy saved
- User payment to sub-contract address successful
- Deposit order visible in admin console
- System auto-sweep executed successfully
- System auto-withdrawal executed successfully