How to use multisig to manage your organization and funds?

PRO and STD merchants use a contract with multi-signature functionality to manage members, merchant configurations, and transfer operations. This article will explain how to use the multi-signature contract to manage your organization and funds.
Modify Merchant Configuration with Multisig
For ease of expression, this article uses "hot wallet" to refer to the hot contract address of the Pro version.
Newly registered merchants have a default hot wallet limit of 0 and need to modify the merchant configuration with multisig to set the limit for each currency in the hot wallet. This section will explain how to modify the merchant configuration using multisig.
-
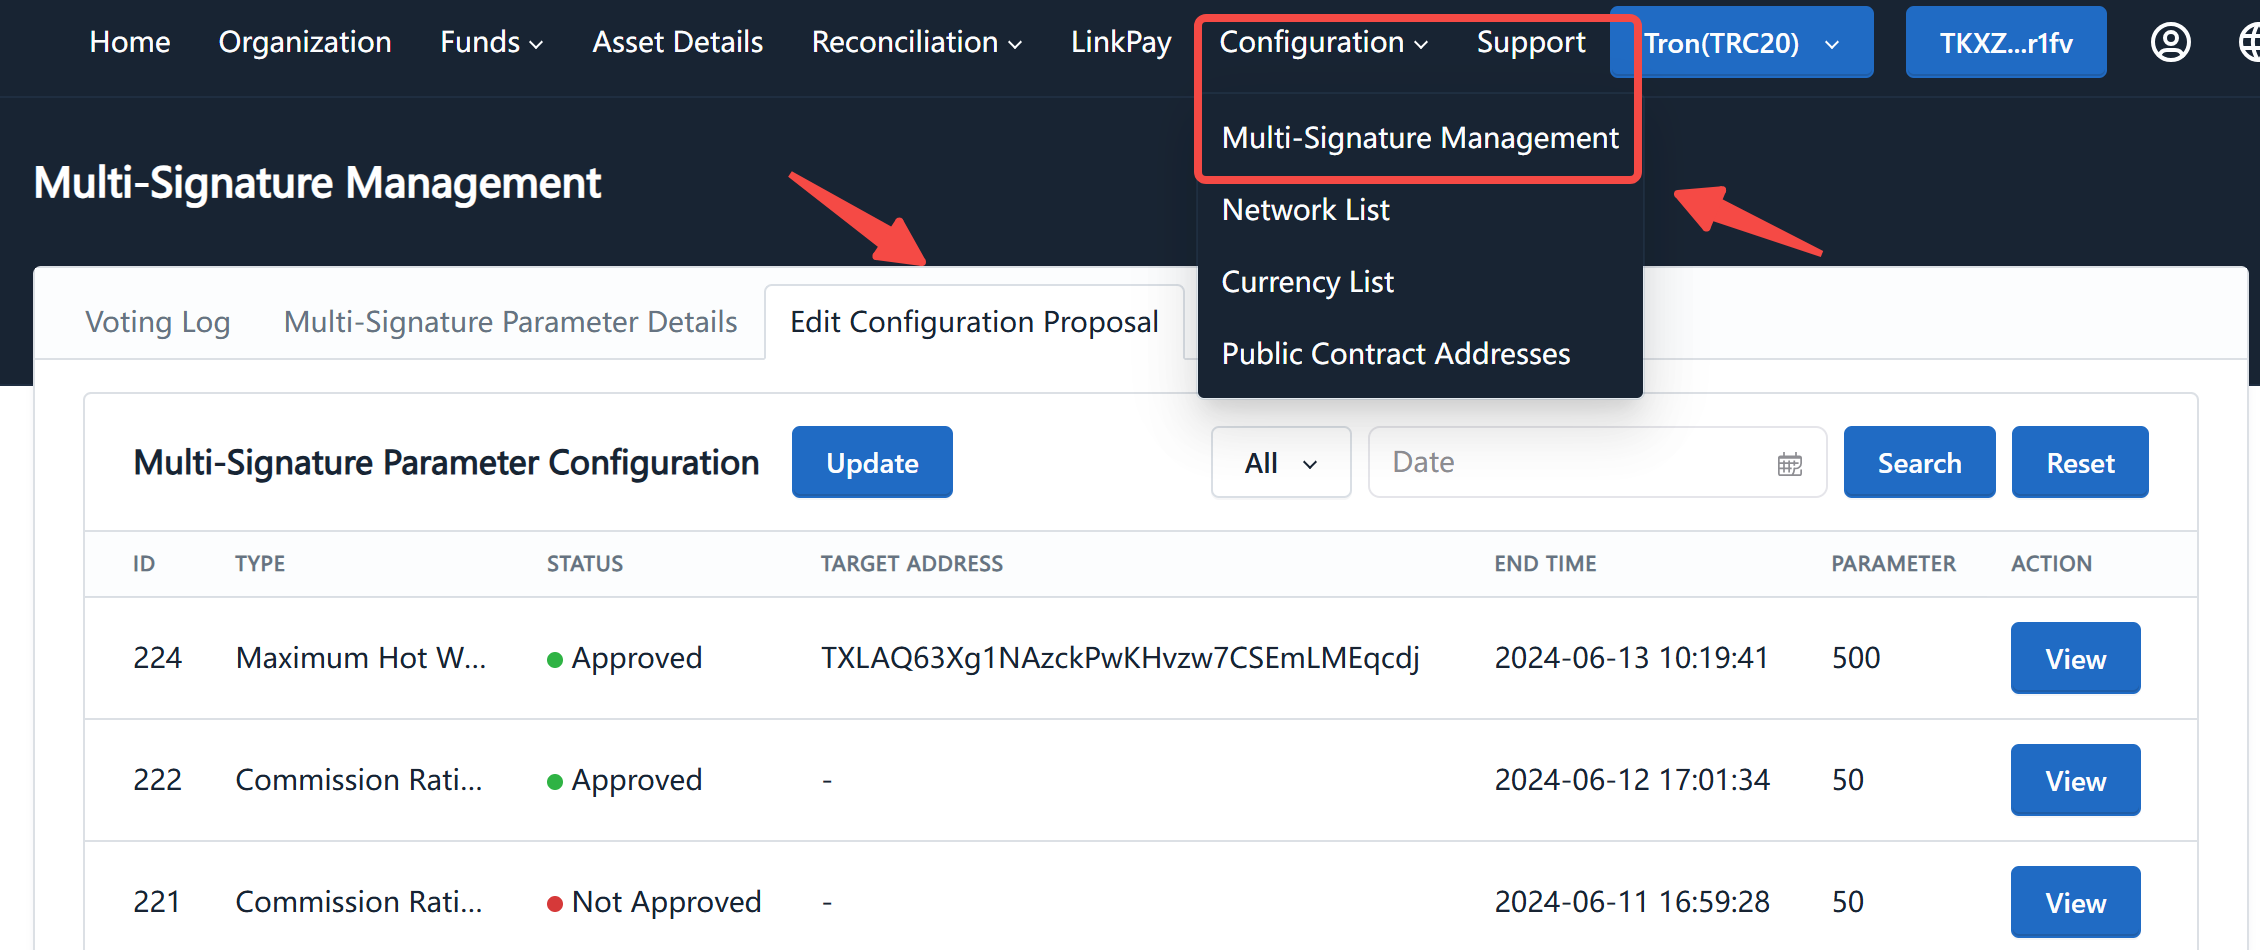
Log in to the Pay Protocol admin console using the executive wallet, click on the "Configuration"-"Multi-Signature Management" in the navigation bar, and select the "Edit Configuration Proposal" tab:
-
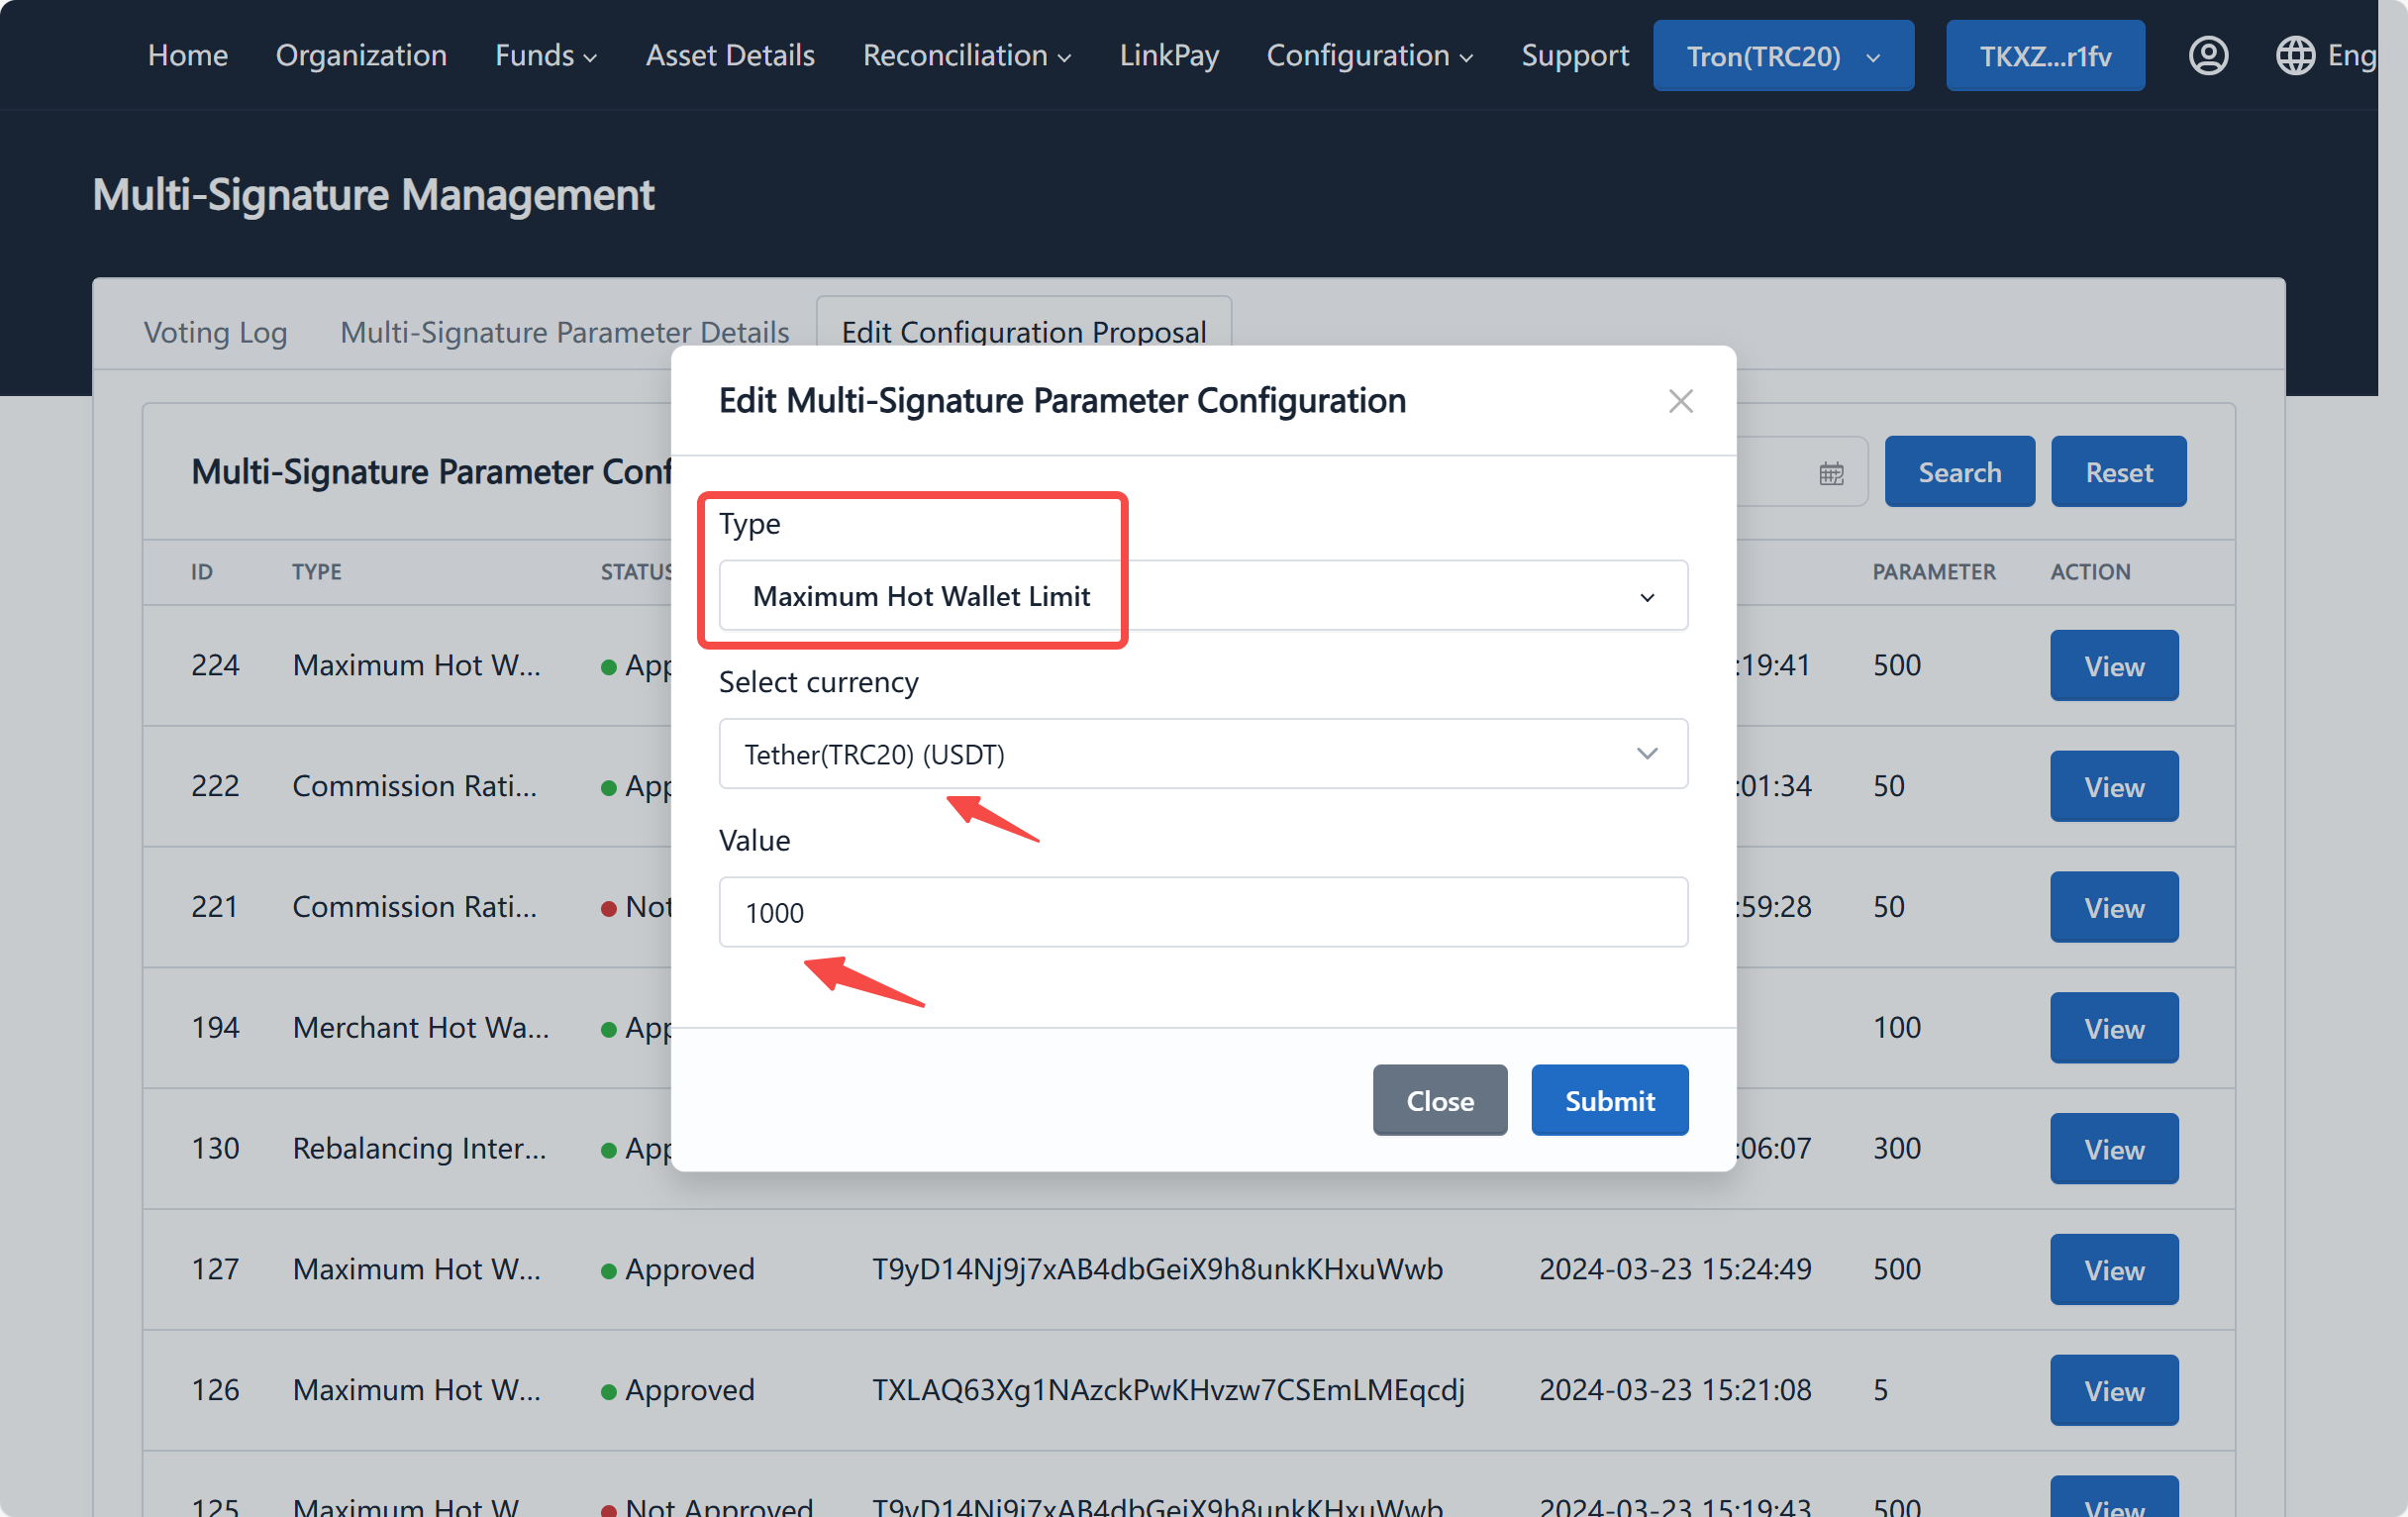
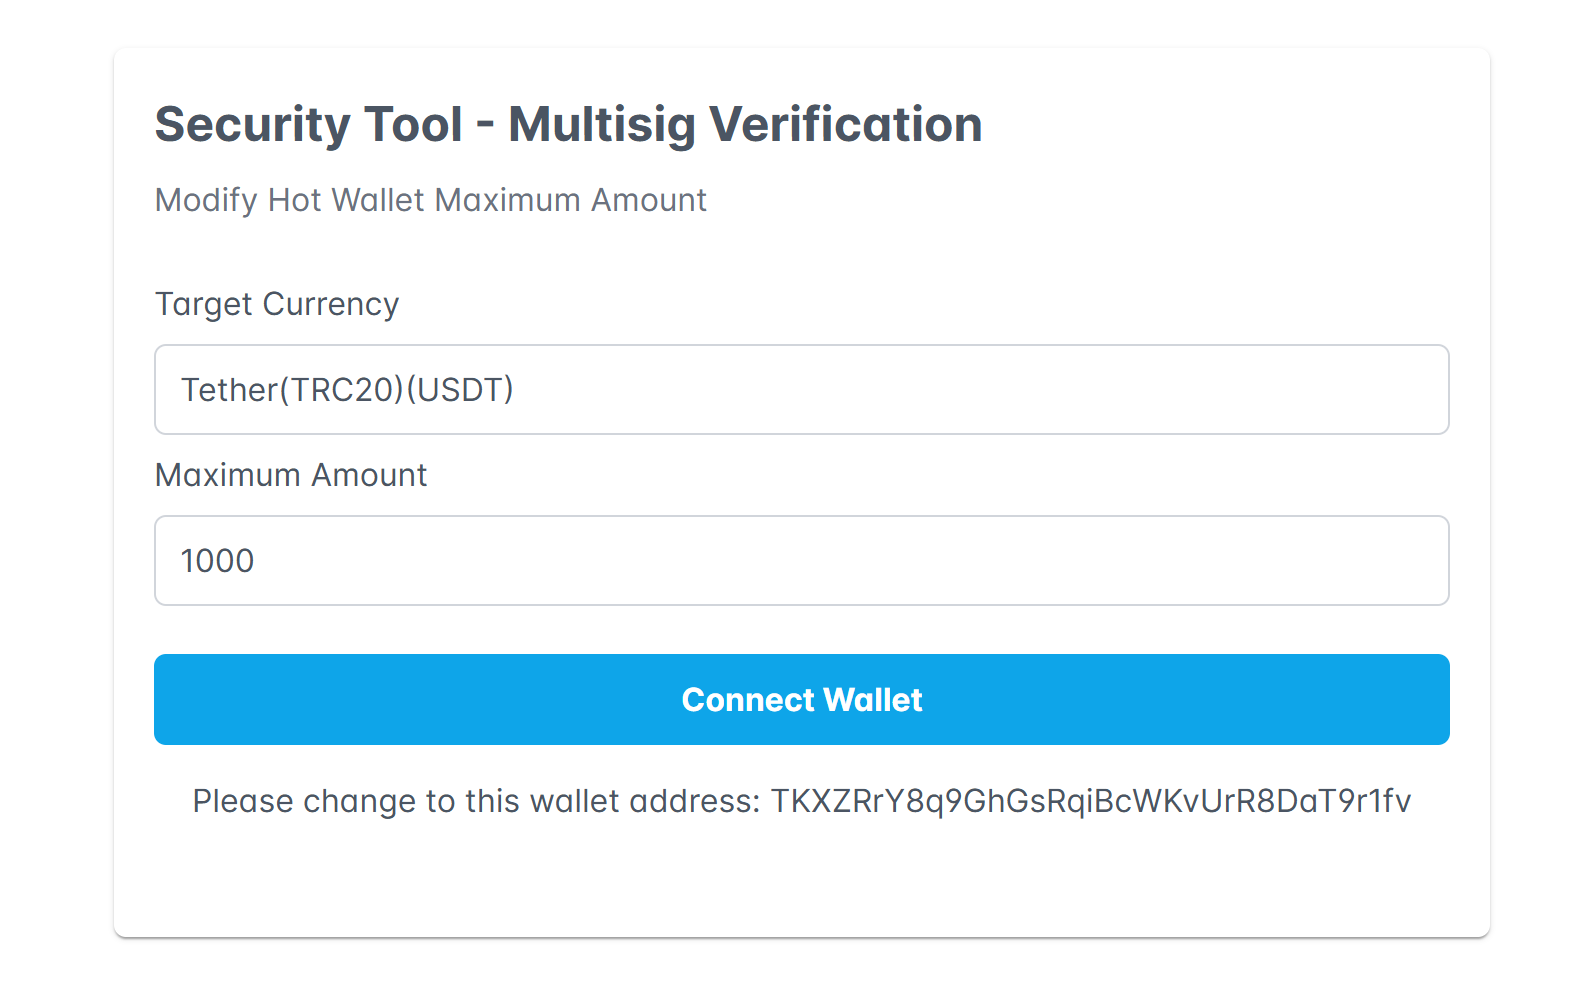
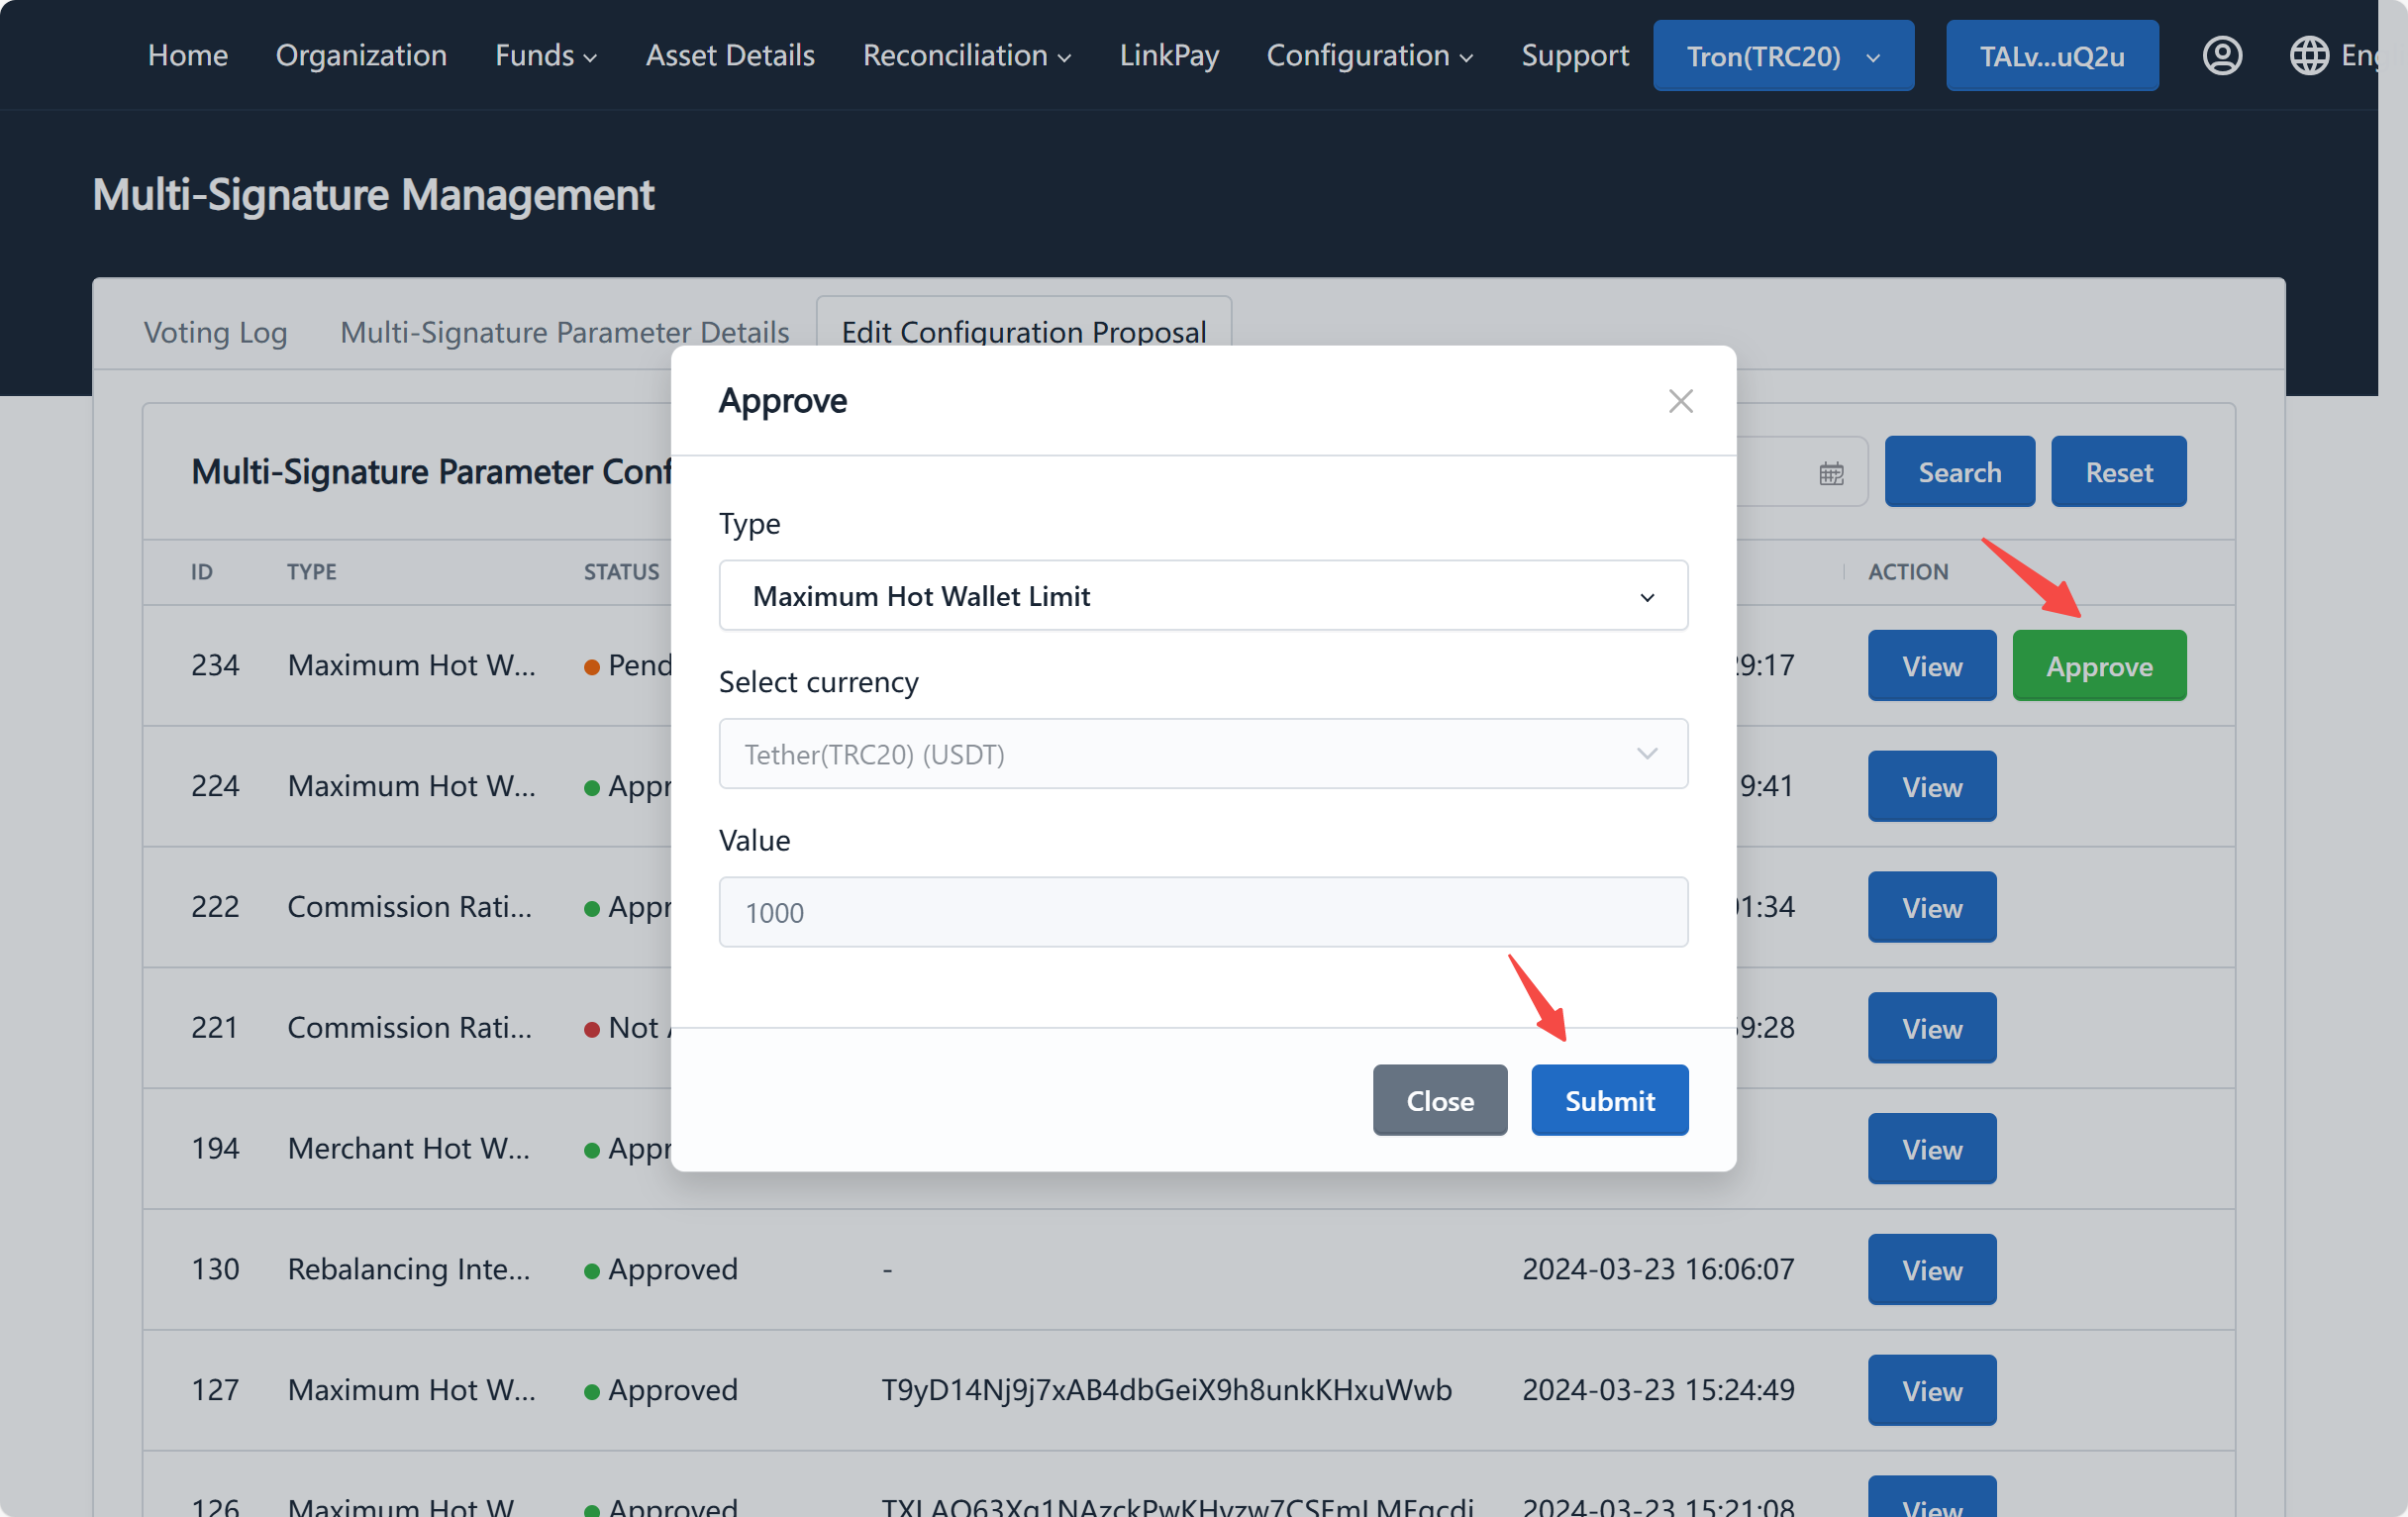
Click on the "Update" button, select the type as "Maximum Hot Wallet Limit", choose the currency that needs to be modified, enter the new limit, and click the "Submit" button:
-
We provide a security tool to verify and submit signatures for multisig parameters on a third-party website. After clicking the "Submit" button, a new tab will pop up (which may be blocked by the browser, please allow it). You can see the type of multisig and the modified parameters on this page, please verify them:
-
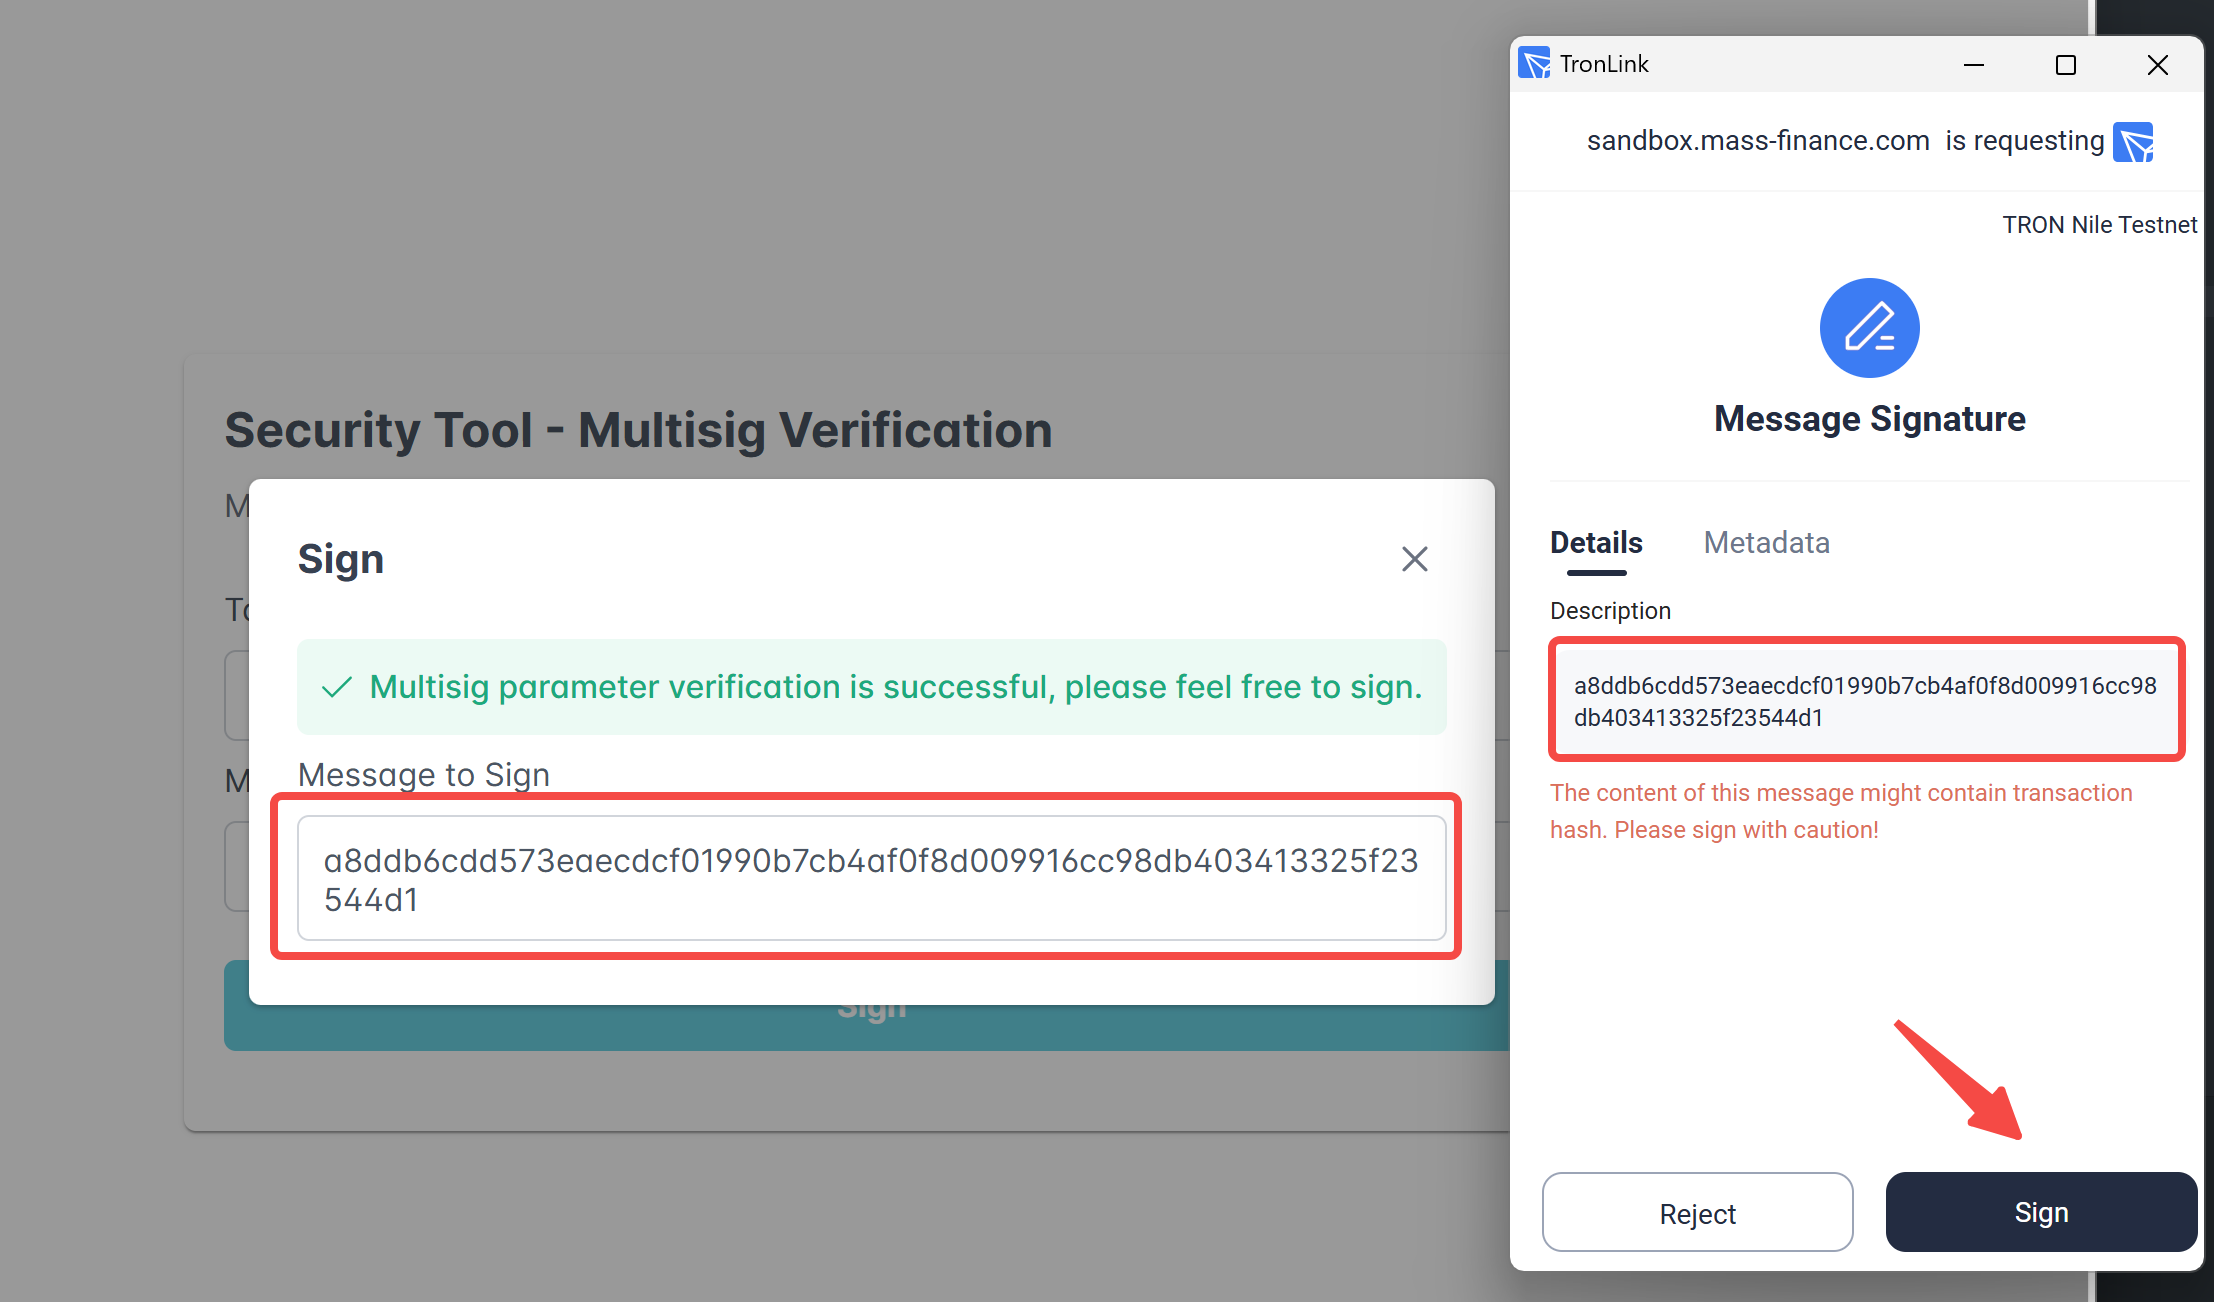
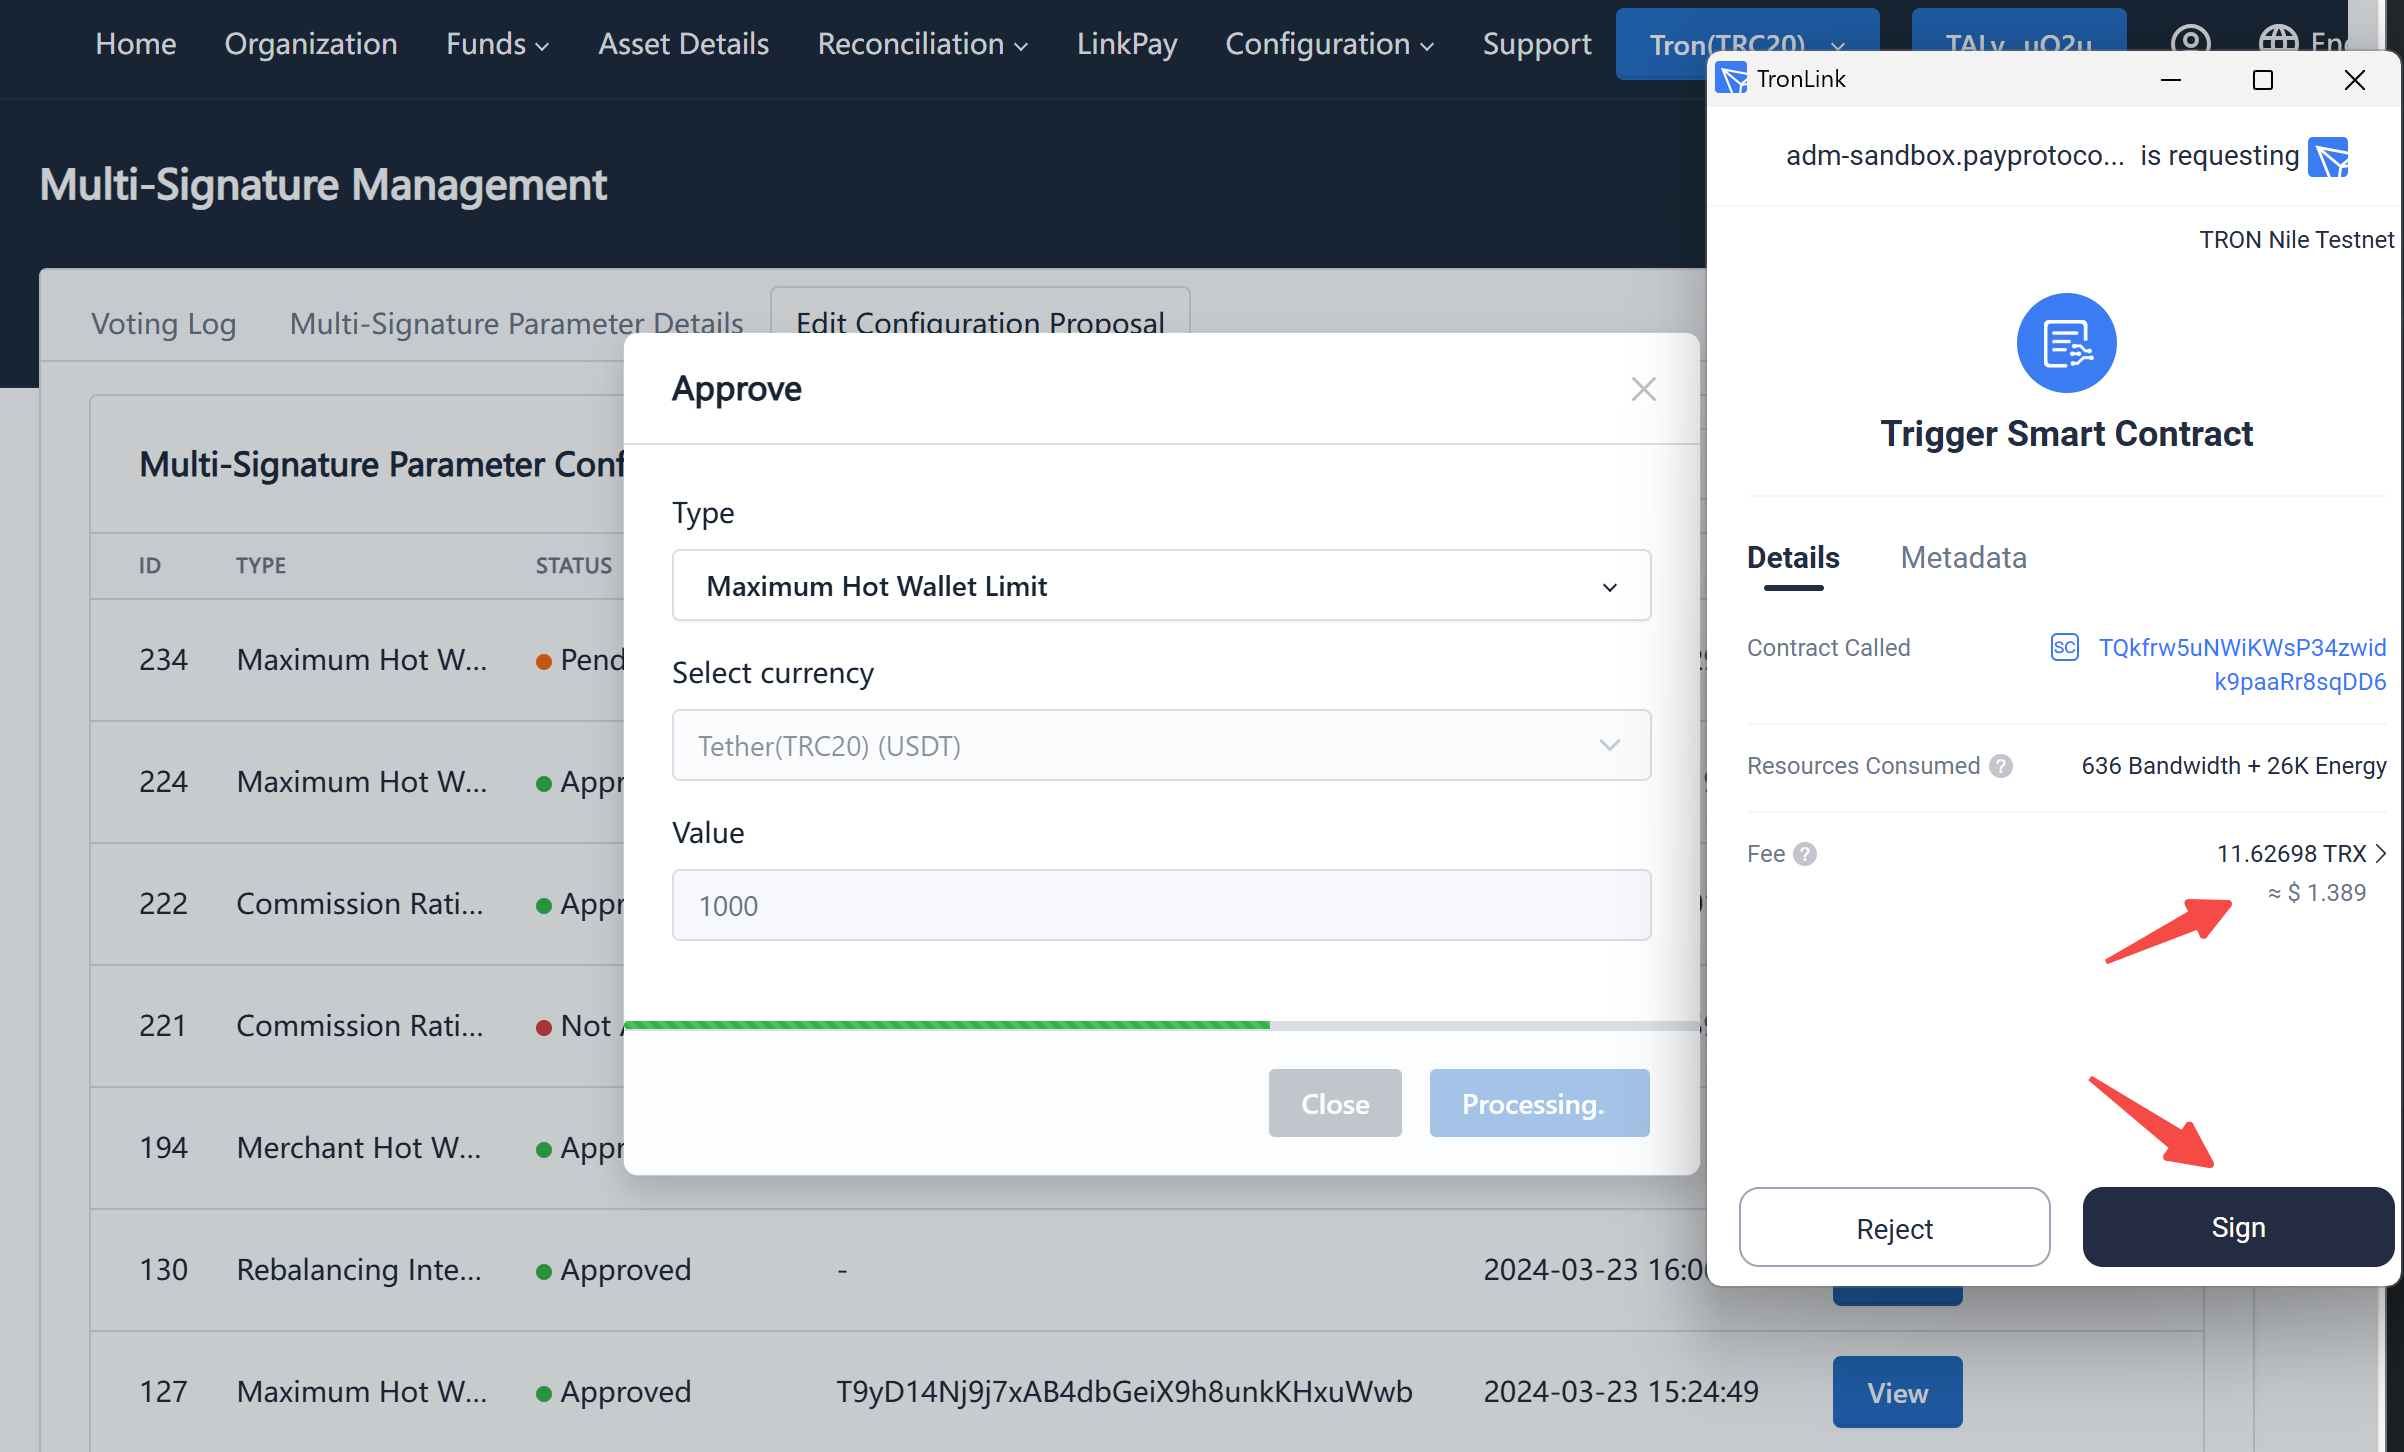
Click on "Connect Wallet" and switch to the correct wallet address, then click on the "Sign" button. The security tool will perform a secondary verification of the multisig parameters and display the message for signing. You can compare this message with the signature content displayed in the wallet's signature window, and after confirming its accuracy, proceed with the signing:
-
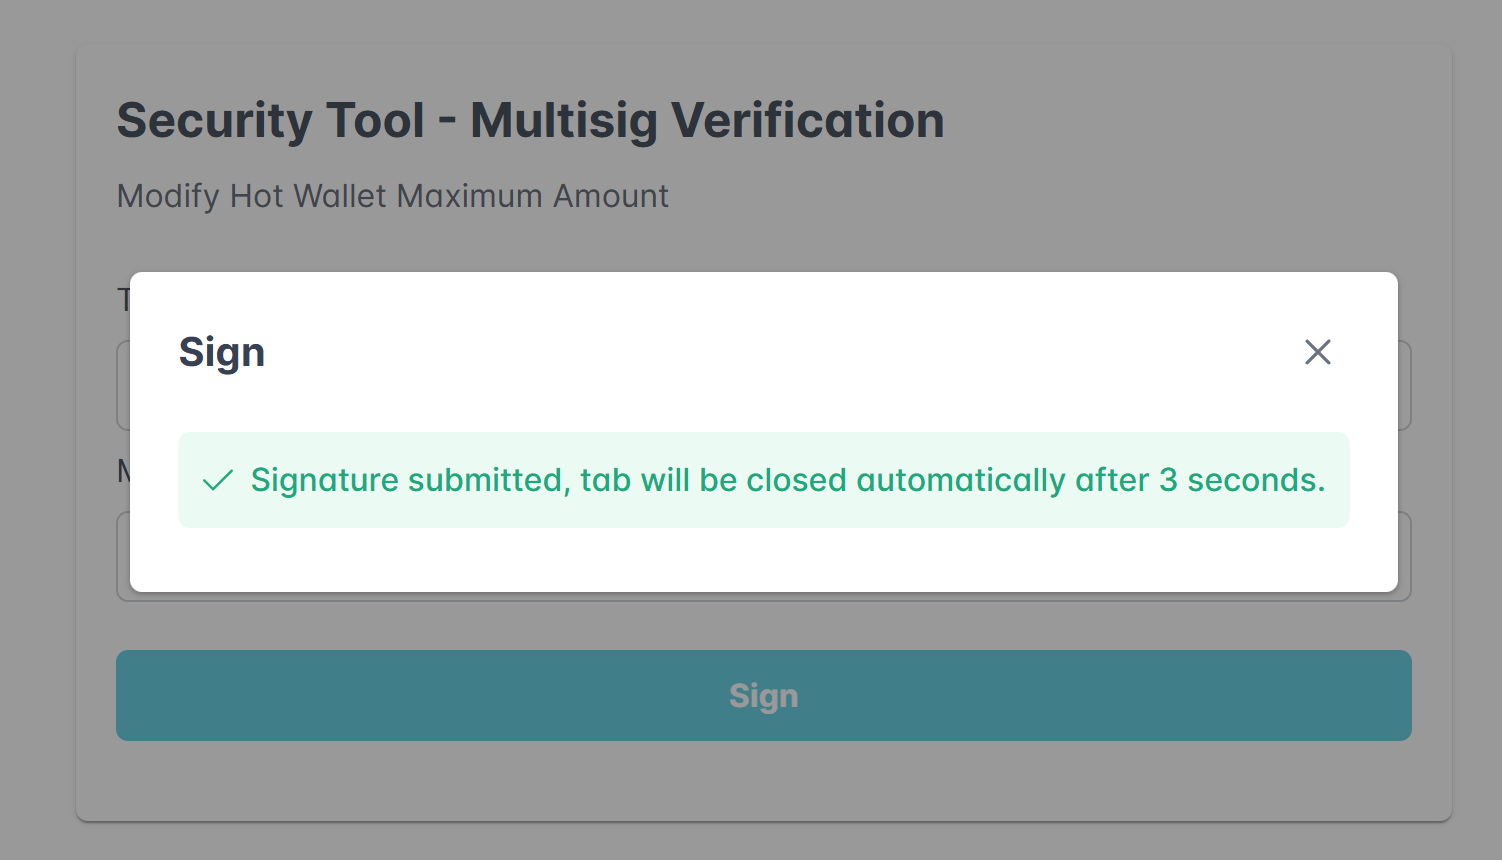
After the signature submission is successful, there will be a prompt, and the security tool page will automatically close and return to the Pay Protocol admin console. You can see the submitted proposal on the "Multi-Signature Management" page:
-
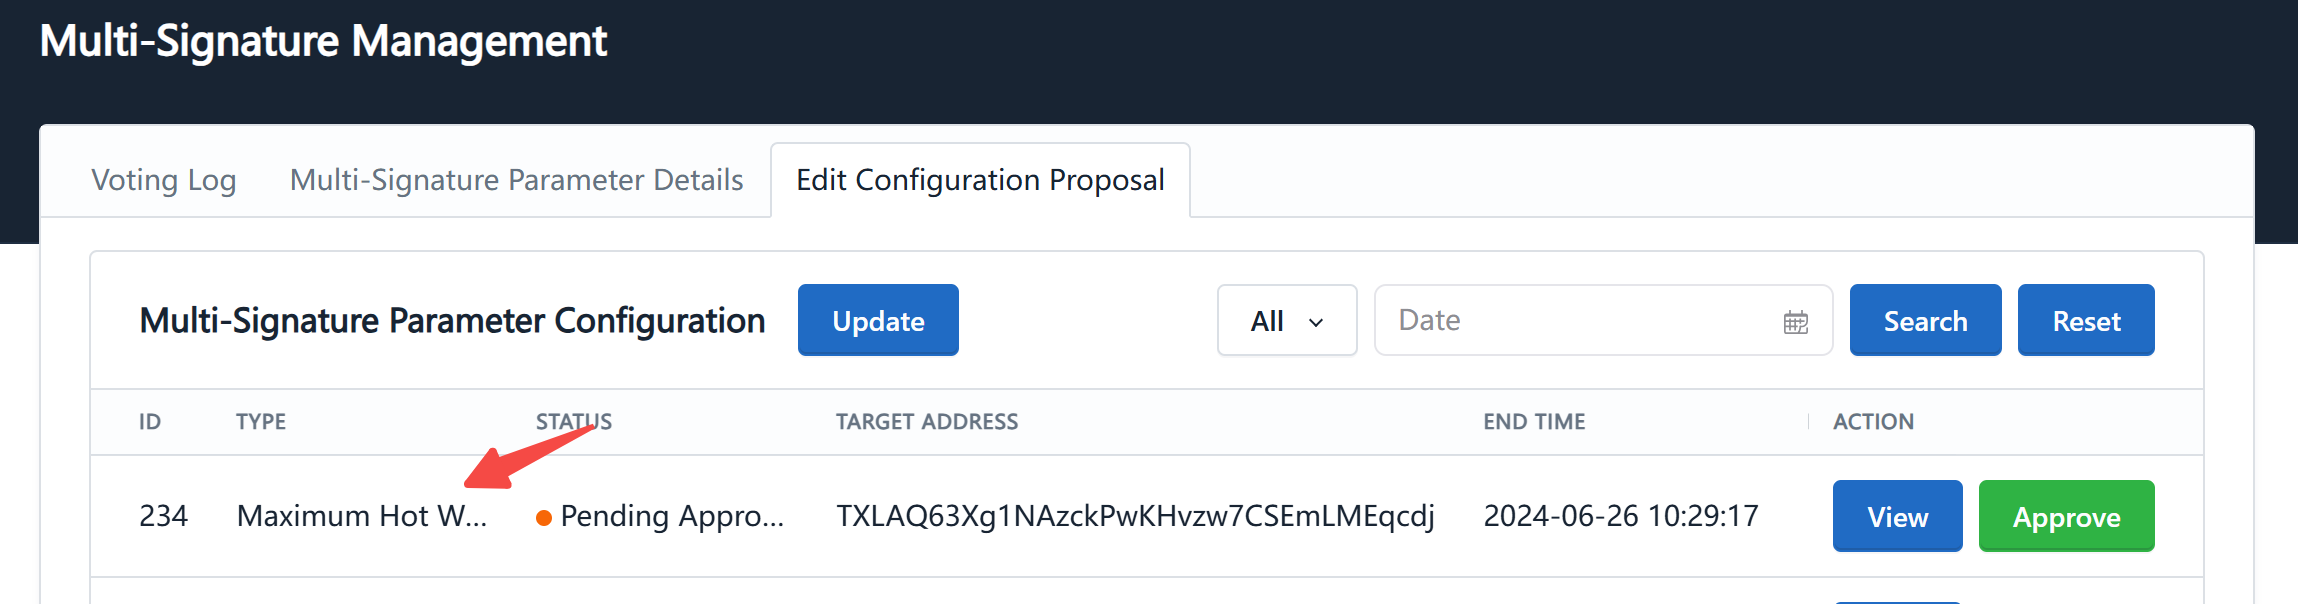
Other executives log in to the Pay Protocol admin console and review and approve this proposal on the multisig management page:
 warning
Each proposal has a valid time. If the approval is not completed within the valid time, the proposal will expire. If the proposal expires, you need to initiate a new proposal.
The approval of a proposal requires the required number of signatures according to the multisig requirement.
The valid time of a proposal and the required number of signatures (which is actually the number of contract administrators * voting approval ratio rounded up) can be viewed on the "Multi-Signature Parameter Details" tab or modified through a proposal.
-
During the approval process, signatures are also required on the security tool page. After collecting the required number of signatures, the proposal needs to be submitted to the chain by the last signer:
 info
infoSubmitting to the chain requires a certain amount of transaction fee. If your wallet does not have enough balance, you can reject the submission first, then transfer enough balance into the wallet, and then click the approval button again to submit. Alternatively, you can use a wallet with sufficient balance from an executive to perform the broadcasting operation without initiating a new proposal.
-
After the proposal is submitted to the chain, you need to wait for confirmation from the blockchain network. Once confirmed, you can see the status of the proposal on the multisig management page:


-
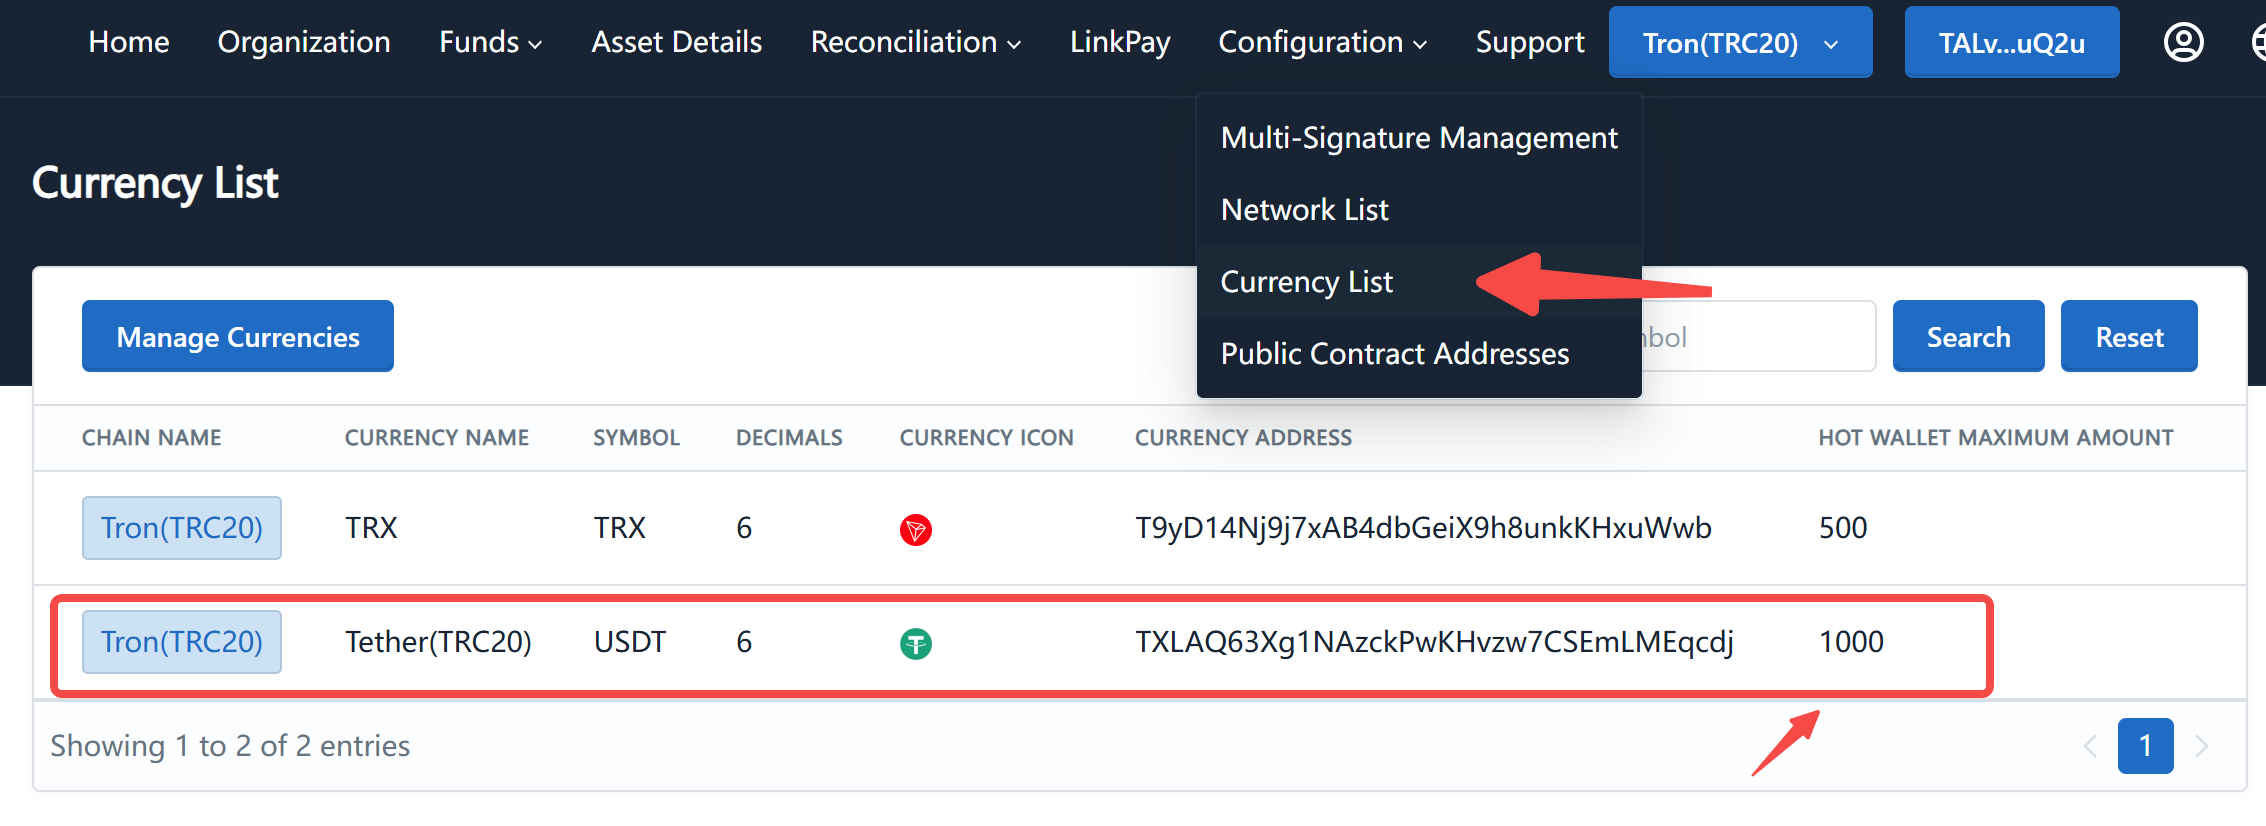
After successfully modifying the maximum limit, merchants can see the modified hot wallet limit on the "Configuration" - "Currency List" page:
Manage Members with Multisig
PRO merchants can add or remove executives and treasurers using multisig; STD merchants can add or remove executives, and the finance wallet address (i.e., the hot wallet address) can be replaced using multisig through "Modify Hot Wallet Address".
This section will explain how to manage members using multisig, taking the example of adding an executive. The process for adding treasurers and deleting members is similar.
-
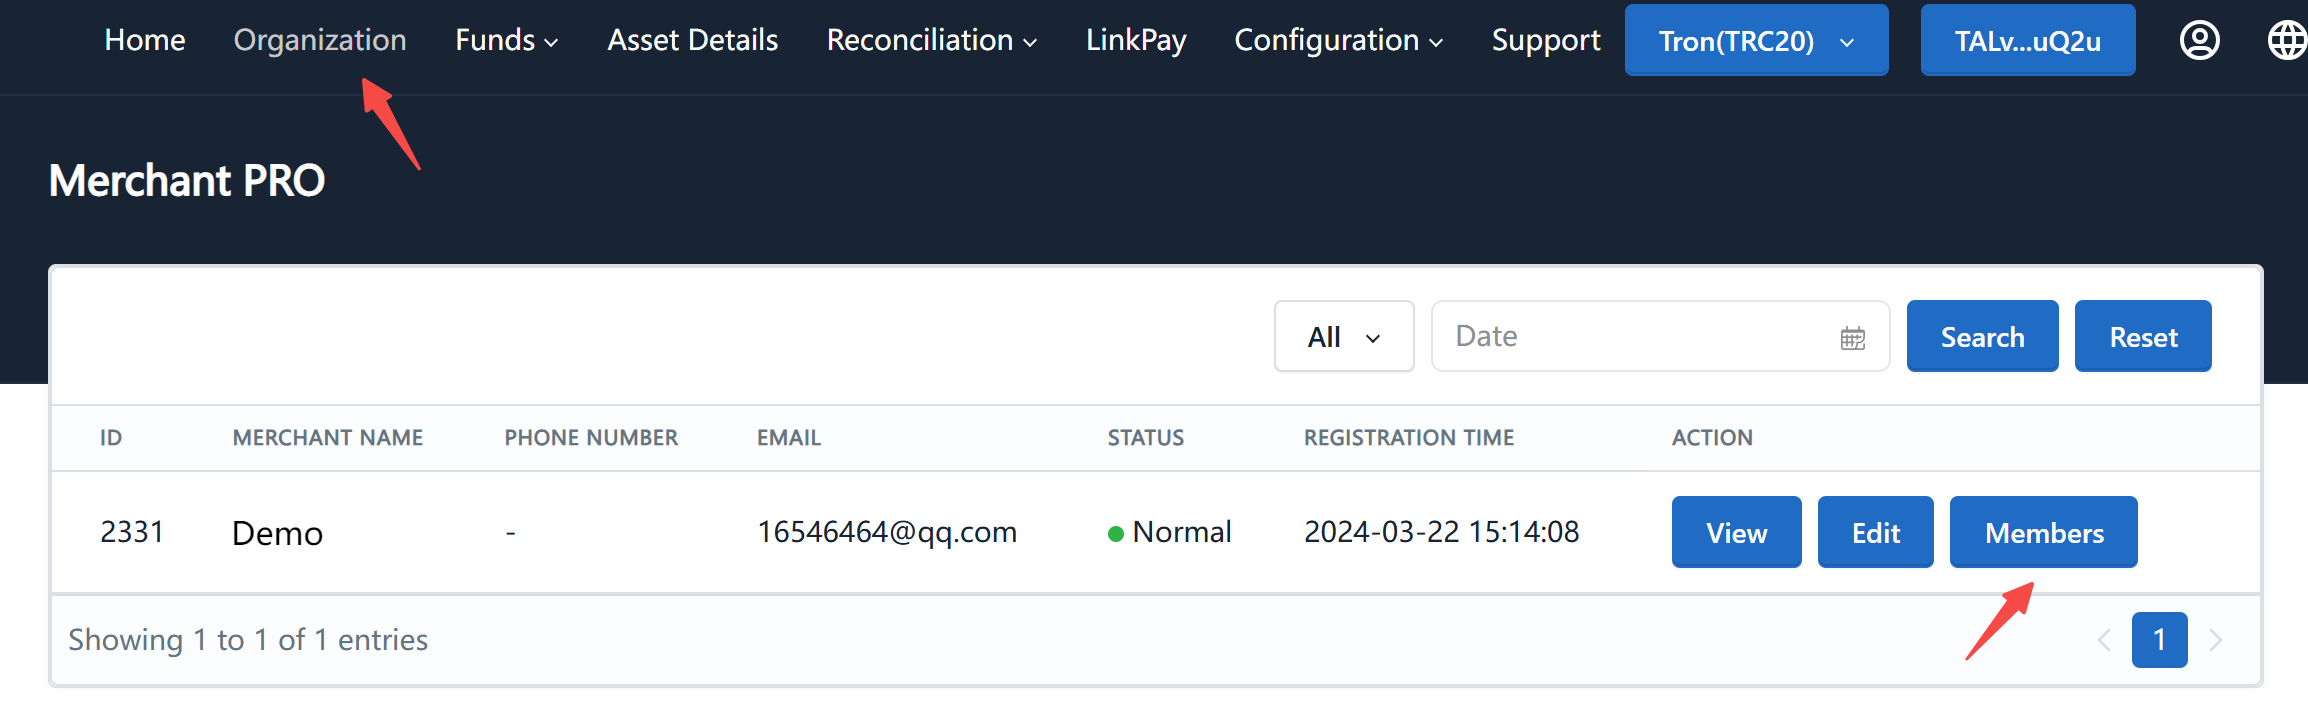
Log in to the Pay Protocol admin console using the executive wallet, click on the "Organization"-"Members" page:
-
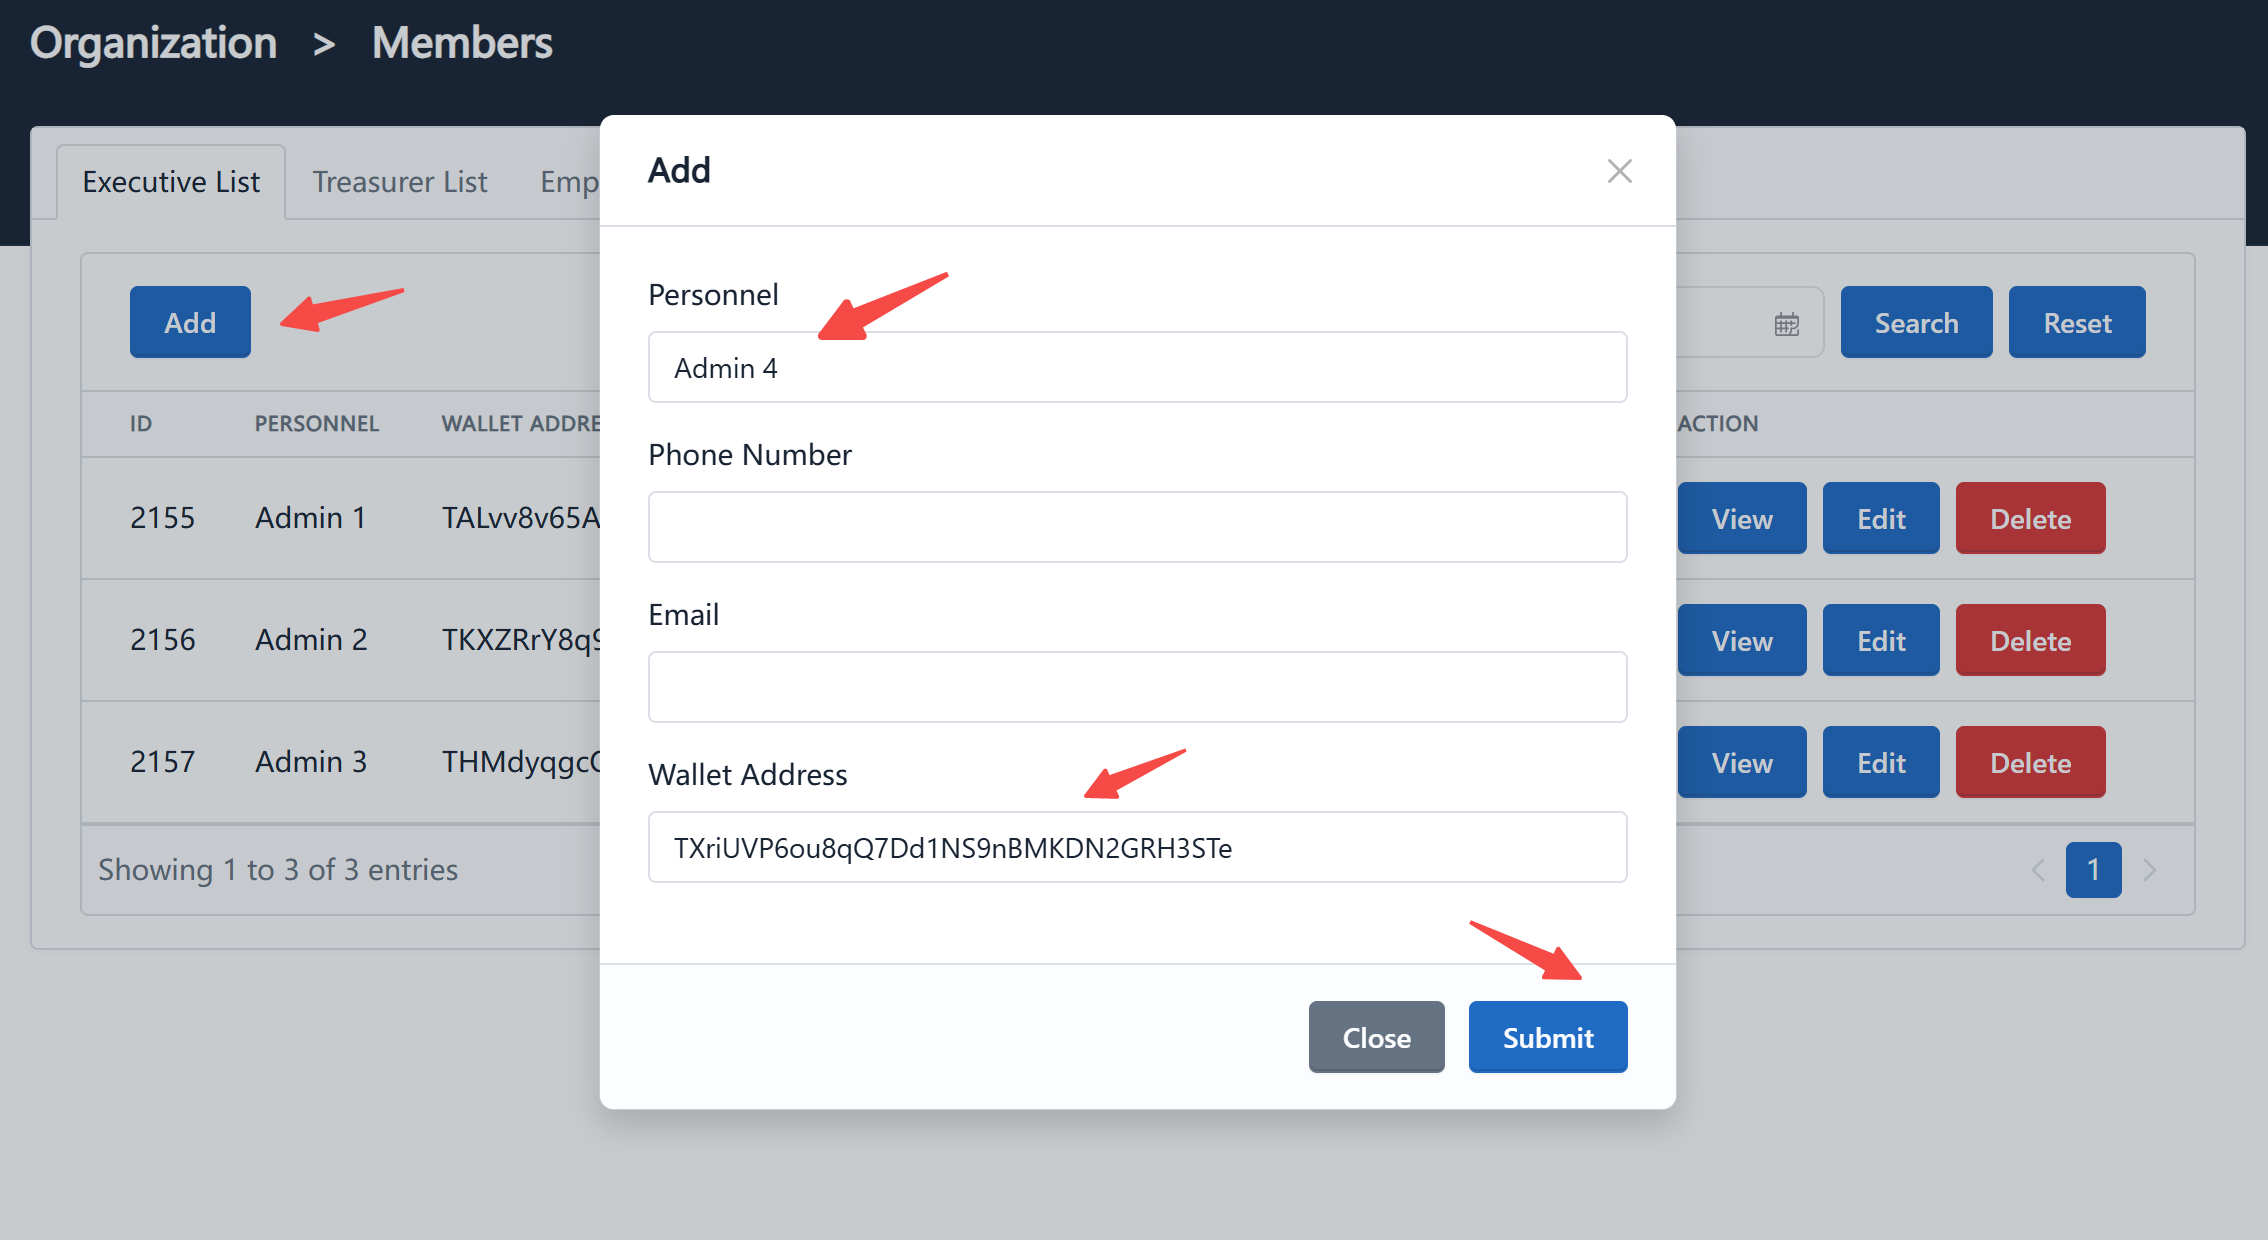
Click on the "Add" button, enter the information of the executive to be added and the wallet address, and click "Submit":
-
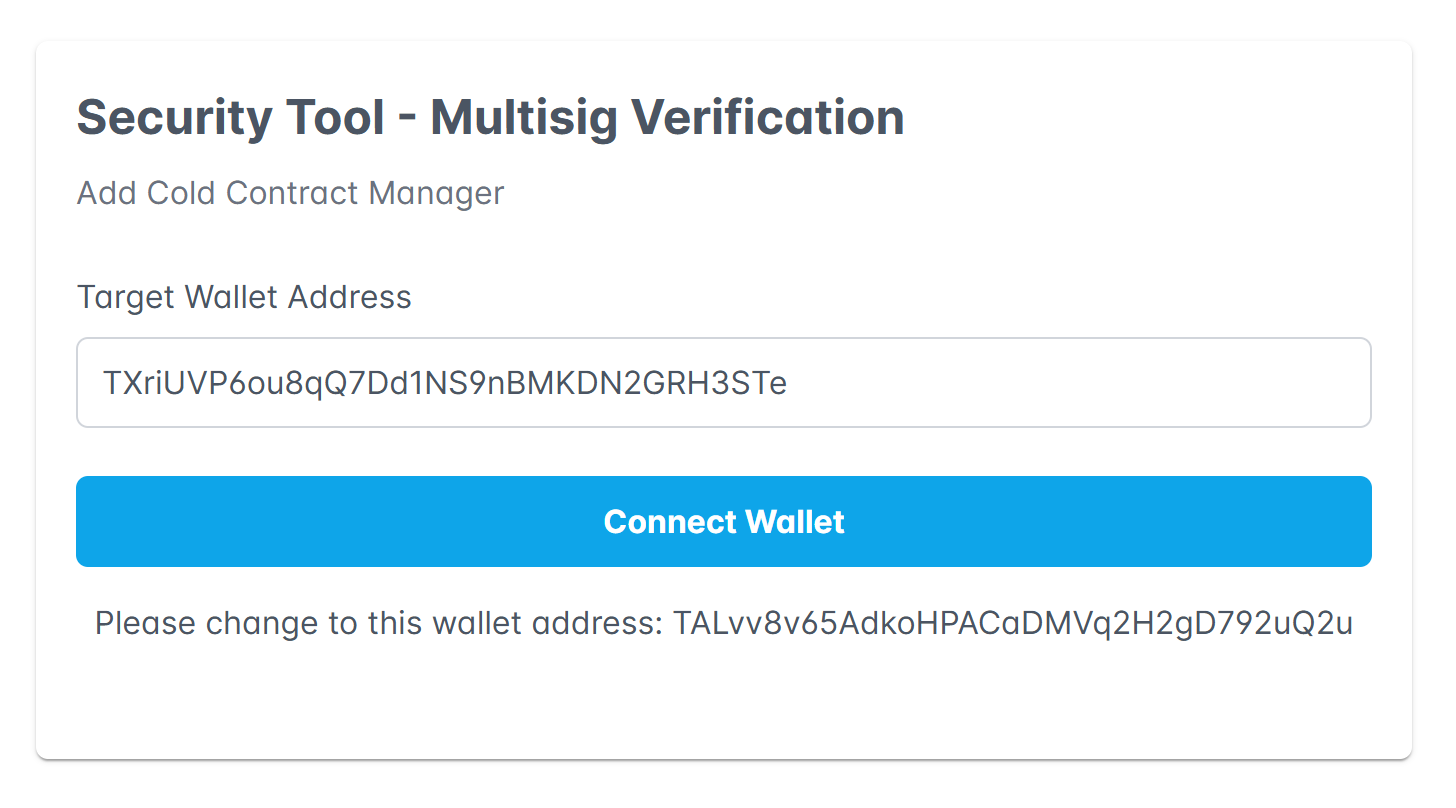
You will be redirected to the security tool page to perform the signing operation:
-
After the proposal is successfully submitted, other executives can log in to the Pay Protocol admin console and view and approve the proposal on the same page:

-
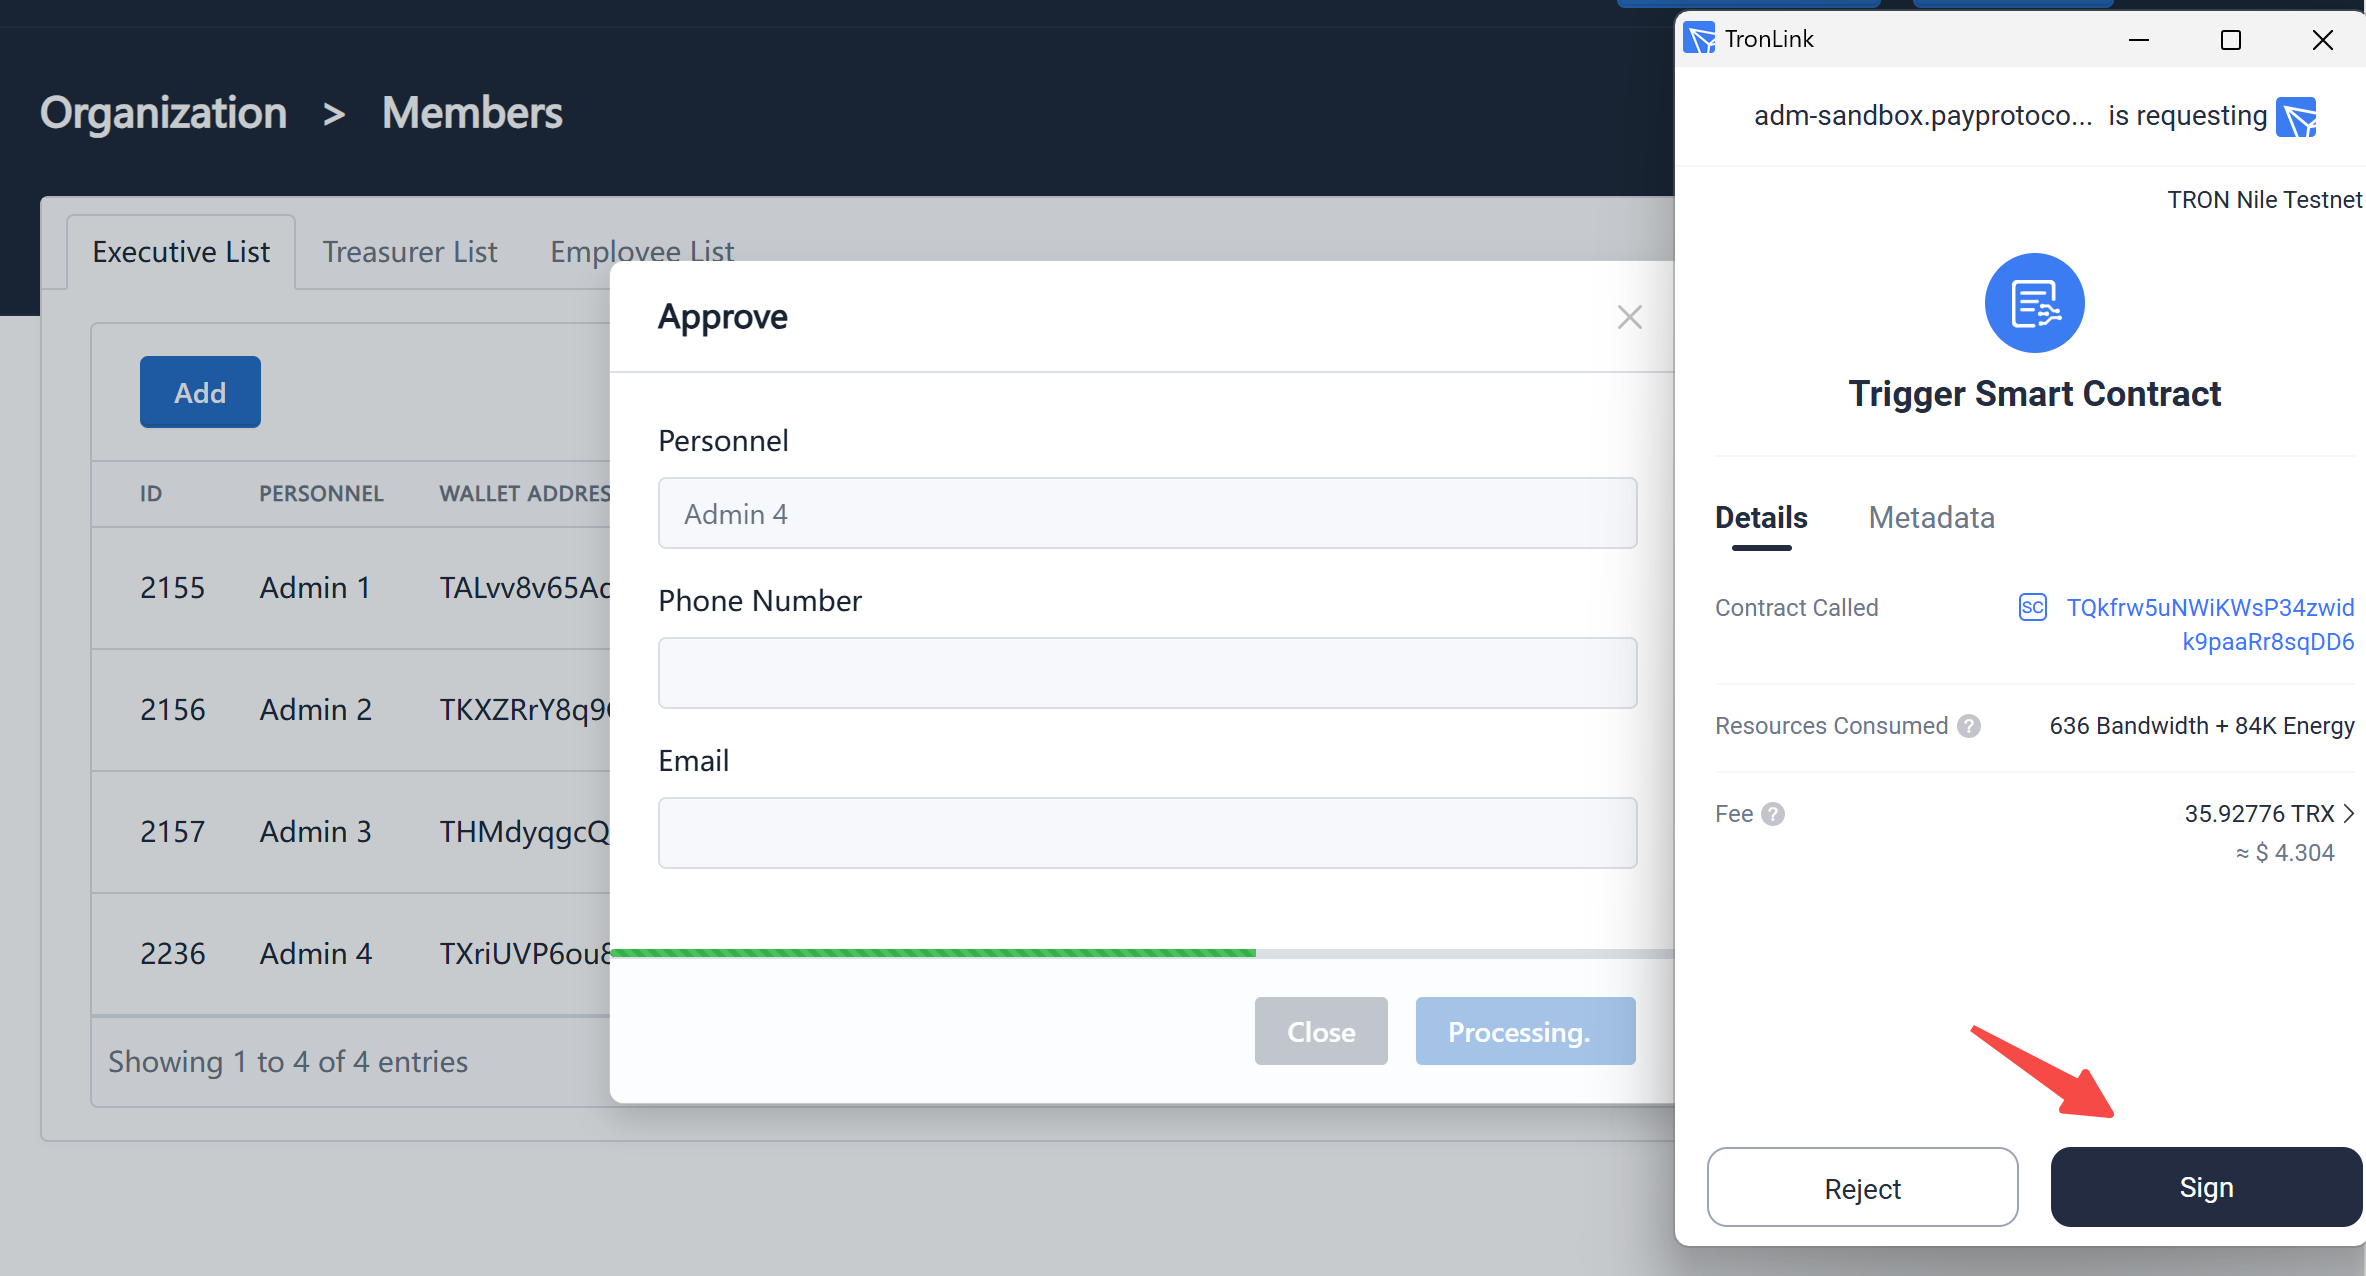
During the approval process, signatures are also required on the security tool page. After collecting the required number of signatures, the last signer among the executives needs to submit the proposal to the chain:
-
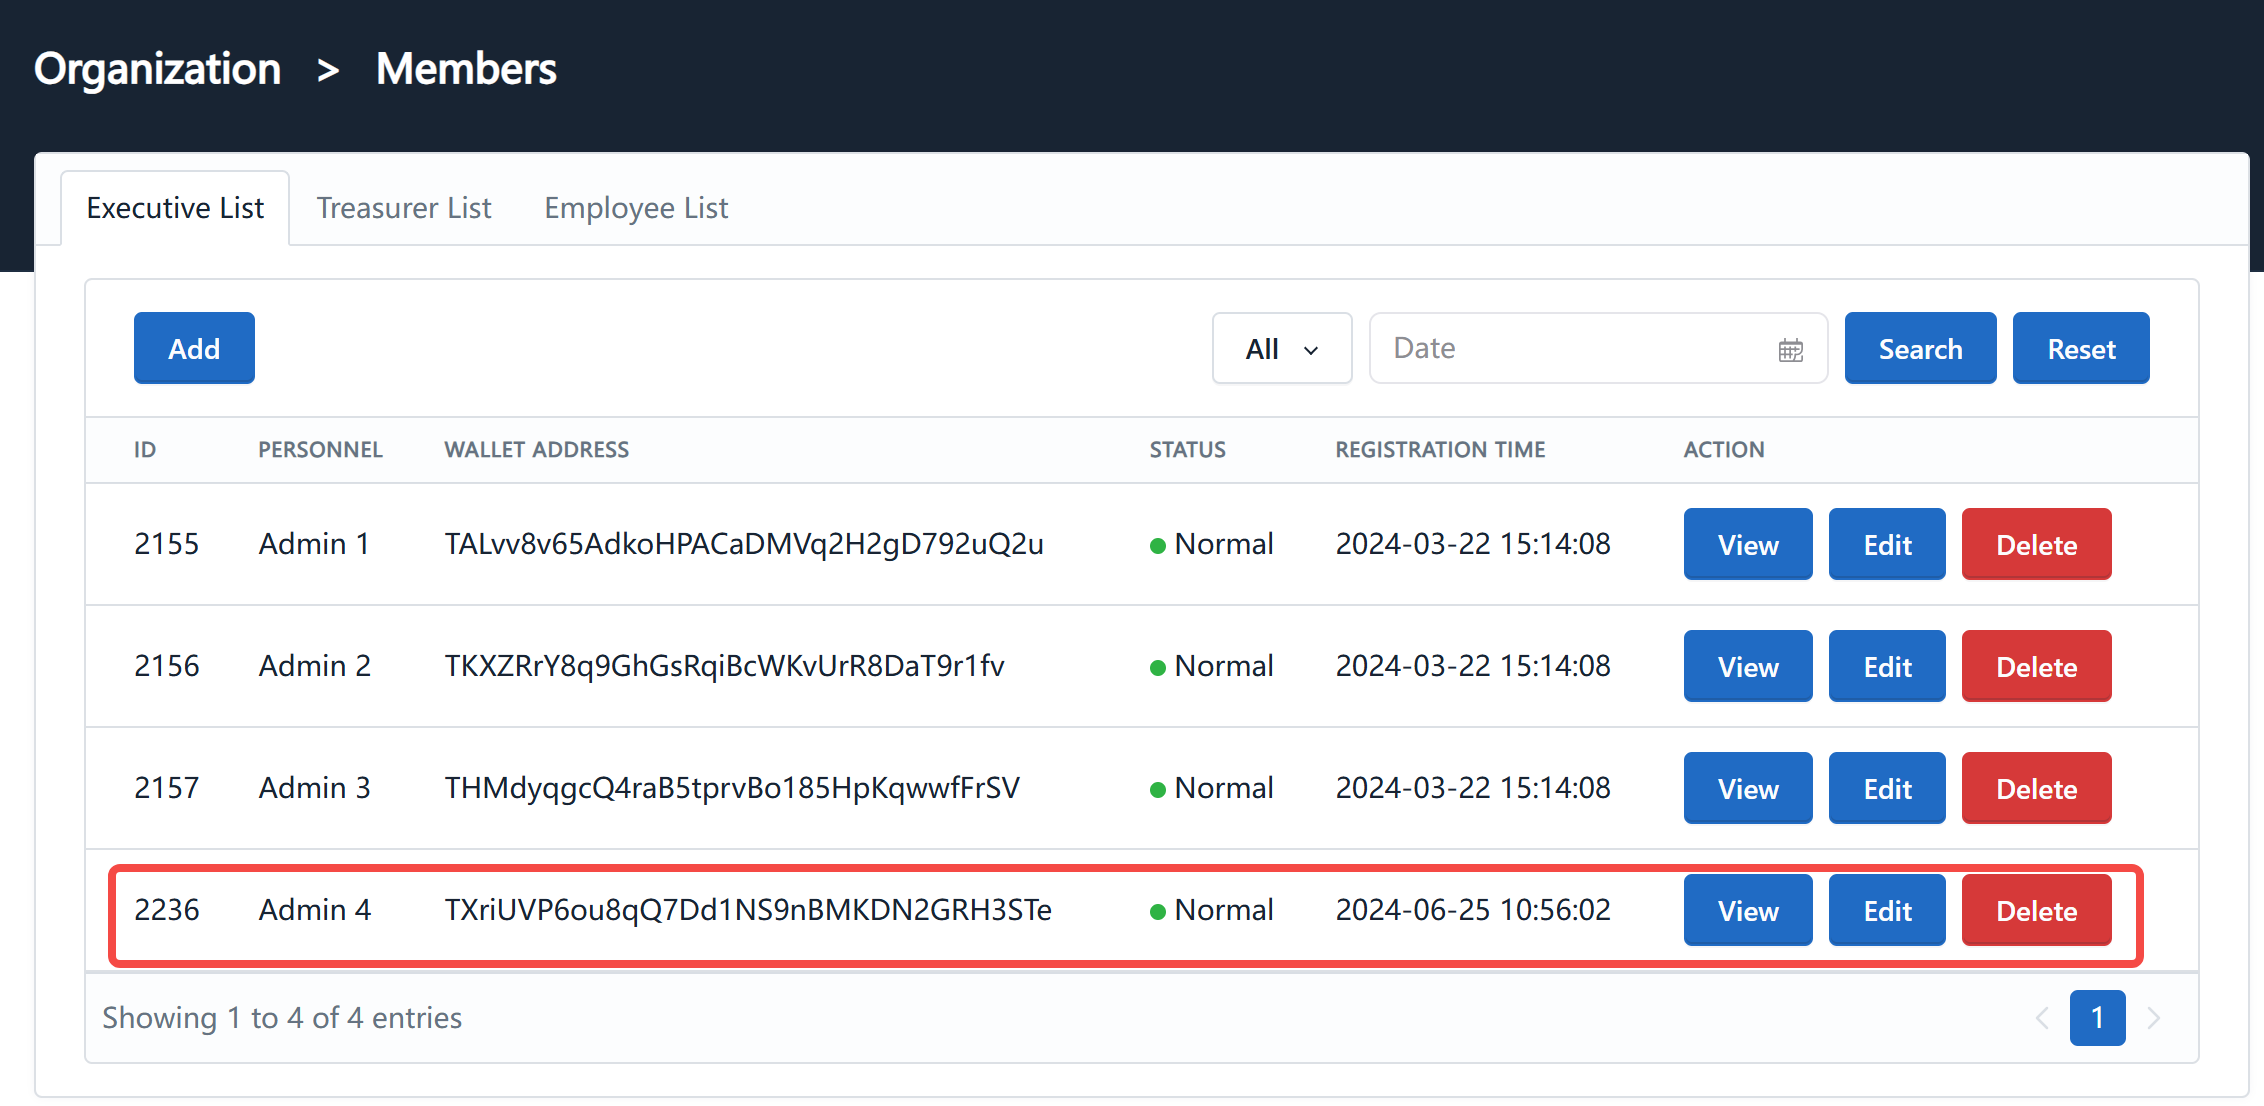
Wait for confirmation from the blockchain network. Once confirmed, the newly added executive can use the wallet address to log in to the system:
 info
infoThe process of deleting members is similar to adding members, except that you need to click the "Delete" button on the member list and then proceed with multisig approval.
Note:
- Because the number of executives has changed, the required number of votes for multisig will also change, which needs to be confirmed on the multisig parameter details page.
- The minimum number of executives is 3, and the minimum number of treasurers for PRO merchants is 2.
Multisig Transfer
Only PRO merchants' transfer, withdrawal, and refund operations require multisig approval. STD and LITE merchants directly transfer funds from the currently logged-in wallet address.
This section will explain how to transfer funds using multisig, using the example of a PRO merchant transfer.
-
Log in to the Pay Protocol admin console using a treasurer wallet, click on the "Fund Management"-"Transfer" page in the navigation bar:
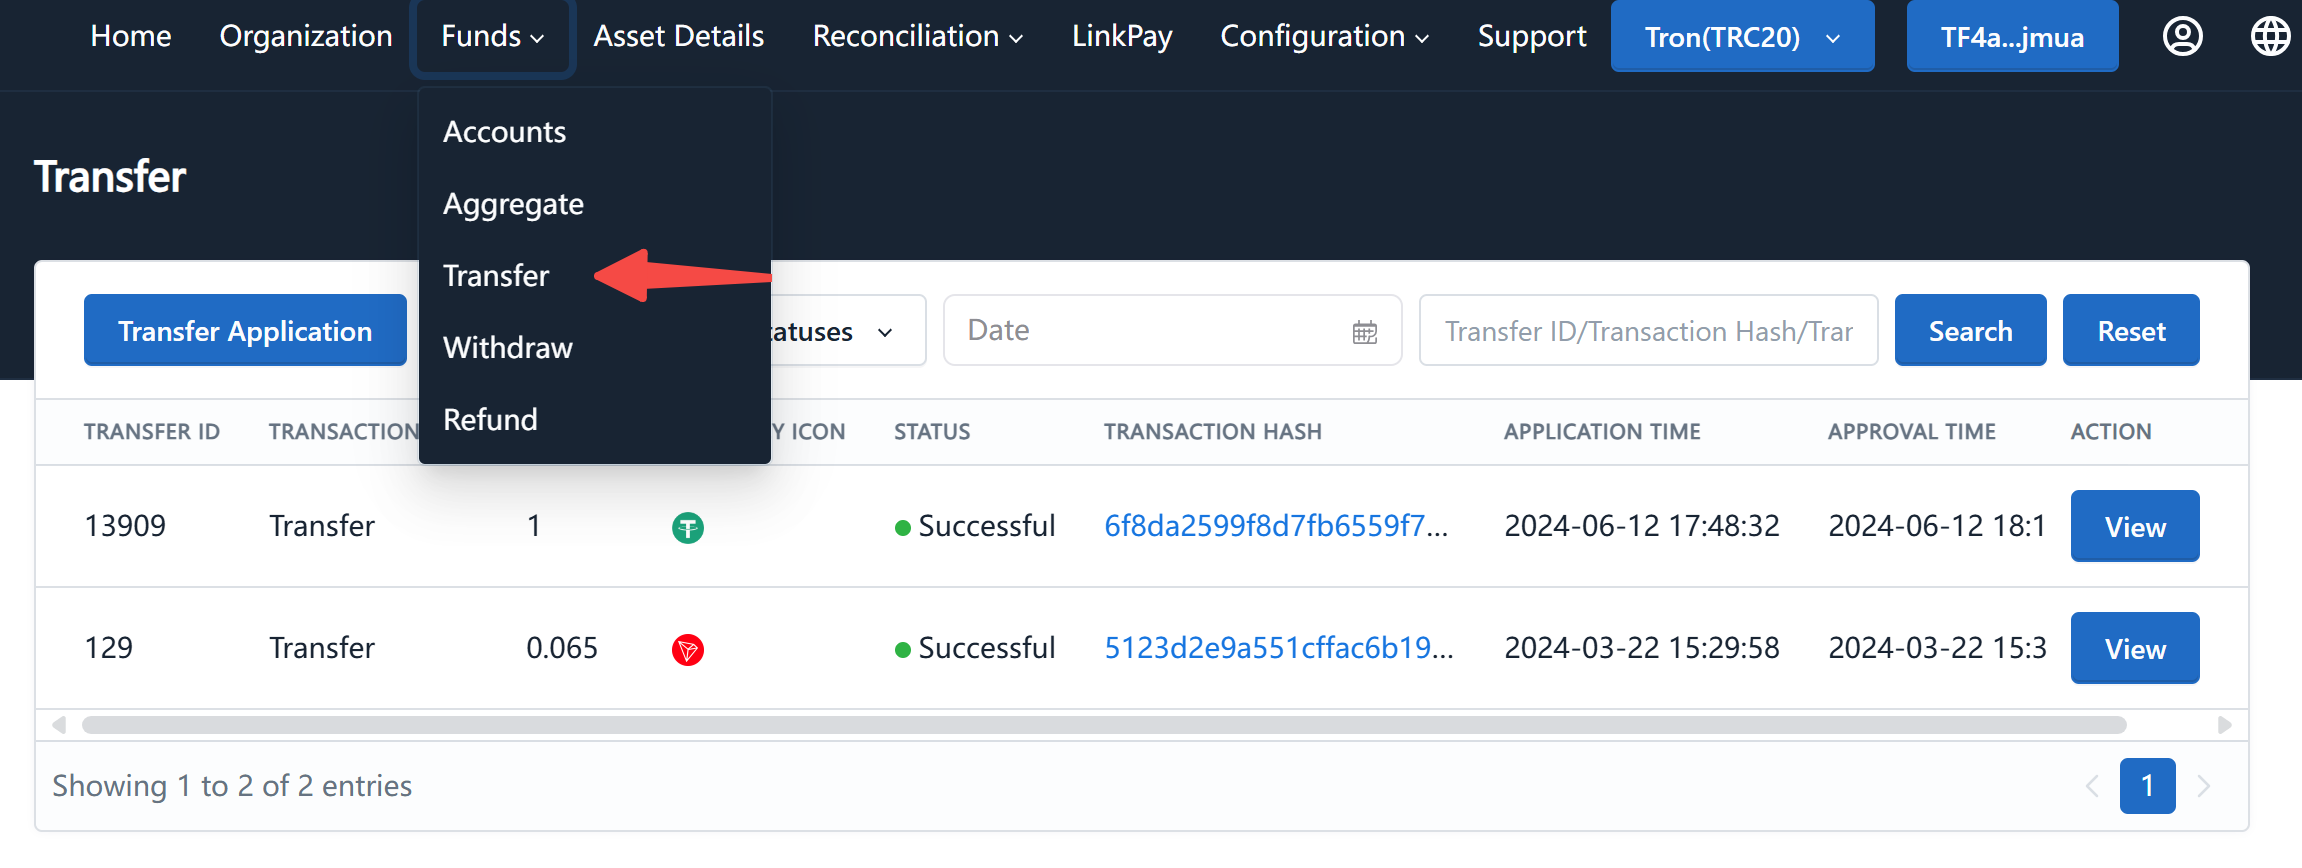
-
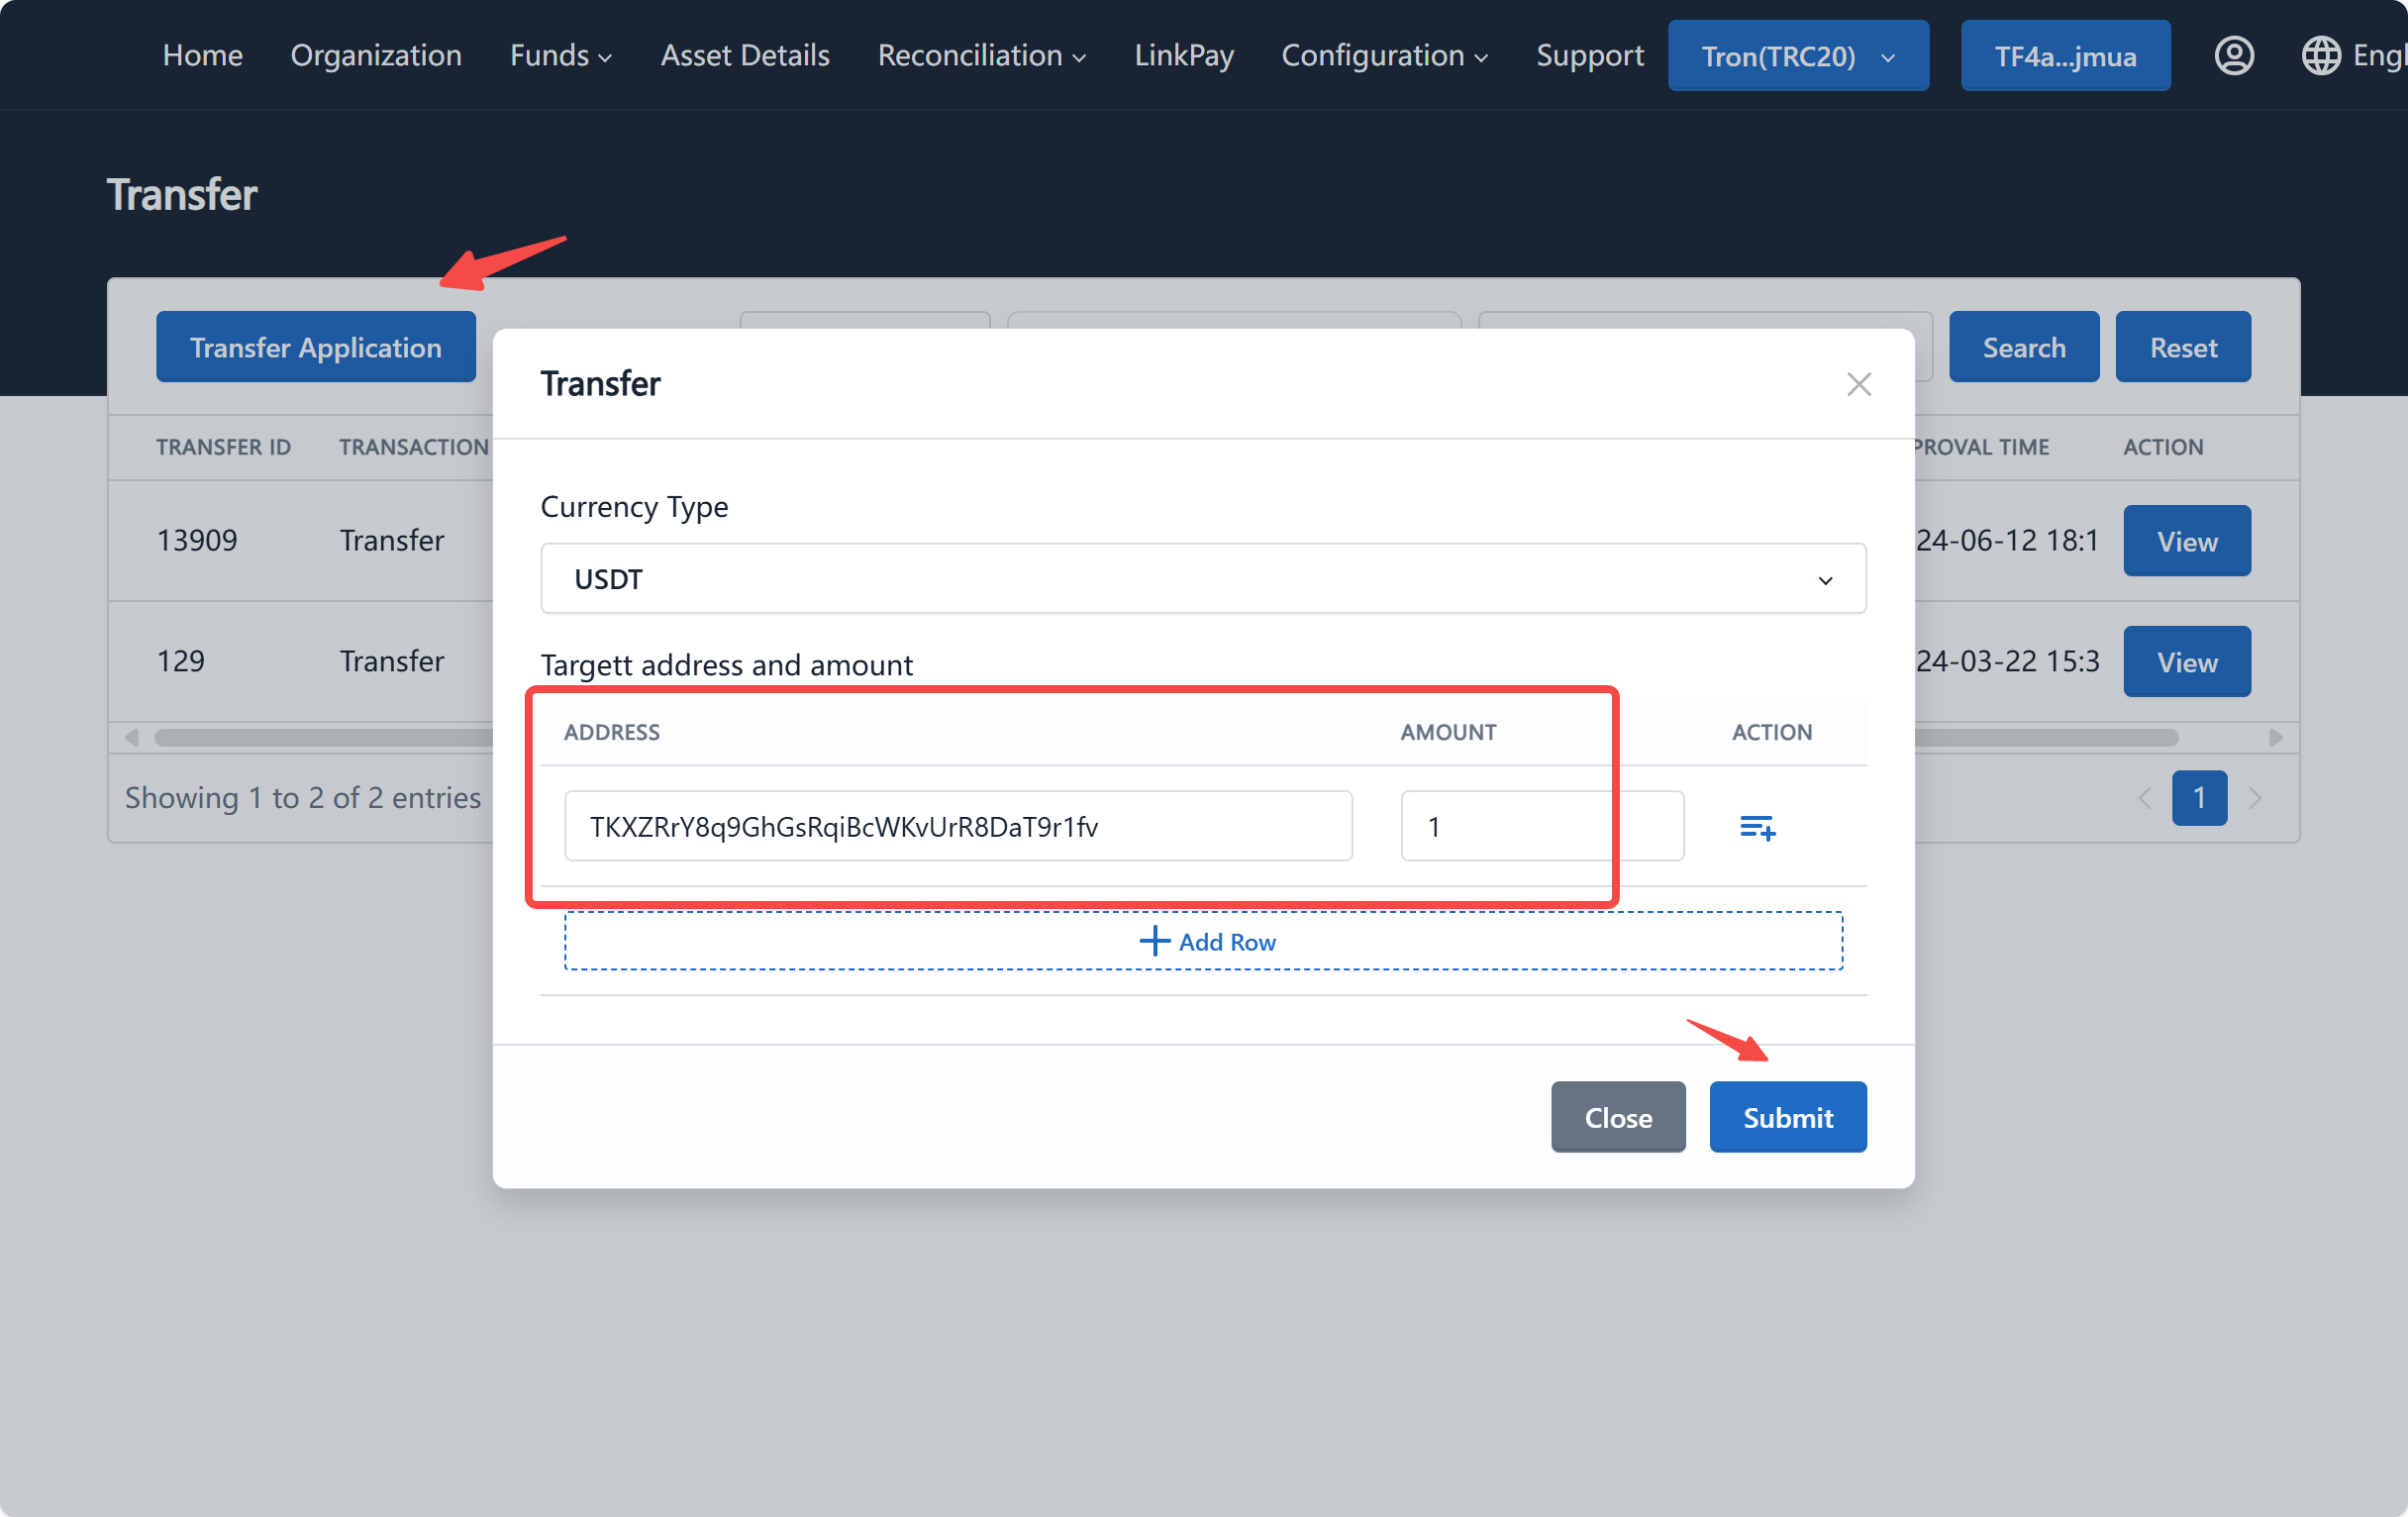
Click on the "Transfer Application" button, select the currency for transfer, enter the transfer amount and the recipient's wallet address, and click "Submit":
 tip
tipThe total transfer amount cannot exceed the balance of the hot wallet.
Multiple addresses and amounts can be transferred in a single transfer for a single currency.
-
Click on "Confirm Proposal" on the transfer list for approval:

-
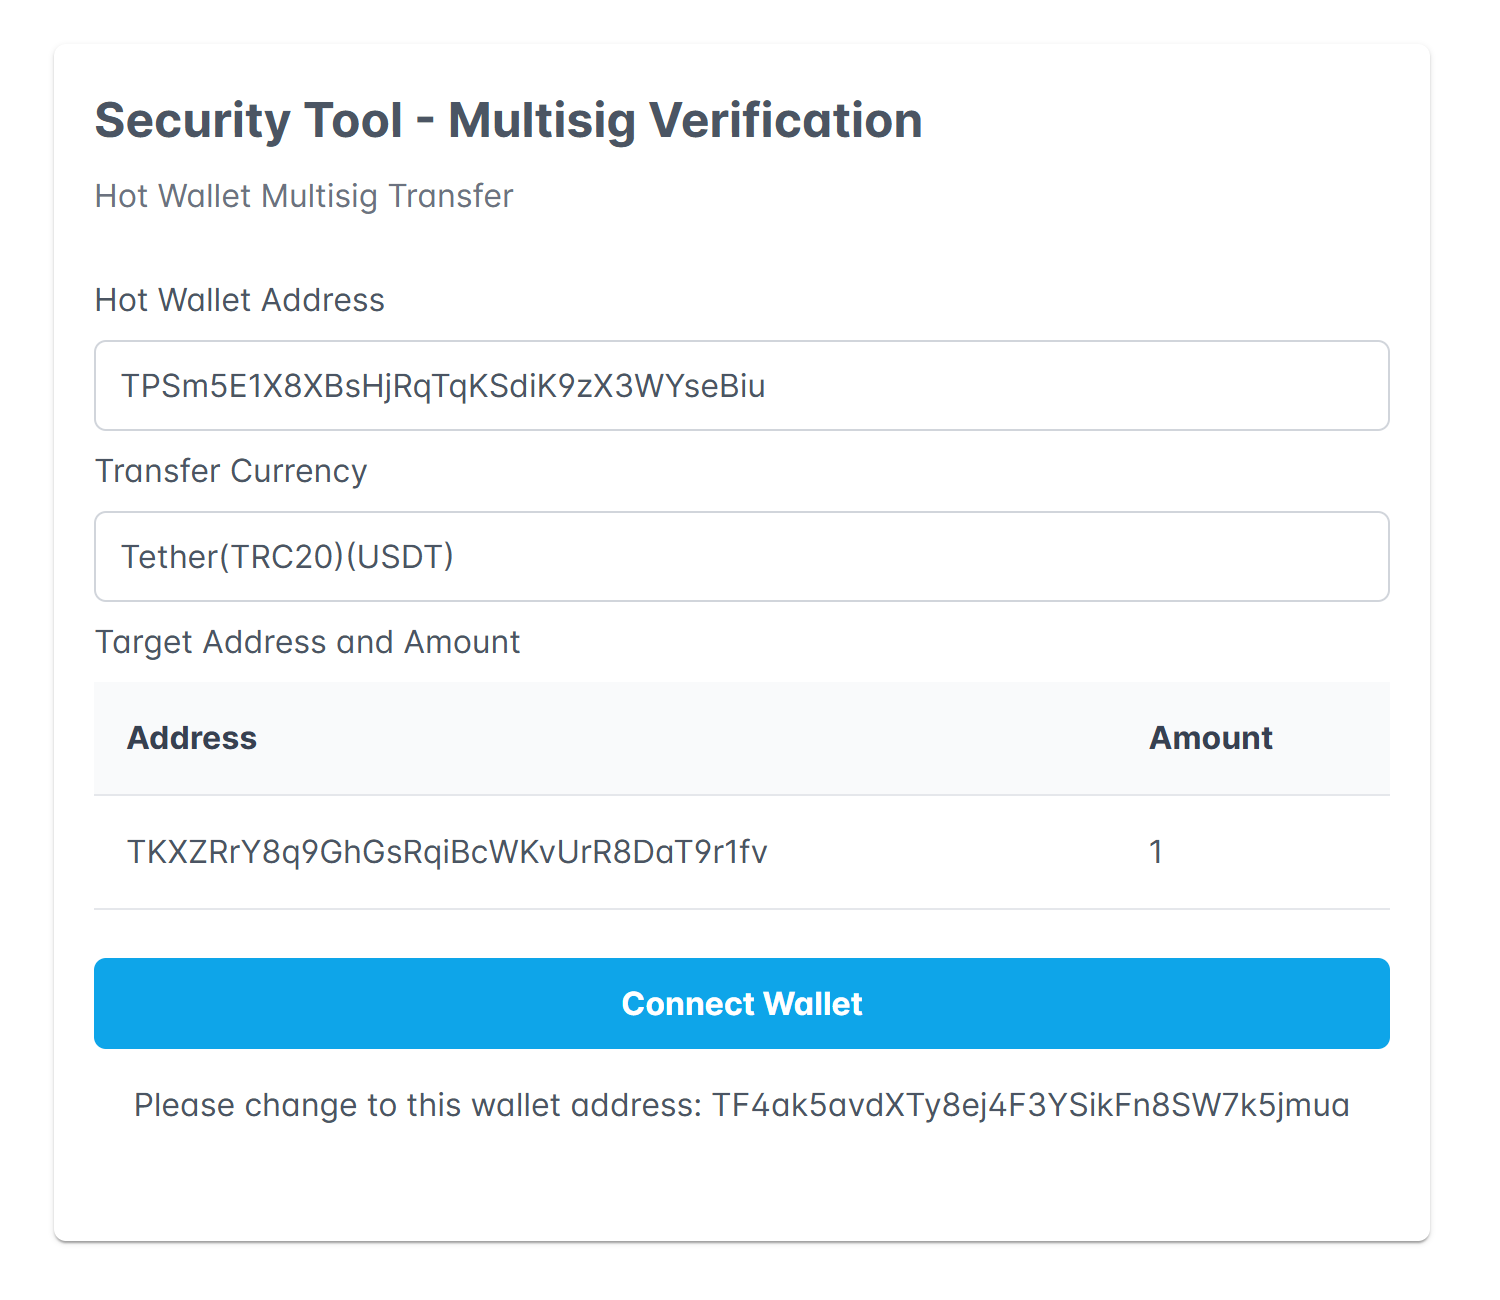
After clicking "Submit", you will be redirected to the security tool page. Confirm the transfer address and amount, and then proceed with the signing operation:
-
After the initiator's approval, other treasurer log in to the Pay Protocol admin console and view and approve the proposal on the same page:

-
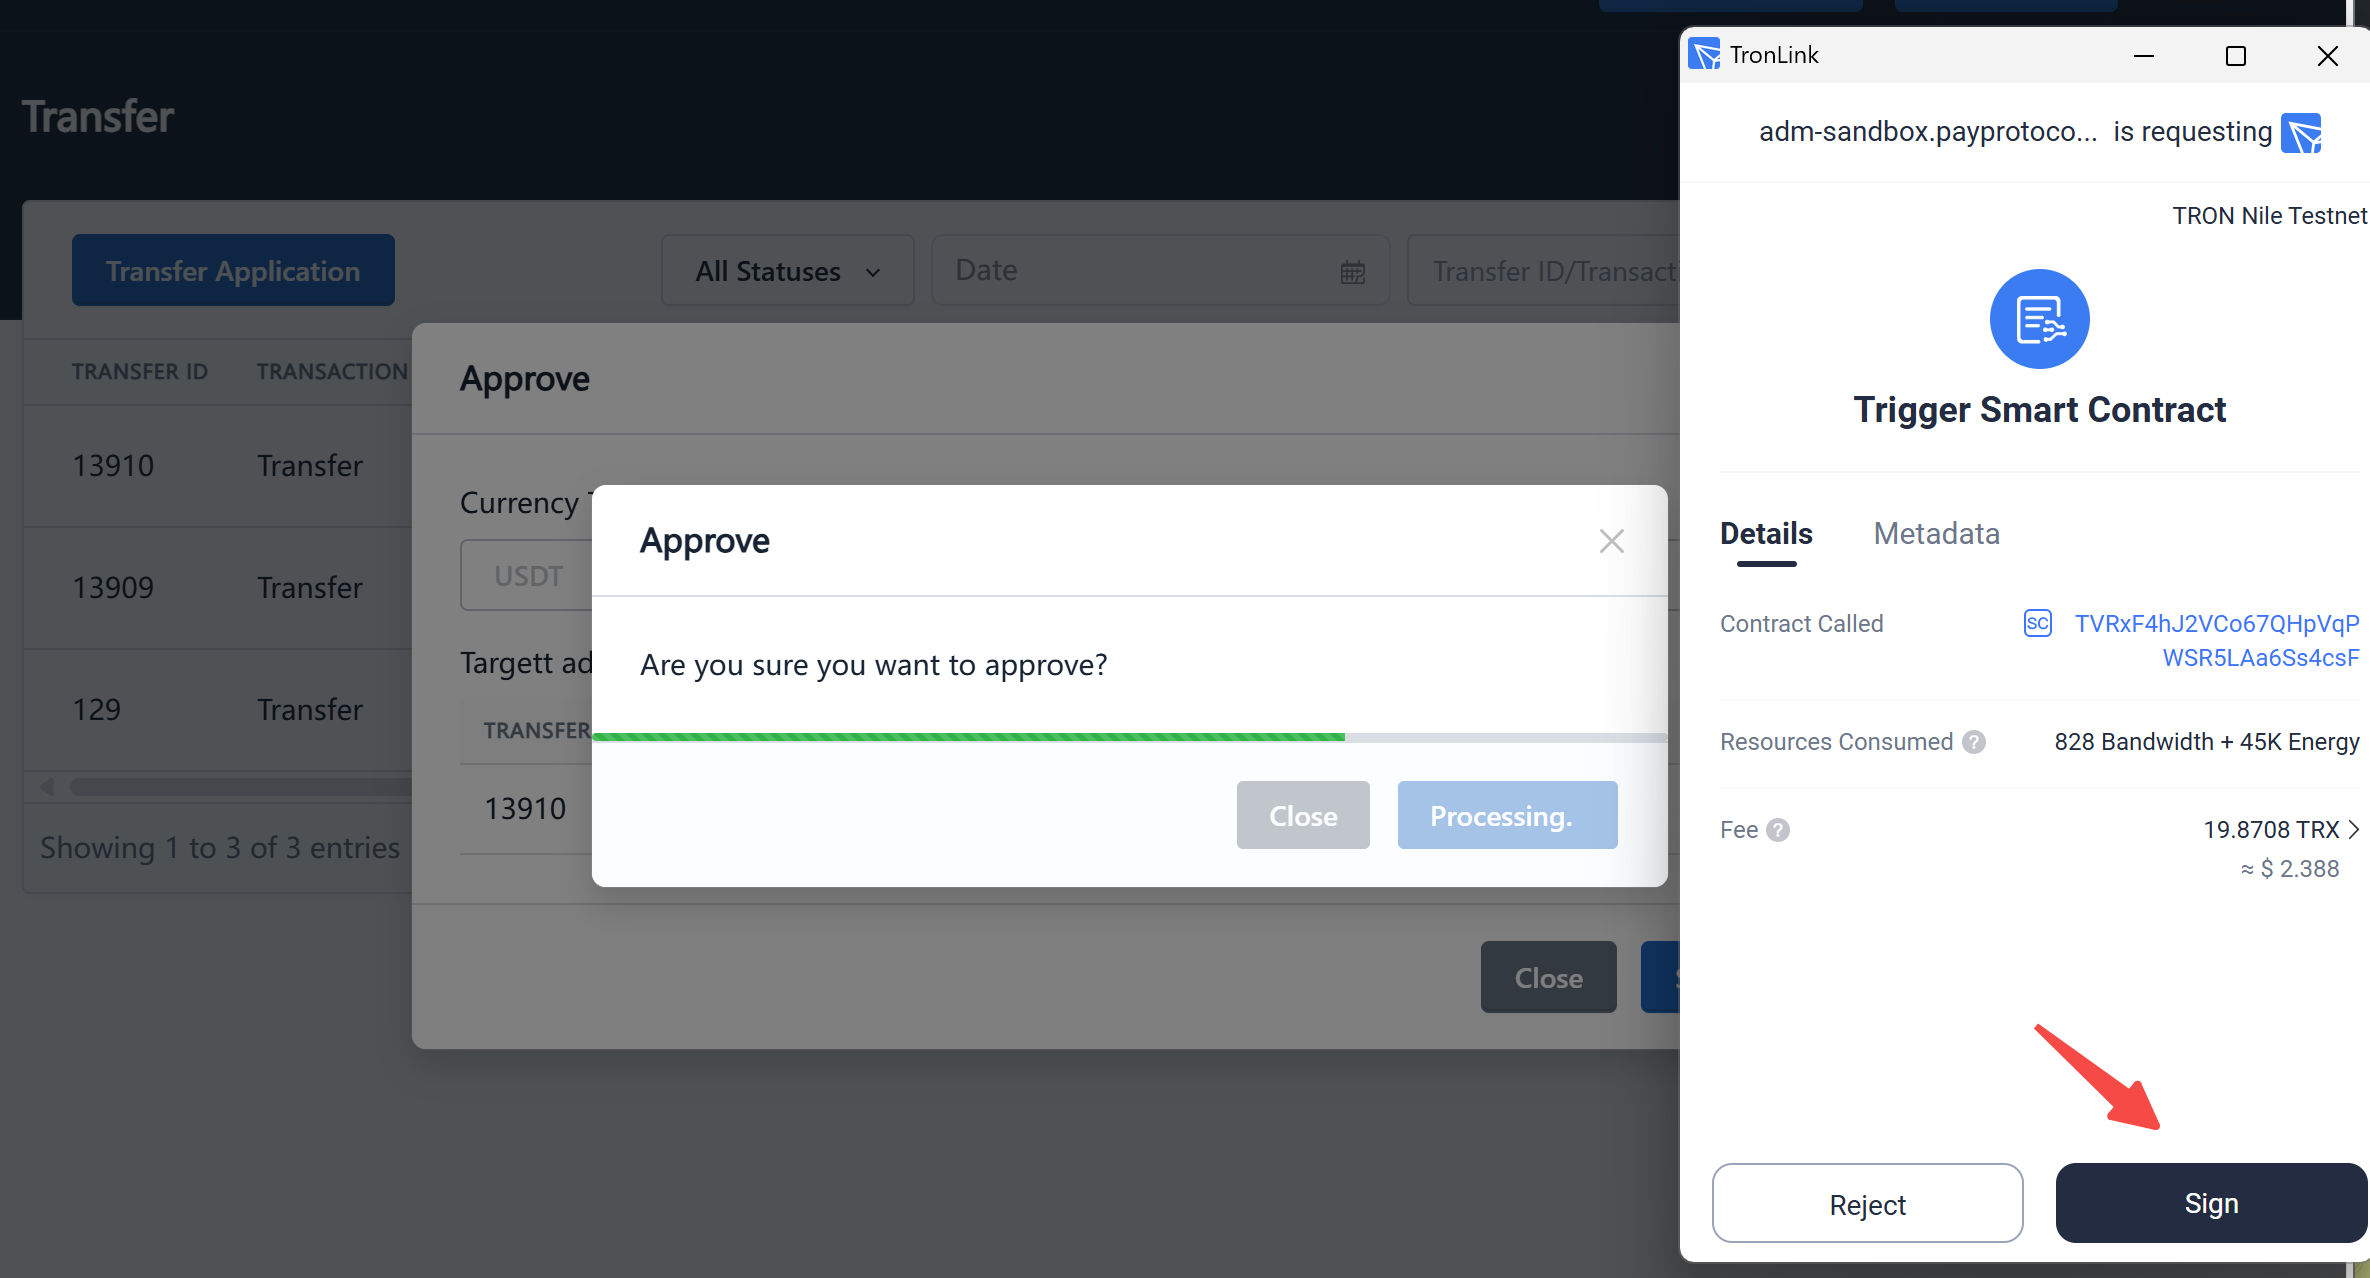
During the approval process, signatures are also required on the security tool page. After collecting the required number of signatures, the last signer among the finance personnel needs to submit the proposal to the chain:
-
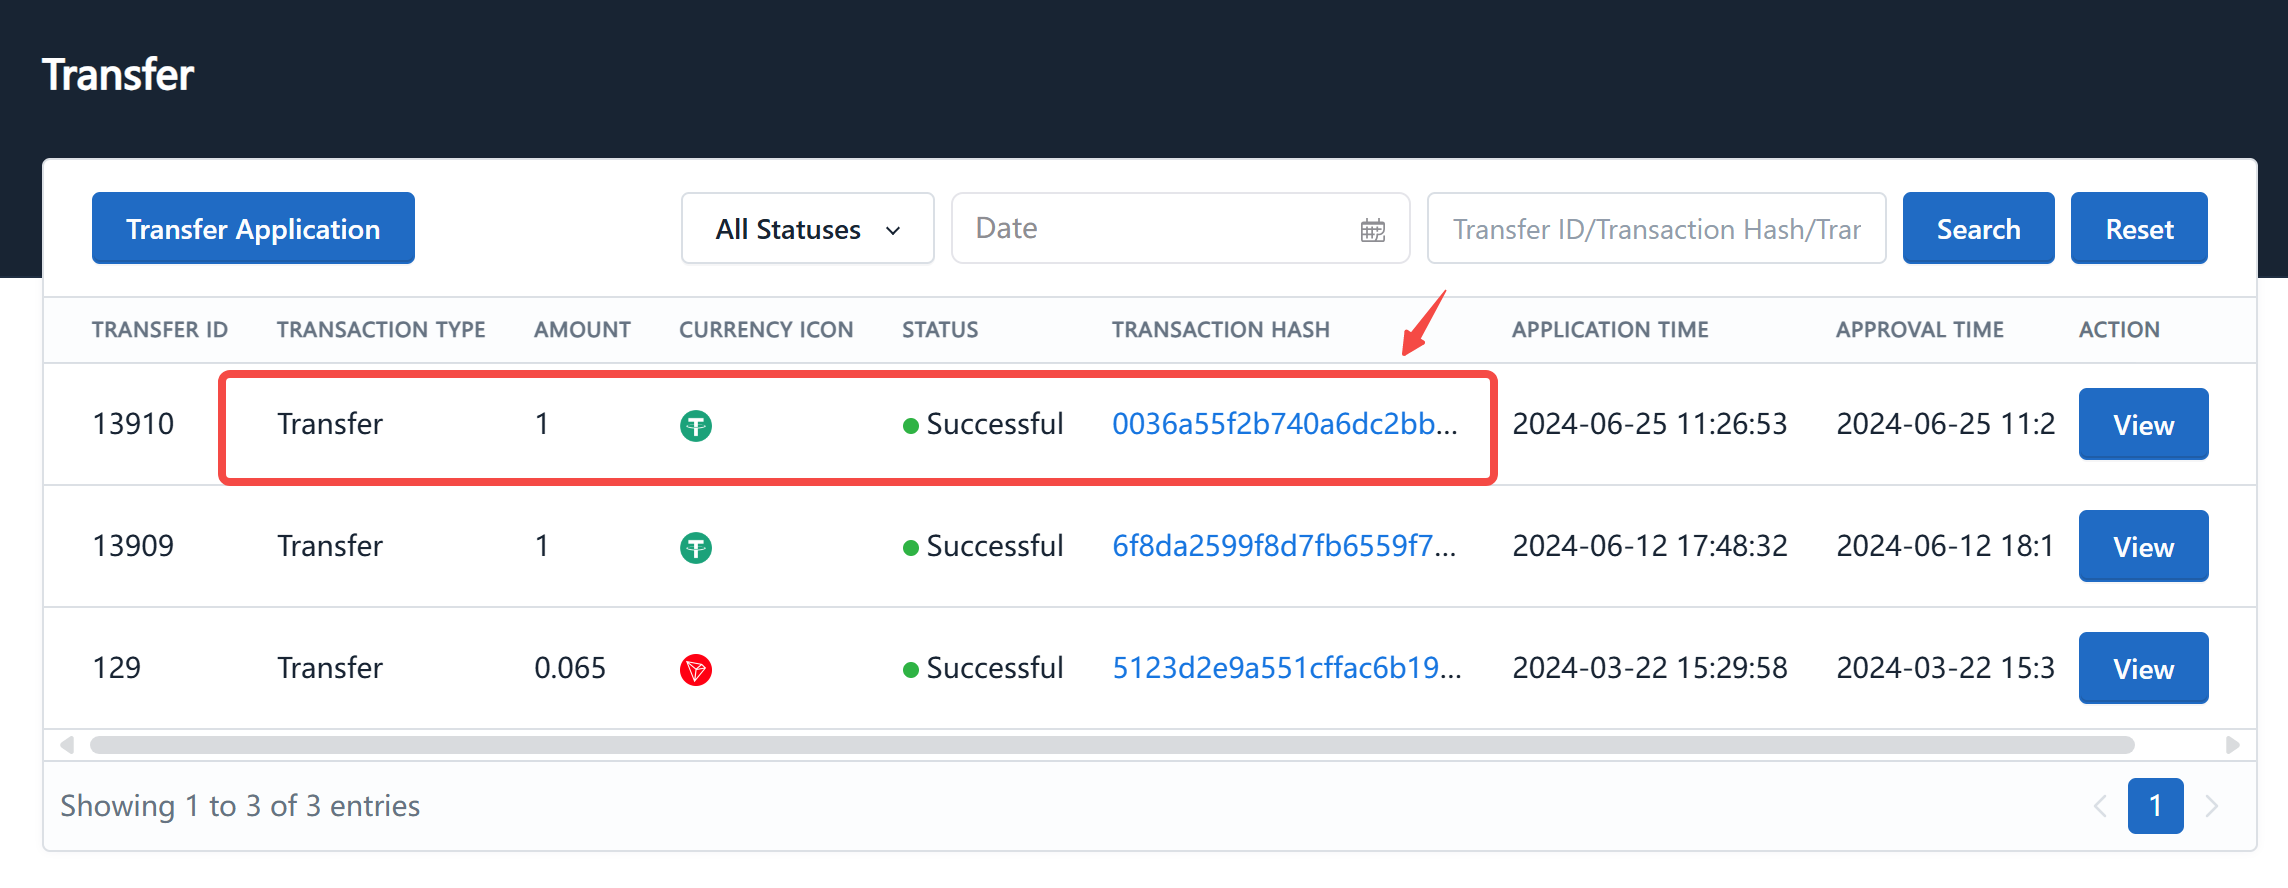
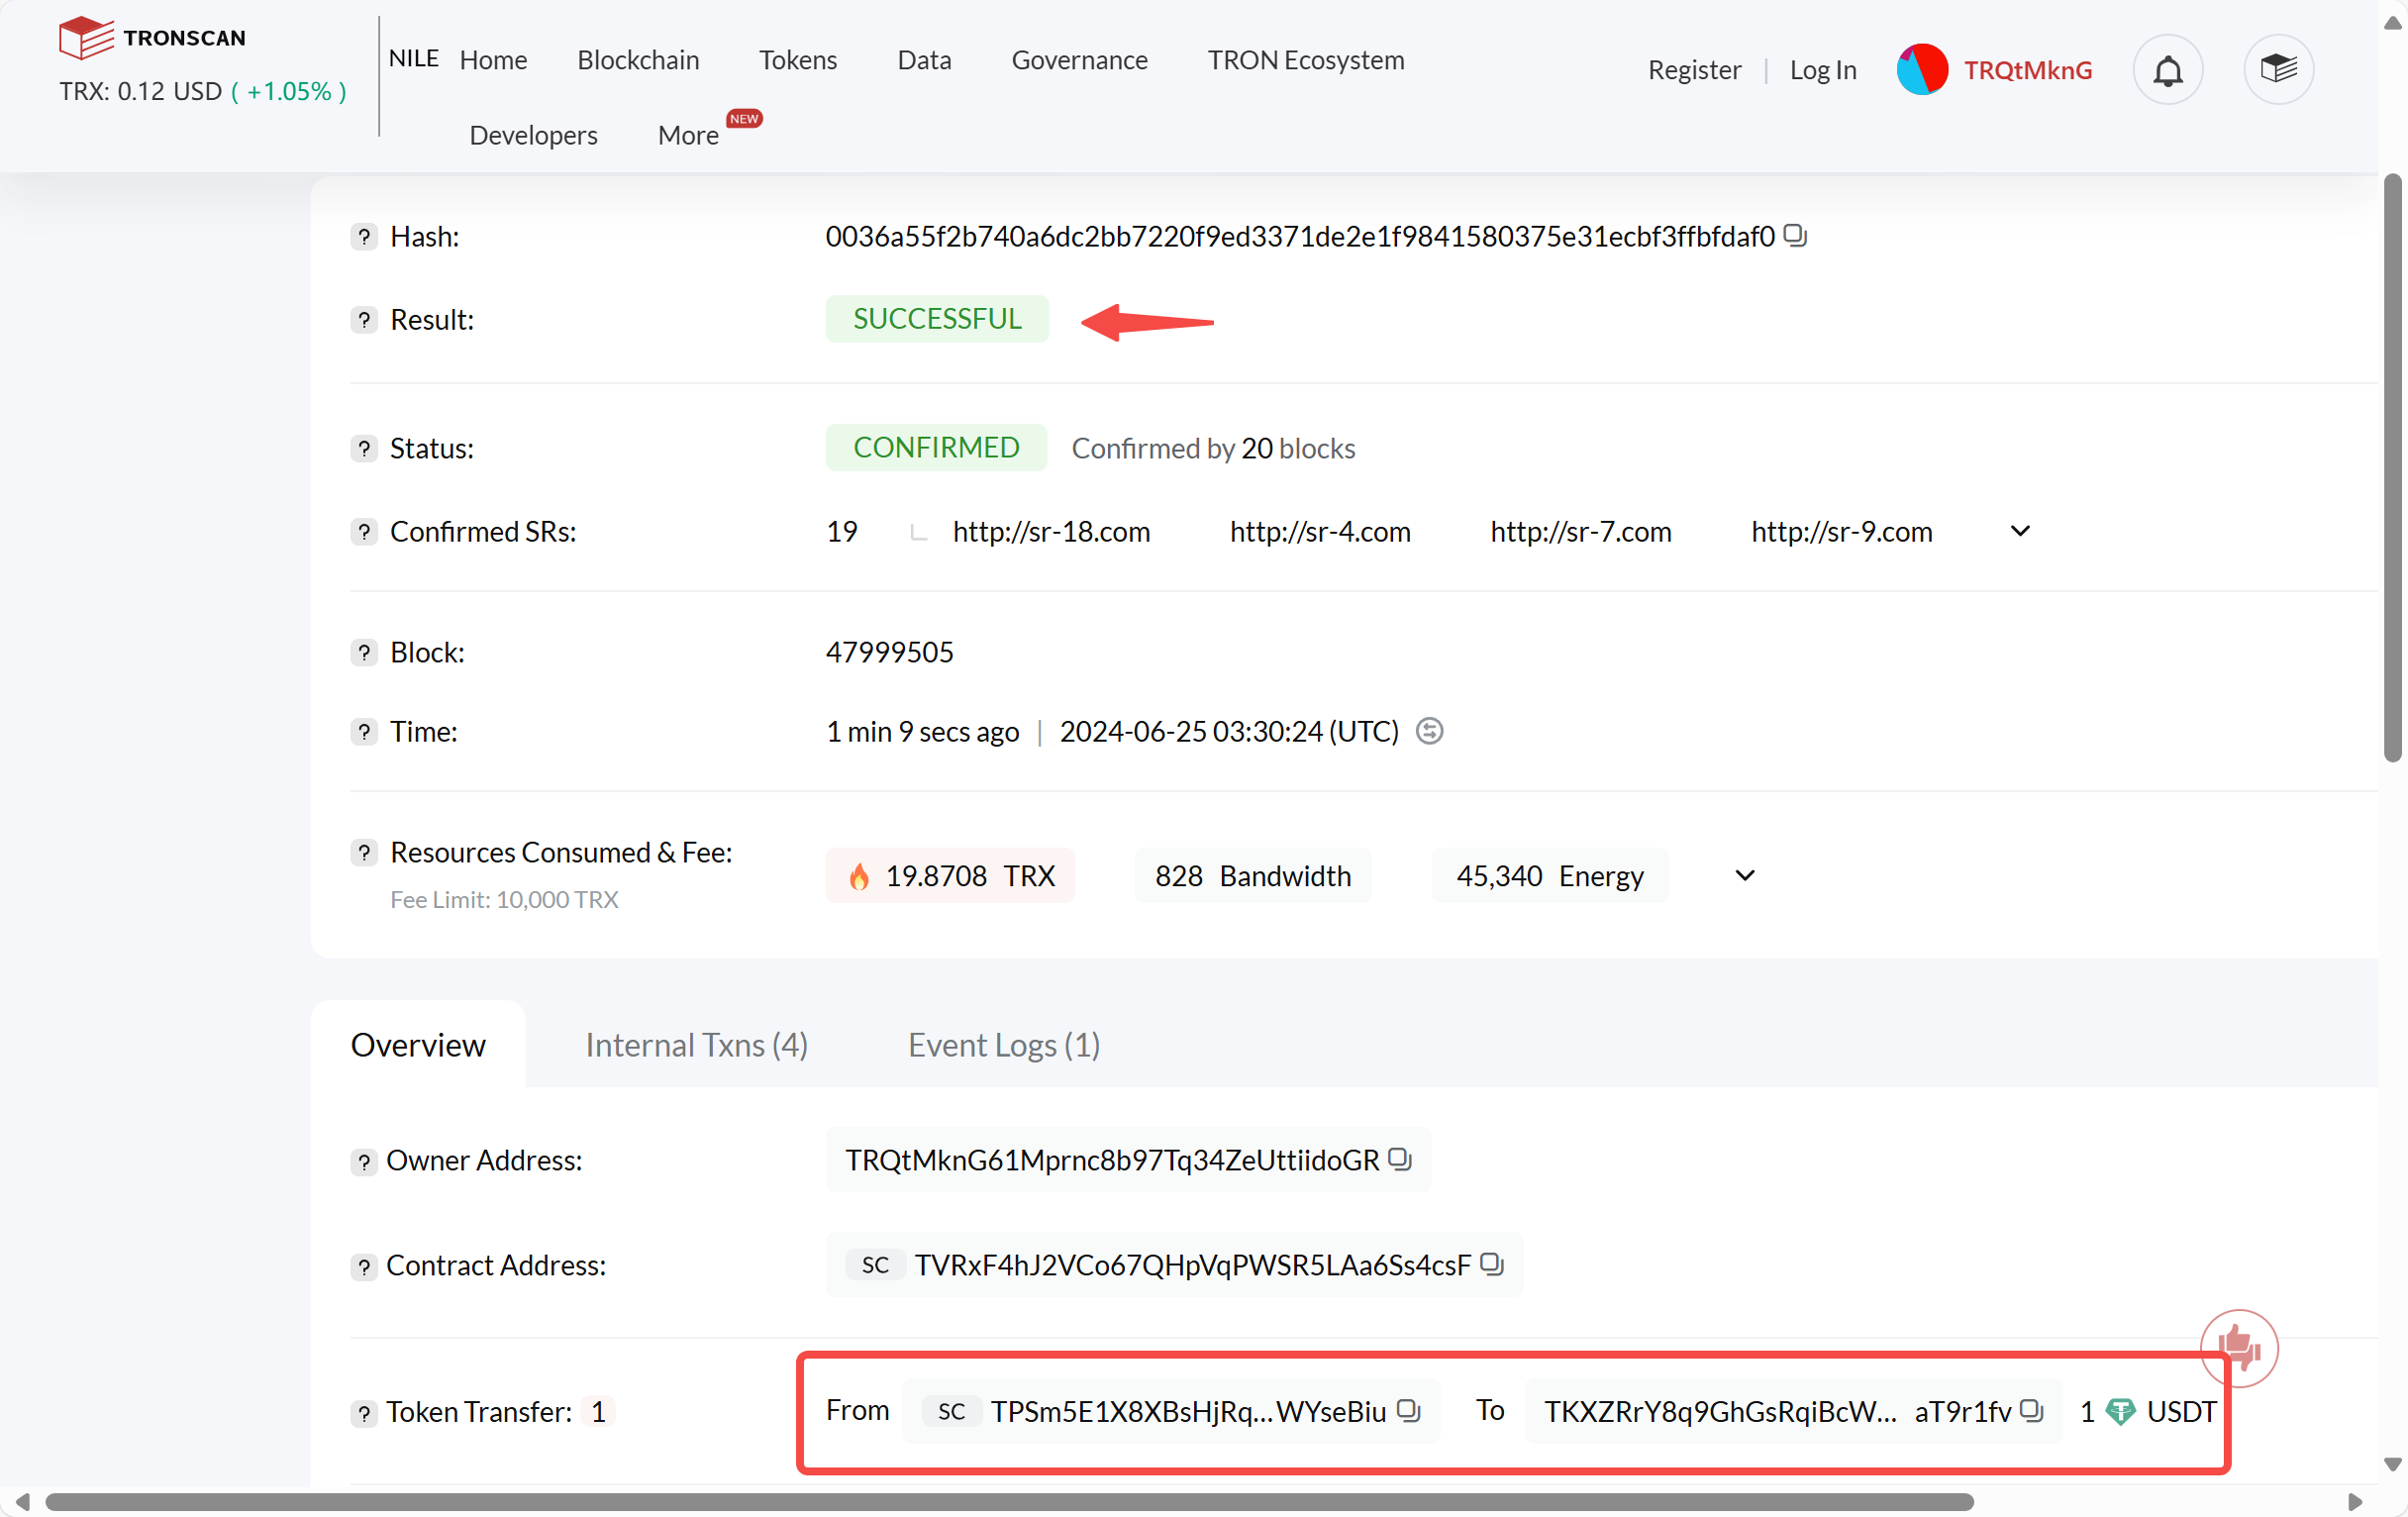
Wait for confirmation from the blockchain network. Once confirmed, the transfer is successful. You can click on the transaction hash to confirm the result on the blockchain explorer: