Recharge & Withdrawal Quick Start
Process Overview
Recharge Process
Withdrawal Process
Recharge Process Details
1. Overview
Recharge: Merchants generate an exclusive recharge address for users by calling APIs. Address generation involves two steps: first create a sub-contract address (uuid), then call the query API to get the actual recharge address. After users transfer funds to this address, the Pay Protocol system automatically confirms receipt and sends a callback to the merchant. Finally, merchants can obtain recharge details through the query API.
Process:
👉 Merchant calls createUserWallet → Get uuid →
Call getUserWalletDetail → Get recharge address →
User transfer → Pay Protocol callback rechargeCallback →
Merchant confirmation → Call getRechargeDetail to query recharge details.
2. Prerequisites
-
Create merchant account: Sandbox Registration
-
Get API Key / Secret: Get API Key / Secret
-
Confirm the network to use:
- Sandbox environment:
https://api-sandbox.payprotocol.network/api/mer - Production environment:
https://api.payprotocol.network/api/mer
- Sandbox environment:
3. API Signature Authentication
All requests need to add signature parameters in the Header:
| Header | Description |
|---|---|
X-PAY-KEY | Merchant API Key |
X-PAY-TIMESTAMP | Current Unix timestamp (in seconds, error ≤ 60 seconds) |
X-PAY-SIGN | Signature, refer to Signature Rules |
The signature rules are consistent with the payment process:
signString = timestamp + method + requestPath + body
sign = Base64( HMAC_SHA256(apiSecret, signString) )
4. Create Sub-contract Address (createUserWallet)
createUserWallet API Documentation
Request Example
POST /api/mer/user/create
Host: api-sandbox.payprotocol.network
Content-Type: application/json
X-PAY-KEY: <your_api_key>
X-PAY-TIMESTAMP: 1723971200
X-PAY-SIGN: <generated_signature>
Request Body Example
{
  "uuid": "USER10001"
}
Response Example
{
  "code": 200,
  "msg": "Success",
  "data": 7046
}
5. Query Sub-contract Address (getUserWalletDetail)
getUserWalletDetail API Documentation
Request Example
GET /api/mer/user/detail?uuid=USER10001
Host: api-sandbox.payprotocol.network
Response Example
{
  "code": 200,
  "msg": "Success",
  "data": {
    "userId": 7046,
    "createTime": "2025-06-23 14:18:58",
    "userWallet": [
      {
        "walletId": 65953,
        "chainId": 136,
        "walletAddress": "THwGn3FcboiwbaJmLqXTkXapWryegchc3v"
      }
    ],
    "userType": 0,
    "uuid": "USER10001"
  }
}
The walletAddress is now the user's exclusive recharge address.
6. User Recharge
Merchants provide the generated walletAddress to users, who then recharge funds to this address.
- Users can use exchange wallets or decentralized wallets (such as TronLink, MetaMask) to transfer funds
- The system will automatically trigger a callback after detecting the deposit
7. Recharge Callback (rechargeCallback)
After the user's recharge is confirmed, Pay Protocol will automatically call the merchant's configured callback URL (POST request).
rechargeCallback API Documentation
Callback Example
{
  "rechargeId": 1017,
  "chainId": 136,
  "currencyId": 107,
  "userId": 5923,
  "walletId": 62928,
  "walletAddress": "THwGn3FcboiwbaJmLqXTkXapWryegchc3v",
  "rechargeStatus": 0,
  "rechargeAmount": "10000000",
  "transferHash": "35e5e3dab41b43e9727a21b69f07a330af34c86673fb931e2f7a61ca871b7d27",
  "fromAddress": "TGrw6GPAPrtRR7ivdzJR8WyqdA3dy6XnqJ",
  "blockTime": "2025-06-24 07:06:30",
  "createTime": "2025-06-24 15:06:41",
  "uuid": "10"
}
Merchants need to:
- Verify signature
sign - Update order status
- Return HTTP 200 to indicate success
8. Configure Recharge Callback URL
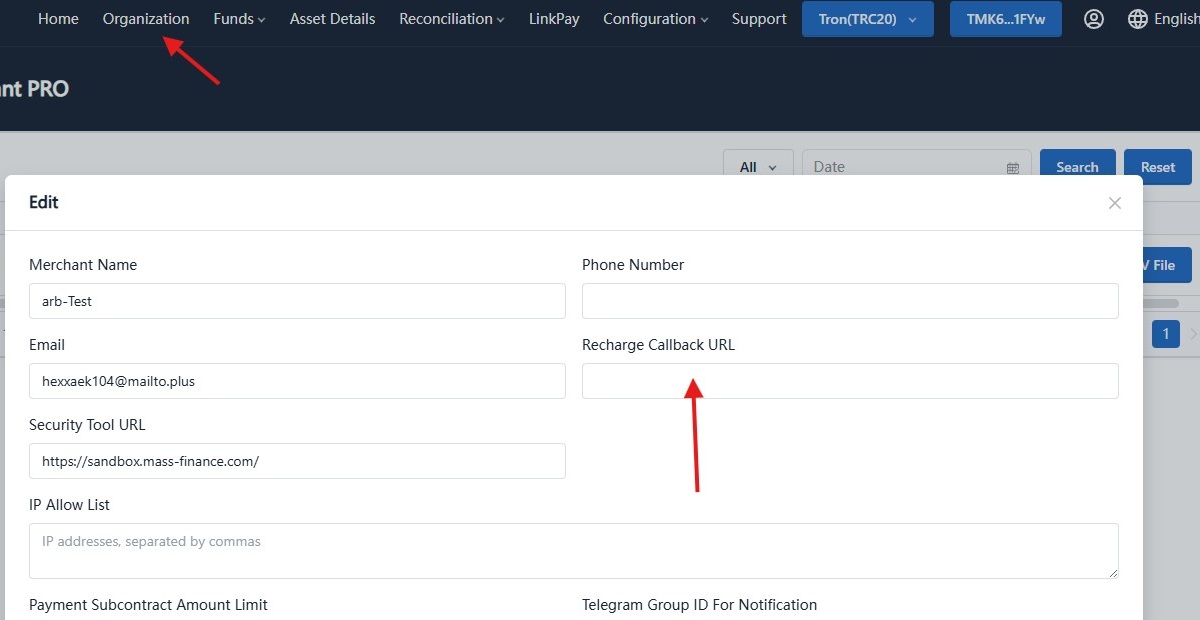
Merchants need to configure the recharge callback URL in Pay Protocol admin console → Organization Information page. This URL must be publicly accessible with HTTPS protocol, otherwise callback notifications cannot be received normally.
Steps:
- Login to merchant backend
- Go to Organization in the top navigation
- Click Edit
- Fill in your callback URL in "Recharge Callback URL" field (must be HTTPS)
Illustration:
9. Query Recharge Order (getRechargeDetail)
getRechargeDetail API Documentation
Request Example
GET /api/mer/recharge/detail?rechargeId=1017
Host: api-sandbox.payprotocol.network
Response Example
{
  "code": 200,
  "msg": "Success",
  "data": {
    "rechargeId": 1017,
    "chainId": 136,
    "currencyId": 107,
    "userId": 5923,
    "walletId": 62928,
    "walletAddress": "THwGn3FcboiwbaJmLqXTkXapWryegchc3v",
    "rechargeStatus": 0,
    "rechargeAmount": "10000000",
    "transferHash": "35e5e3dab41b43e9727a21b69f07a330af34c86673fb931e2f7a61ca871b7d27",
    "fromAddress": "TGrw6GPAPrtRR7ivdzJR8WyqdA3dy6XnqJ",
    "blockTime": "2025-06-24 07:06:30",
    "createTime": "2025-06-24 15:06:41",
    "uuid": "10"
  }
}
✅ Congratulations! You have completed the complete recharge process:
Withdrawal Process Details
1. Overview
Withdrawal: Merchants initiate withdrawal requests through APIs. After admin approval, the system pays out funds from the merchant's contract or wallet address to the specified withdrawal address.
Process:
👉 Merchant calls withdrawApply → Get withdrawId →
Admin approval → Pay Protocol callback withdrawCallback →
Merchant confirmation → Call getWithdrawDetail to query withdrawal details.
2. Apply for Withdrawal (withdrawApply)
withdrawApply API Documentation
Request Example
POST /api/mer/withdraw/apply
Host: api-sandbox.payprotocol.network
Content-Type: application/json
X-PAY-KEY: <your_api_key>
X-PAY-TIMESTAMP: 1723971200
X-PAY-SIGN: <generated_signature>
Request Body Example
{
  "chainId": 1,
  "currencyId": 1,
  "withdrawAddress": "TWgjEv2SKVxFZM6n1o1uDSi1kPxsYEZkFd",
  "withdrawAmount": "3.5",
  "outTradeNo": "202404191100",
  "notifyUrl": "https://api.mer.com/withdraw/202404191100"
}
Response Example
{
  "code": 200,
  "msg": "success",
  "data": {
    "withdrawId": 35
  }
}
3. Admin Approval
After the merchant initiates a withdrawal request, it needs to be approved through the Pay Protocol admin console:
- Login to merchant backend
- Go to withdrawal management page
- Select pending withdrawal orders
- Confirm approval
4. Withdrawal Callback (withdrawCallback)
After the withdrawal is approved and transferred, the Pay Protocol system will automatically call the merchant's configured callback URL (POST request).
withdrawCallback API Documentation
Callback Example
{
  "withdrawId": 35,
  "chainId": 1,
  "currencyId": 1,
  "withdrawAddress": "TWgjEv2SKVxFZM6n1o1uDSi1kPxsYEZkFd",
  "withdrawAmount": "35000000",
  "withdrawStatus": 0,
  "transferHash": "35e5e3dab41b43e9727a21b69f07a330af34c86673fb931e2f7a61ca871b7d27",
  "outTradeNo": "202404191100"
}
Merchant needs to:
- Verify the signature
- Update order status
- Return HTTP 200 to indicate success
5. Query Withdrawal Order (getWithdrawDetail)
getWithdrawDetail API Documentation
Request Example
GET /api/mer/withdraw/detail?withdrawId=35
Host: api-sandbox.payprotocol.network
Response Example
{
  "code": 200,
  "msg": "success",
  "data": {
    "withdrawId": 35,
    "chainId": 1,
    "currencyId": 1,
    "withdrawAddress": "TWgjEv2SKVxFZM6n1o1uDSi1kPxsYEZkFd",
    "withdrawAmount": "35000000",
    "withdrawStatus": 0,
    "transferHash": "35e5e3dab41b43e9727a21b69f07a330af34c86673fb931e2f7a61ca871b7d27",
    "outTradeNo": "202404191100",
    "withdrawTime": "2024-04-19 11:00:00"
  }
}
✅ Congratulations! You have completed the complete withdrawal process: